Using a custom thank you screen
Overview
Many merchants chose to create and host a custom thank you screen for their customers. Here's how to insure that your customers will be taken to your custom thank you screen upon completion of their order.
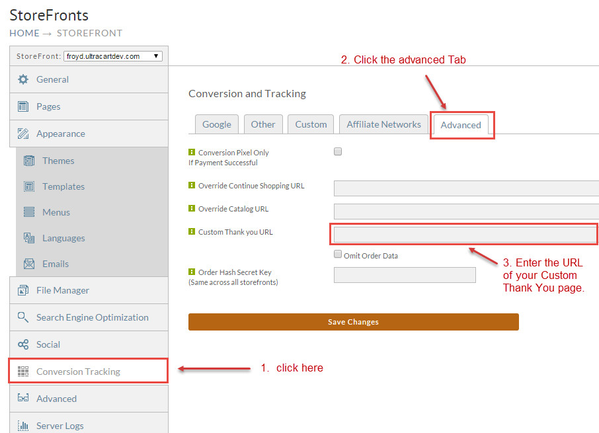
At StoreFronts click the Conversion Tracking Tab followed by clicking the Advanced tab under the Conversion and Tracking tab. Then simply enter the URL of your Custom thank you screen. If your custom thank you screen is not secure (SSL) then click the "Omit Order Data" check box.
To finalize click the Save Changes button.
Coding your custom receipt page
Enter the following in your receipt.html page on your site to capture and display the receipt details:
Please notice that the orderText is decoded twice. This is because the orderText will often be encoded twice during the assembly of the redirection url. The double encoding is necessary to prevent parts of the order text from corrupting the url.
<script type="text/javascript" language="JavaScript">
function gup( name )
{
name=name.replace(/[\[]/,"\\\]").replace(/[\]]/,"\\\]");
var regexS = "[\\?&]"+name+"=([^&#]*)";
var regex = new RegExp( regexS );
var results = regex.exec( window.location.href );
if( results == null )
return "";
else
return results[1];
}
document.writeln("<PRE>" + decodeURIComponent(decodeURIComponent(gup("orderText"))).replace(/\+/g," ") + "</PRE>");
</script>
Passing Additional Information to the URL
Almost all of the token supported in the conversion HTML section can also be used within the custom thank you URL. For example if you wanted to pass the current stage of the order over to your thank you page you would add:
¤tstage=[currentstage]
to the URL. Likewise you could pass the custom fields using the tags [customfield1] through [customfield7]
Order Tokens that can be used with tracking pixels and scripts
Tokens that can be used
[ActivationCodes=<ItemId>]
[AffiliateId]
[AffiliateSubId]
[AffiliateCustomHtml]
[BillingFirstName]
[BillingLastName]
[BillingCompany]
[BillingAddress1]
[BillingAddress2]
[BillingCity]
[BillingState]
[BillingPostalCode]
[BillingCountry]
[BillingDayPhone]
[BillingEveningPhone]
[ChargeAppearsOnStatementAs]
[Commission]
[Coupon]
[CouponForNewAffiliate=CODE]
[CurrentStage]
[CustomField1]
[CustomField2]
[CustomField3]
[CustomField4]
[CustomField5]
[CustomField6]
[CustomField7]
[DirectTrackProducts]
[Email]
[GrossProfit]
[IfPurchased=<ItemId>]<Conditionally Display>[/IfPurchased]
[IfPaymentMethod=<Method>]<Conditionally Displayed>[/IfPaymentMethod]
[IfShippingMethod=<Method>]<Conditionally Displayed>[/IfShippingMethod]
[OmnitureProducts]
[OrderId]
[OrderHash]
[PaymentMethod]
[PaymentProcessed]
[ProductIds]
[ProductQuantities]
[ProductCosts]
[ProductCostsWithoutDecimal]
[ProductDescriptions]
[ProductQuantity1] ... [ProductQuantity#]
[ShippingFirstName]
[ShippingLastName]
[ShippingCompany]
[ShippingAddress1]
[ShippingAddress2]
[ShippingCity]
[ShippingState]
[ShippingPostalCode]
[ShippingCountry]
[ShippingDayPhone]
[ShippingEveningPhone]
[Shipping]
[SubtotalAndShipping]
[Subtotal]
[SubtotalBeforeDiscount]
[SubtotalDiscount]
[Tax]
[Total]
[TotalQuantity]
We recommend that you put all your conversion pixels within the UltraCart system, but some trackers can not deal with the multiple domains. If so, make sure that you pass over the currentstage token and check that it's either the value SD (for shipping department) or CO (completed order) before firing the pixels on your page. Otherwise you could be firing conversion pixels for orders that are sent to your Accounts Receivable for fraud review.
