Custom Thank You Page URL
Hosting the Receipt Page on your own custom URL requires three easy steps:
- Direct the system to your custom URL.
- Edit your Screen Branding Receipt screen to insure the receipt information is delivered properly.
- Capture and display the receipt details on your site. Requires coding on your receipt.html page at your web site.
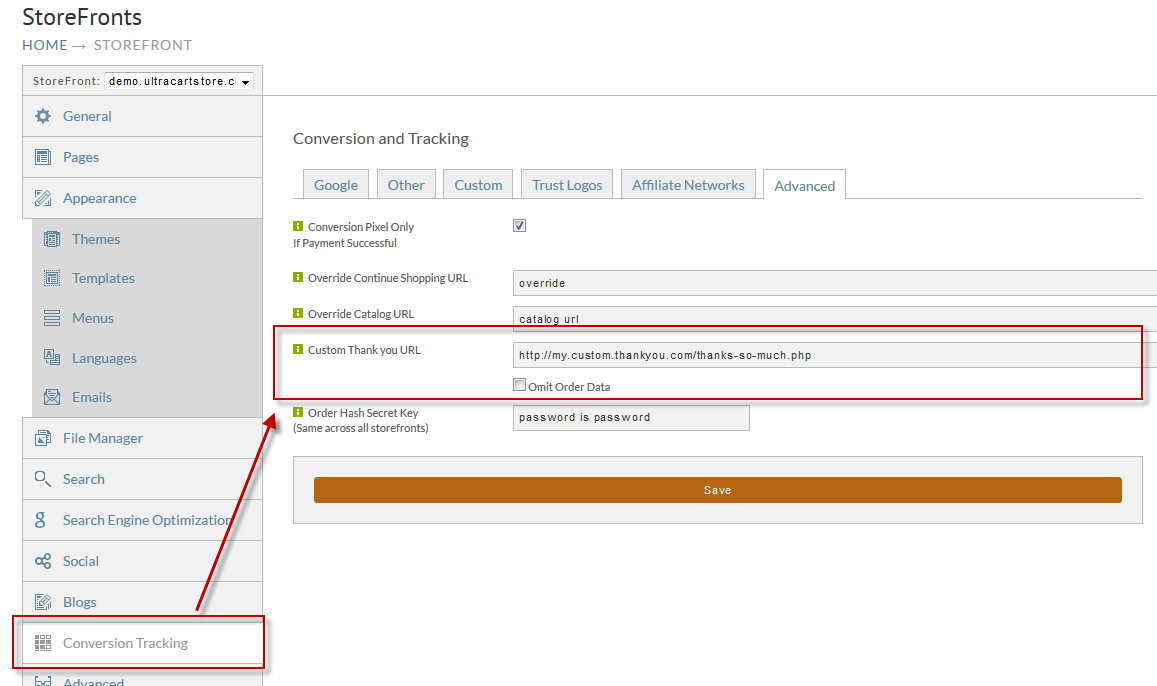
Finding the Thank You Page setting in StoreFronts
Choose your StoreFront, and click on the Conversion Tracking tab. Once that page loads, click on the Advanced Tab.
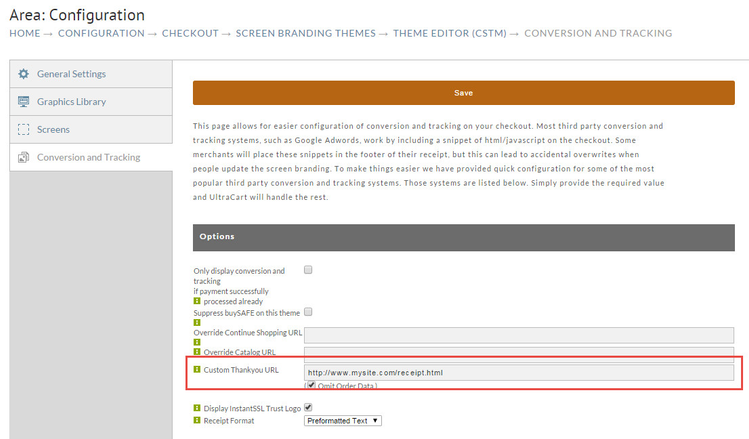
Finding the Thank you Page setting using Legacy Screen Branding Themes
Navigate to the "Conversion and Tracking" tab of the Screen Branding Themes Editor.
Main Menu → Configuration → screen branding → Conversion and Tracking (tab)
Setting the URL in Conversion and Tracking tab of the Screen Branding Theme Editor
- Locate the "Custom Thank you URL" field.
- Enter your URL.
Click the
savebutton.
Conversion and Tracking & Custom Thank You URL
When the "Custom Thank You URL" is configured (as shown above), UltraCart will actually load the UltraCart receipt page but it will appear as the "please wait...in progress" screen. This allows UltraCart to load any configured, supported pixels or custom tracking pixels/script configured in the "Conversion HTML" field of the "Other" section.
You can observe this by performing a checkout while having Fire bug extension enabled in your browse. Set Fire Bug to the "NET" view during the completion of your checkout to a receipt.
Test Credit Card Configuration
When placing test orders using a configured "test" credit card, there is a checkbox setting that determines whether or not tracking pixels should be fired. Please make sure you have that checkbox setting configure appropriate to your needs.
Coding the Receipt Screen in UltraCart (Legacy Themes Only)
Note
If you use the "Custom Thankyou URL" field described above, skip this step and proceed to the "Coding your custom receipt page" section below, unless you require item specific triggering of custom thank you pages, in which case this method combined with the IfPurchasing special tag in the receipt page with allow for selective triggering of item specific thank you pages within a single screen branding theme.
Navigate to the "Screens" tab of the Screen Branding Themes Editor.
Main Menu → Configuration → screen branding
Special coding needs to be added to the Header and Footer of your screen branding In the list of screens, click on the Receipt screen.
Header
Enter the following into the Header area of the Receipt Screen
<html>
<head>
<meta http-equiv="refresh" content=0;url=http://www.yoursite.com/receipt.html?orderText=[ordertexturlencoded]>
</head>
<body>
<div style="display:none;">
Same example as above combined with the IfPurchased token to selective trigger the customer thank you for a specific item (in this case itemID 001)
<html>
<head>
[IfPurchased=001]<meta http-equiv="refresh" content=0;url=http://www.yoursite.com/receipt.html?orderText=[ordertexturlencoded]>
<div style="display:none;"> [/IfPurchased]
</head>
<body>
<div style="display:none;">
Note
When copying and pasting the code above, make sure to edit this portion to reflect your actual website:
www.yoursite.com/receipt.html
Footer
Enter the following in the Footer Area of the Receipt Screen.
</div>
</body>
</html>
Coding your custom receipt page
Enter the following in your receipt.html page on your site to capture and display the receipt details:
Please notice that the orderText is decoded twice. This is because the orderText will often be encoded twice during the assembly of the redirection url. The double encoding is necessary to prevent parts of the order text from corrupting the url.
<script type="text/javascript" language="JavaScript">
function gup( name )
{
name=name.replace(/[\[]/,"\\\]").replace(/[\]]/,"\\\]");
var regexS = "[\\?&]"+name+"=([^&#]*)";
var regex = new RegExp( regexS );
var results = regex.exec( window.location.href );
if( results == null )
return "";
else
return results[1];
}
document.writeln("<PRE>" + decodeURIComponent(decodeURIComponent(gup("orderText"))).replace(/\+/g," ") + "</PRE>");
</script>
Passing Additional Information to the URL
Almost all of the token supported in the conversion HTML section can also be used within the custom thank you URL. For example if you wanted to pass the current stage of the order over to your thank you page you would add:
¤tstage=[currentstage]
to the URL. Likewise you could pass the custom fields using the tags [customfield1] through [customfield7]
We recommend that you put all your conversion pixels within the UltraCart system, but some trackers can not deal with the multiple domains. If so, make sure that you pass over the currentstage token and check that it's either the value SD (for shipping department) or CO (completed order) before firing the pixels on your page. Otherwise you could be firing conversion pixels for orders that are sent to your Accounts Receivable for fraud review.
Related pages
Test Credit Card or Electronic Check Payments (test credit card configuration)

