Single Upsell Page for Multiple Items
- Jonathan Tew
- Chris Torigian
Single Upsell Page for Multiple Items
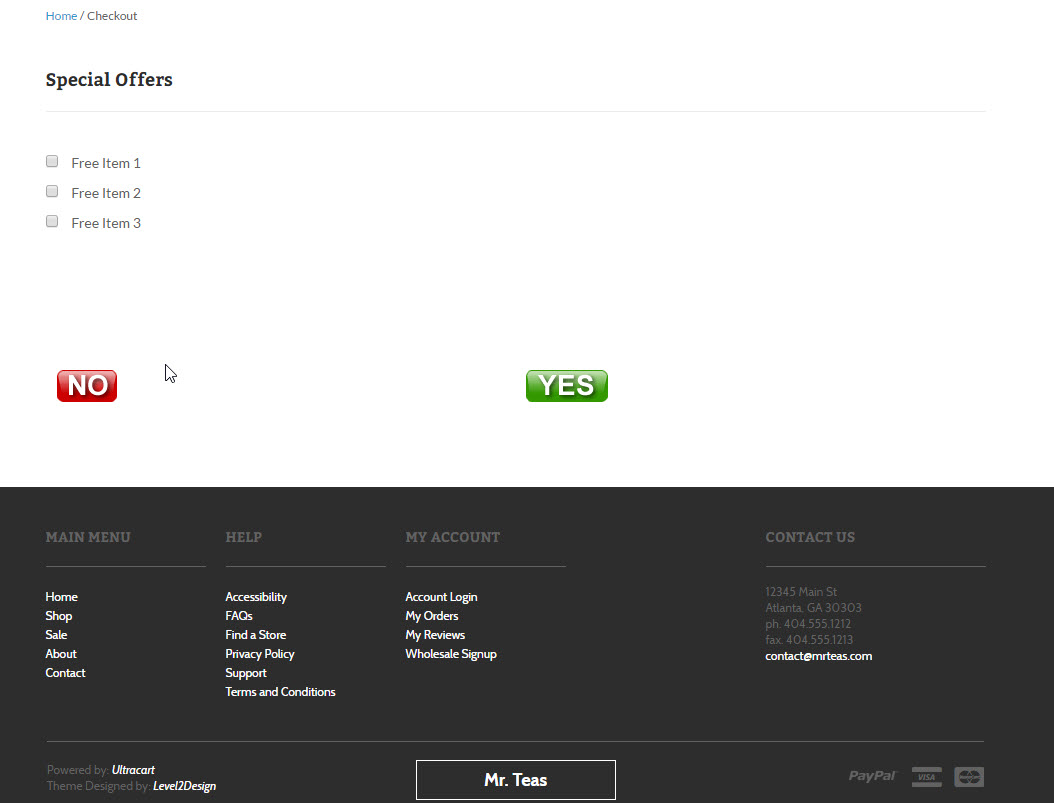
This tutorial will show how to code an advanced upsell after offer page where the customer can select more than one item. First let's catch a vision of the complex page we're trying to build.
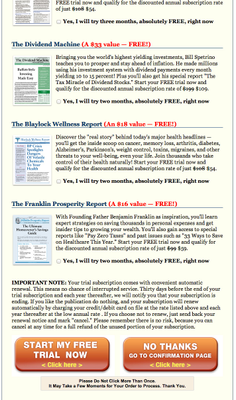
Notice we have check boxes for each item on the page and then two buttons at the bottom.
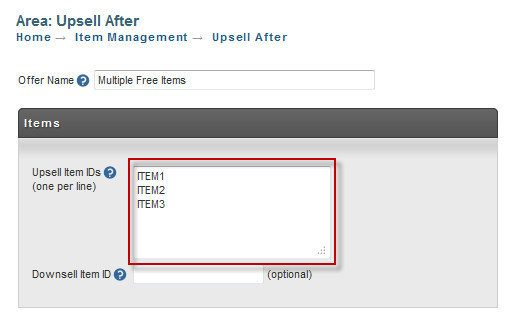
Item Configuration
For this tutorial we've already created test items ITEM1, ITEM2, and ITEM3.
Upsell Configuration
The first part of the configuration is to add all the items to the list as shown below.
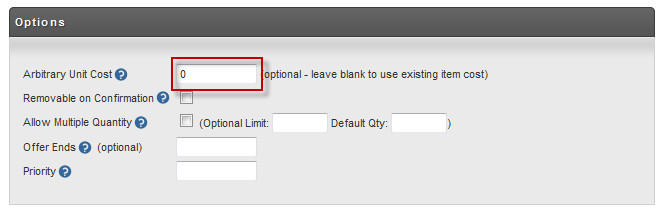
Then we'll set the price of the free items on this upsell to zero by using the arbitrary unit cost. You don't need to do this if the items aren't free, but in this example they are:
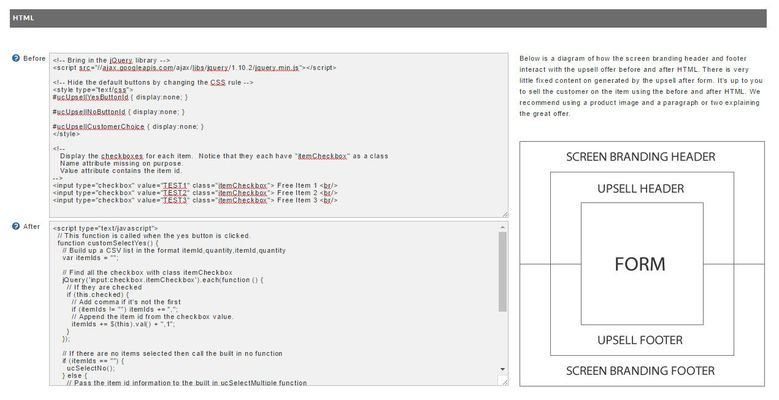
Now down in the header/footer section of the upsell editor we need to use this code for the header:
<!-- Bring in the jQuery library -->
<script src="//ajax.googleapis.com/ajax/libs/jquery/1.10.2/jquery.min.js"></script>

<!-- Hide the default buttons by changing the CSS rule -->
<style type="text/css">
#ucUpsellYesButtonId { display:none; }

#ucUpsellNoButtonId { display:none; }

#ucUpsellCustomerChoice { display:none; }
</style>

<!--
   Display the checkboxes for each item.  Notice that they each have "itemCheckbox" as a class
   Name attribute missing on purpose.
   Value attribute contains the item id.
-->
<input type="checkbox" value="ITEM1" class="itemCheckbox"> Free Item 1 <br/>
<input type="checkbox" value="ITEM2" class="itemCheckbox"> Free Item 2 <br/>
<input type="checkbox" value="ITEM3" class="itemCheckbox"> Free Item 3 <br/>
then in the footer:
<script type="text/javascript">
  // This function is called when the yes button is clicked.
  function customSelectYes() {
    // Build up a CSV list in the format itemId,quantity,itemId,quantity
    var itemIds = "";

    // Find all the checkbox with class itemCheckbox
    jQuery('input:checkbox.itemCheckbox').each(function () {
      // If they are checked
      if (this.checked) {
        // Add comma if it's not the first
        if (itemIds != "") itemIds += ",";
        // Append the item id from the checkbox value.
        itemIds += $(this).val() + ",1";
      }
    });

    // If there are no items selected then call the built in no function
    if (itemIds == "") {
      ucSelectNo();
    } else {
      // Pass the item id information to the built in ucSelectMultiple function
      ucSelectMultiple(itemIds);
    }
  }
</script>

<!-- Table with our custom buttons.  When clicked we call the built in no method or our custom yes method -->
<table>
  <tr>
    <td>
      <img src="/checkout/images/upsellNo.gif" onclick="ucSelectNo()" style="cursor:pointer">
    </td>
    <td>
      <img src="/checkout/images/upsellYes.gif" onclick="customSelectYes()" style="cursor:pointer">
    </td>
  </tr>
</table>
The upsell after offer editor should look something like this:
After saving you can preview the page. It should look like this:
Now just embellish the HTML content of the page for each item and you are good to go!