Edit Auto Orders
- Perry Tew
- Chris Torigian
- Loyd James (Unlicensed)
- Hunter Schaeffer
Overview
How to edit an auto order.
Editing an Auto Order
Once you've located an auto order and it is presented in the search results list, click on the "edit" button to the right. This will take you to the Auto Order Editor screen.
Auto Order Editor Screen
This screen is divided into 3 Tabs:
- Auto Order sections
- History
- Future
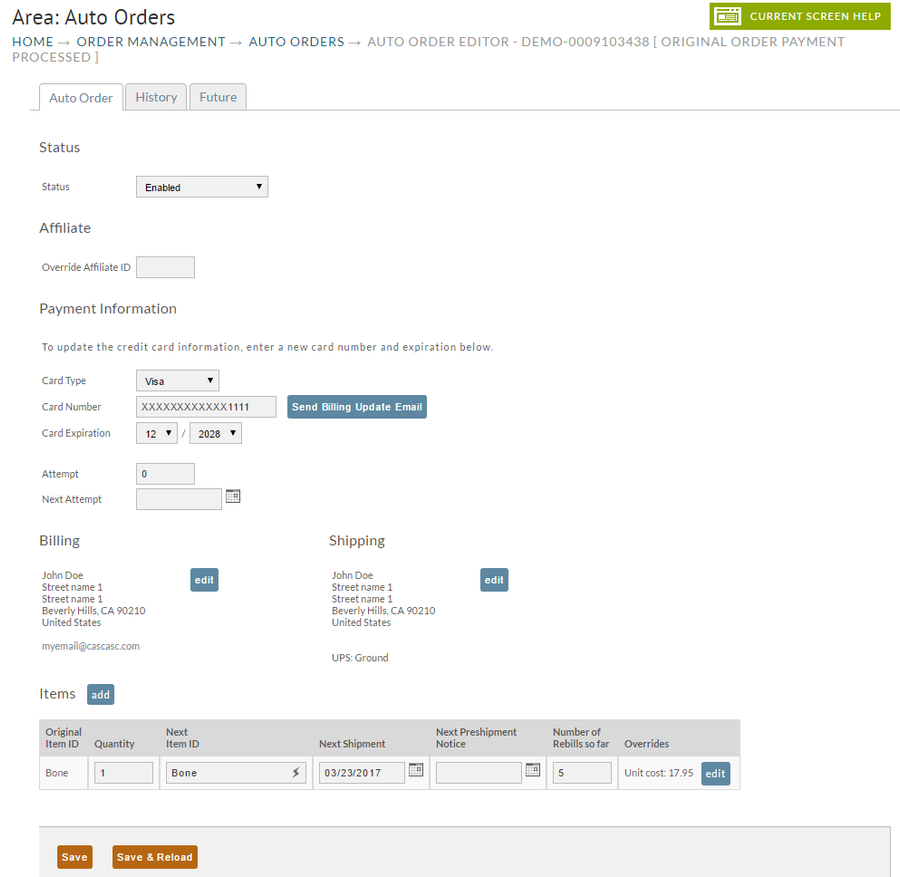
Auto Order tab
The Auto Order tab is the main tab (see above), this is the tab where you are able to modify the auto order schedule, edit items, change frequency and next shipment date, and cancel or re-enable an auto order. (The screenshot above displays the Auto Order tab.
History tab
The History tab shows the orders that have been generated for the history of the auto order.
. Much of this information can be edited.
The original order ID is shown at the top of the screen. The customer will also have this number and may refer to it when they contact you regarding cancellation or changes.
Future tab
The Future tab appears when an auto order is active and still has steps to run in the auto order schedule. Check the Future tab to very that the proper reorder schedule is appearing for the customer's auto order purchase.
Auto Order Settings
The Auto Order tab is where you can view, and enable/disable and edit the auto order items and next shipment (processing) dates.
There are six section to the Auto Order tab in the auto order editor:
| Section Name | Description |
|---|---|
| Status | The Status field indicated the current status of the auto order as:
|
Affiliate | The Affiliate section displays a field for "Override Affiliate ID", where you can enter an affiliateID to the order. |
Payment Information | The Payment Information section is the section where you'll be able to update the customers credit card details, as well as review or edit the Billing Attempts and Next Billing Attempt date. Truncated Cards - Card truncated due to inactivity. A new card must be obtained to re-bill. Cards are truncated 90 days after the auto order has been cancelled or disabled. The number of billing attempts will determine when the auto order will automatically disable due to failed processing attempts. This field indicates the next date the credit card will be processed after failure. The default is every 3 days. If the card fails after 3 attempts, the Auto Order will be set to inactive (the check mark in the Enable Field will automatically be removed). |
| Billing (Address) | The Billing section allows you to review and edit the billing address for the future orders. |
| Shipping (Address) | The Shipping section allows you to review and edit the shipping address for the future orders. |
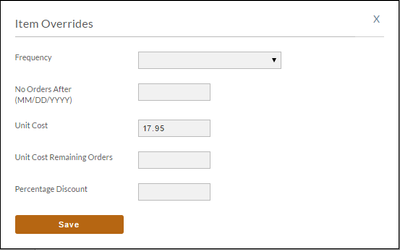
| Items | The Items section is where you can review and modify the rebill item(s) as well as the rebill schedule. In this section you can:
Frequency - Use this drop down menu to apply a new frequency for the auto orders. No Order After - Use this to set a date into the future that will end the auto orders. This is often used when a customer calls to cancel but agrees to one or more orders before cancelling. Unit Cost - Use this to override the defaulted cost of the item. Unit Cost Remaining Orders - If you have applied a Unit Cost override that is only temporary, enter the number of future orders the overridden unit cost should apply before reverting back to the defaulted item unit cost. If the Unit Cost has been overridden and the Unit Cost Remaining Orders is left blank, then the overridden unit cost will continue for the remainder of the active auto order. |
| Field Name | Description |
|---|---|
| Original Item ID | is the Item ID you assigned during creation of the item in the item editor. This field cannot be changed. |
| Quantity | will be the Quantity of the item that the customer selected on the original order. |
| Frequency Override | displays the frequency for how often the order is recurring. If this is an Automatic Auto Order it will show the frequency that the merchant established. A drop-down list is provided so you can change the frequency if desired. |
| Next Shipment | shows the next date the recurring order will occur. |
| Next Item ID | shows the Item ID for the next shipment. This could be the same as the Original Item ID if so configured or it could be a different Item ID in the case of a "Step Item ID". |
| Number of Rebills | shows the number of auto orders that have already occurred. |
| No Orders After | allows the merchant to indicate a STOP date which will terminate the auto order program after the date entered in the text box. |
| Override Unit Cost | allows merchants to change the original unit cost by placing the new unit cost into the text box. |
| Override Unit Cost for Next "x" Orders | allows merchants to set the number of orders that the preceding "Override Unit Cost" will be in effect for. Enter the number in the text box. |
Frequently Asked Questions
Question: How do I go about making changes to a specific customers' auto order only? (change items, billing amount, etc.)
Answer: To affect the auto order if a specific customer, you'll make the changes within the "auto order" record. (Changes for all customers with active auto order for an item, you'll need edit the auto order steps within the "auto order" tab, in item editor.
Click on the "Save" button at the bottom of the screen to save any changes.
![]()