Auto Orders
- Perry Tew
- Hunter Schaeffer
- John Anderson (Unlicensed)
Auto Orders
UltraCart's Auto Order feature allows you to set a schedule in UltraCart to "automatically" order an item for a customer on a set schedule.
(This is also known as free trials, recurring, subscription, membership, or continuity programs.)
The Auto Order feature allows a merchant to configure an item on a schedule that will be followed to automatically order again in the future.
UltraCart also gives the unique ability to use different items at different intervals in your Auto Order schedule.
Visa Rules regarding Subscriptions
Update Merchant Obligations
From 18 April 2020, globally, merchants selling both
physical and digital goods and services who offer free trials
or discounted introductory offers as part of a subscription
(“recurring”) service, must comply with the updated
requirements1
. Following is a Quick Reference card with a
summary of the requirements2
Auto Order Search
At times a merchant may desire to edit, disable, enable or cancel their customers "auto order". Although an email is usually (merchant option) sent to the customers with a cancellation button (link) they may call upon you, the merchant, to make changes (i.e., credit card information update).
You can enter one of 19 different search criteria to locate the customer's auto order. Your entry must be an exact match and is case sensitive. If it fails, go back to the Auto Order Search screen and try a different field (example: use email vise last name).
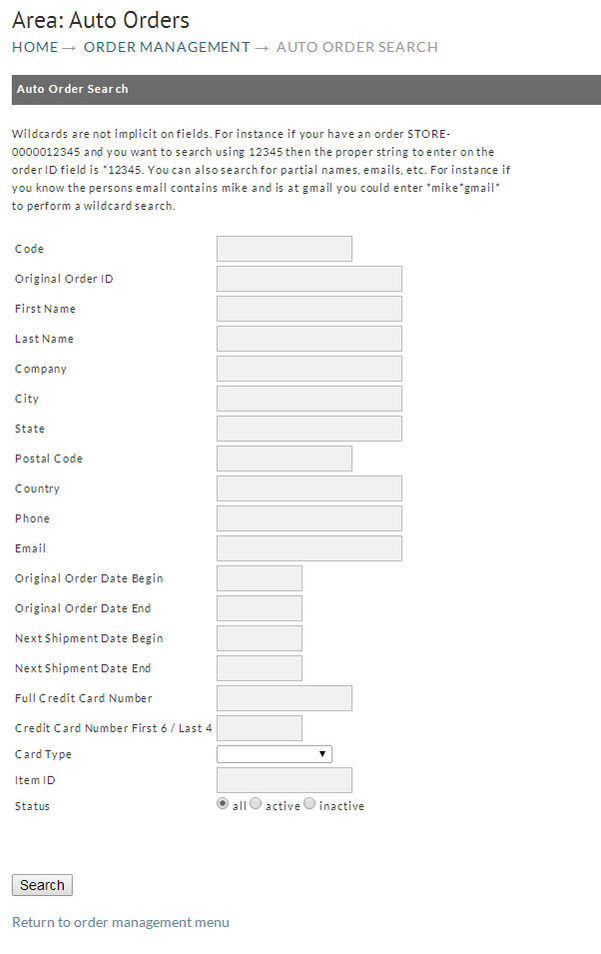
Auto Order Search screen
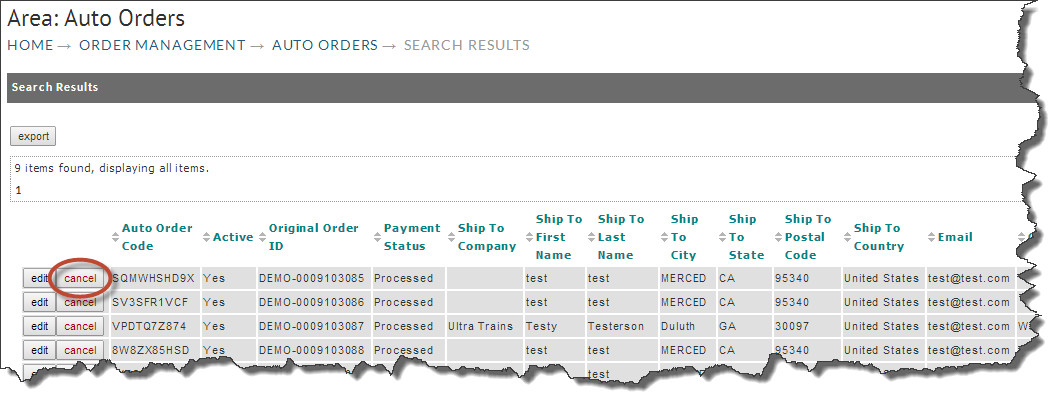
Once you've entered your criteria, click on the "Search" button. If a match is found, the Search (results) screen will then appear with a list of the order(s) that match the criteria.
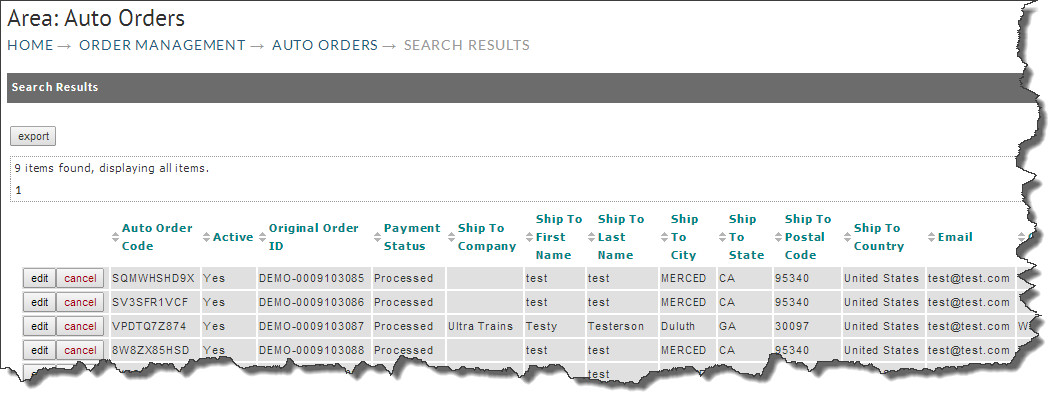
Cancel Auto Orders
To cancel the customers Auto Order, click on the "Cancel" button. Make sure you select the correct order to cancel as a customer may have more than one.
Edit Auto Orders
Once you've located an auto order and it is presented in the search results list, click on the "edit" button to the right. This will take you to the Auto Order Editor screen.
Auto Order Editor
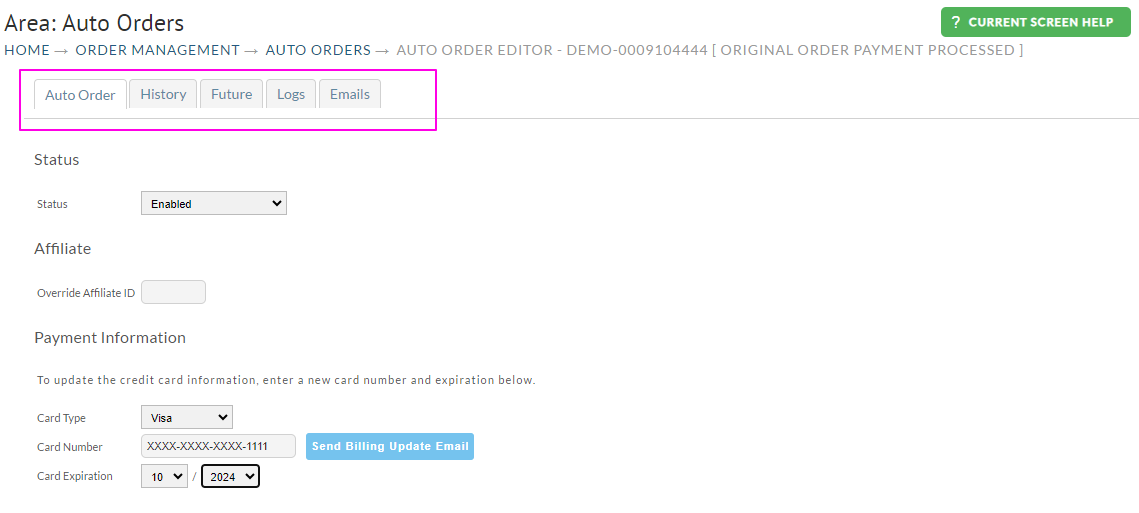
This Auto Order Editor is divided into 5 Tabs:
- Auto Order tab
- History tab
- Future tab
- Logs tab
- Emails tab
Auto Order tab
.png?version=1&modificationDate=1686081077323&cacheVersion=1&api=v2&width=900&height=1191)
The Auto Order tab is where you can view, and enable/disable the auto order.
The following is a description of the Auto Order tab to the auto order editor:
| Section Name | Description | |
|---|---|---|
Status | The Status field indicated the current status of the auto order as:
| |
Affiliate | The Affiliate section displays a field for "Override Affiliate ID", where you can enter an affiliateID to the order. | |
Payment Information | The Payment Information section is the section where you'll be able to update the customers credit card details, as well as review or edit the Billing Attempts and Next Billing Attempt date. The number of billing attempts will determine when the auto order will automatically disable due to failed processing attempts. This field indicates the next date the credit card will be processed after failure. The default is every 3 days. If the card fails after 3 attempts, the Auto Order will be set to inactive (the check mark in the Enable Field will automatically be removed). | |
| Billing (Address) | The Billing section allows you to review and edit the billing address for the future orders. | |
| Shipping (Address) | The Shipping section allows you to review and edit the shipping address for the future orders. | |
| Merchant Notes | ||
| Items | Original Item ID - is the Item ID you assigned during creation of the item in the item editor. This field cannot be changed. Quantity - will be the Quantity of the item that the customer selected on the original order. Next Item ID - This will be the item that is processed in the next rebill. This is initially determined by the steps configured on the original item. You can manually change the itemID by typing in a new item ID. That item ID will carry forward using the same frequency as is configured in the original item auto order steps. you can manually override the frequency in the override settings. Paused - When selected the auto order will be paused, the next shipment date will be pushed back each day until it has been un-paused. Next Shipment - Represent the next time the auto order will process a new rebill. This is reset upon each rebill based upon the steps schedule of the original auto order item or the override settings. Next Preshipment Notice - This date will be populated by the 'Preshipment Days field in the Steps configuration on the original Item ID. Number of Rebills - This is initially calculated by the number of rebills for the auto order. This is used to determine the end date for a item step or the total number of rebills for installment billing configurations. OVERRIDE (Settings) - Configure these by clicking the 'Edit' button Frequency Override - Use this to override the defaulted frequency for the item rebills. No Orders After - Use this to cause the auto order to stop rebilling after a a specified date. Unit Cost - Use this to override the default item cost for future rebills. Unit Cost for Next "x" Orders - Configure this is the Unit Cost override should only process for 'x' number of future rebills. Once that rebill count is reached the item will revert to the default rebill amount. Percentage Discount - Configure a percentage discount on the unit cost for the item. | |
Add Item Button | The "Add" (item) button can be used to add additional items to the existing auto order. Add non auto order items to existing auto ordersNew Feature - Add non auto order items to existing auto orders The auto order editor now supports adding non auto order items. The auto order item editor will add the item with a "Next Shipment" date out in the future. After the item is added, you'll need to adjust the the next shipment date to match the existing items in the auto order. The interval will be set to monthly (you can use the "Overrides" to change the interval.) | |
| Add-On Items | Add-On ItemsNew Feature (06/062023) The Add-On Items section allows for the adding of items for a limited number of rebills. To add an Add-On item:
|

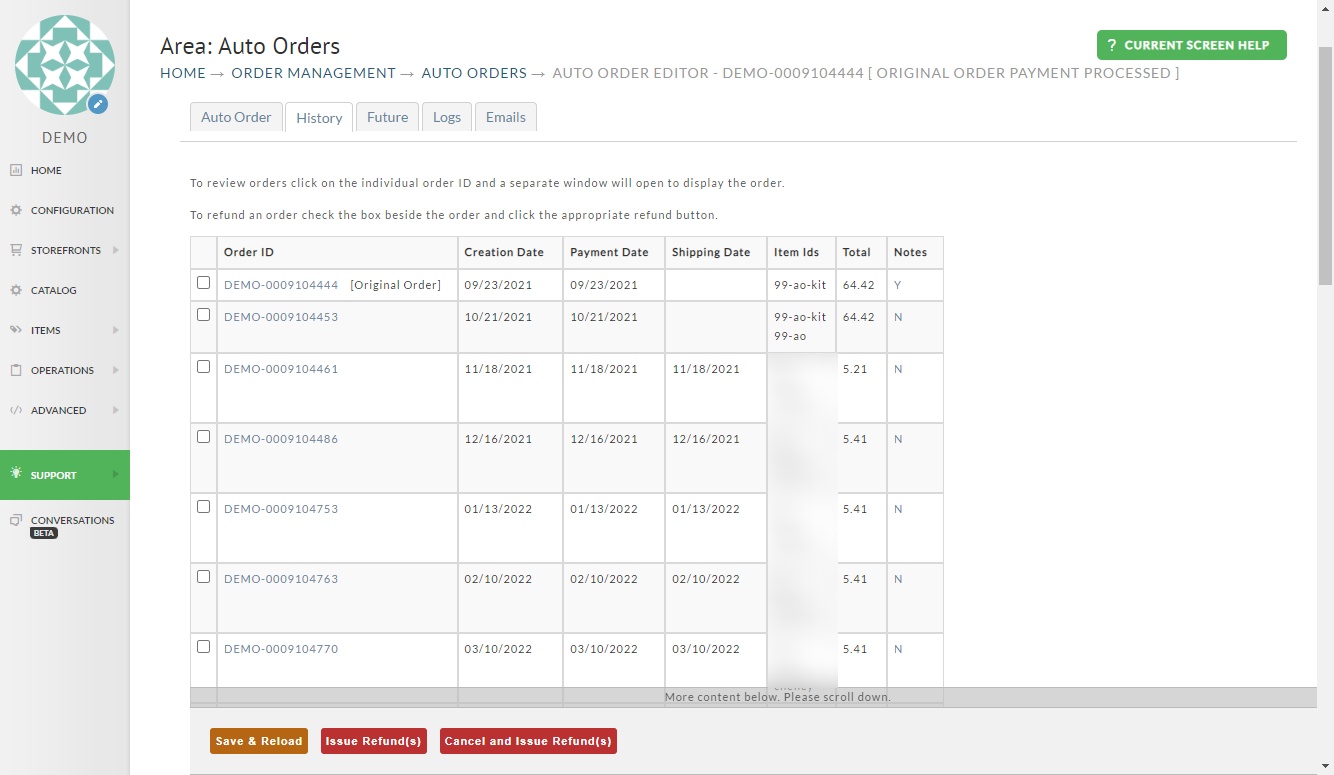
History tab
The History tab shows the orders that have been generated for the history of the auto order.
Future Tab
The Future tab will appear when the auto order is active, it will display the future order schedule for the active auto order.
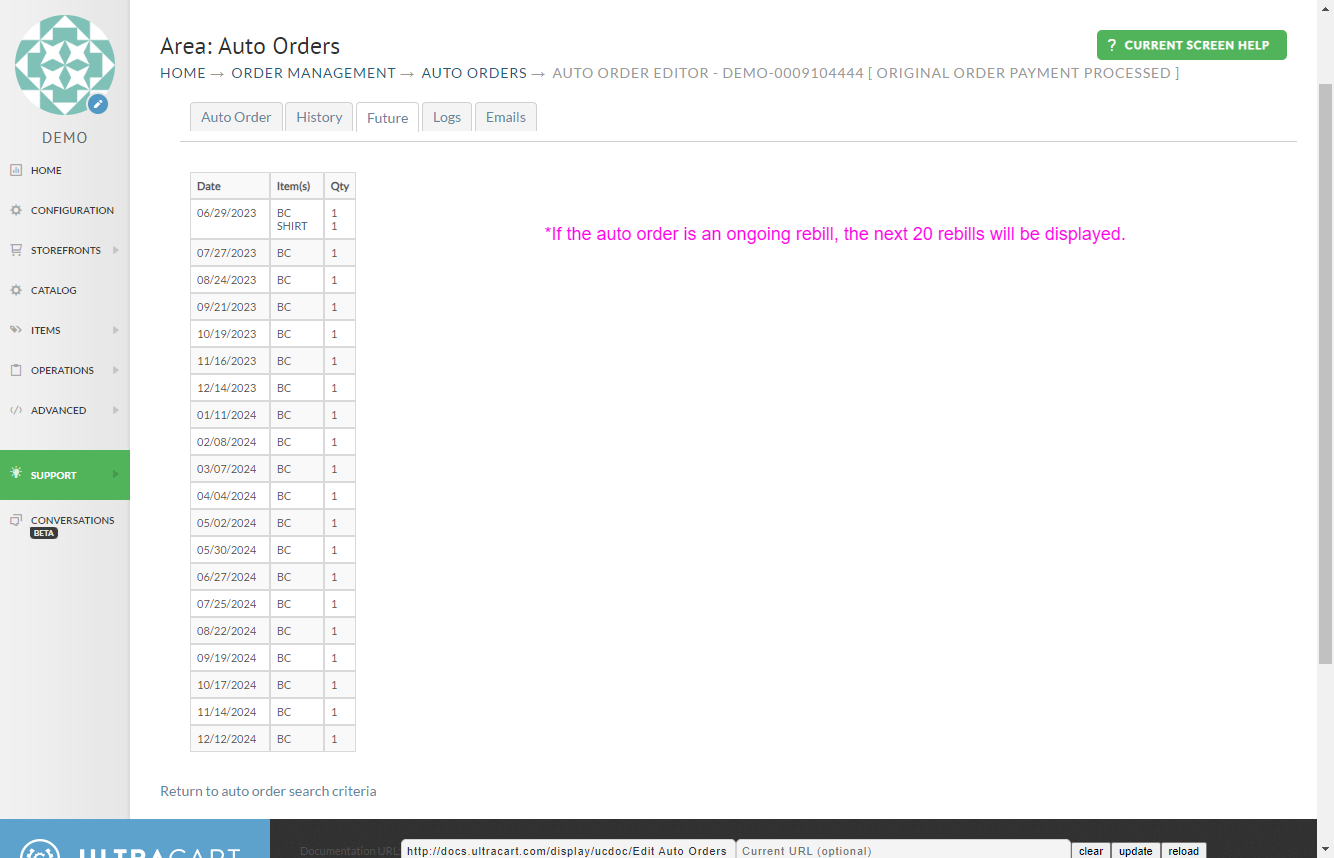
*If the auto order is an ongoing rebill schedule, the next 20 scheduled orders will be displayed.
Logs tab
The Logs tab will show a record of activity for the auto order, including rebills as well as user and customer edits to the auto order.
If you have webhooks configured, webhook activity for the auto order will appear at the bottom of the logs tab:
.png?version=1&modificationDate=1686149148818&cacheVersion=1&api=v2&width=800&height=515)
Restrictions to Logs
Restrictions:
- Logs associated with an auto order will be retained for 1 year retention.
- Any associated webhook logs are retained for 90 days.
Emails tab
The Emails tab provides email deliverability details for both the Customer emails and the Internal user emails:
.png?version=1&modificationDate=1686149484166&cacheVersion=1&api=v2&width=784&height=1280)
Restrictions to Email Logs
Restrictions:
- Records have 1 year retention.
- UltraCart can not capture delivery records if you are using custom SMTP credentials.
FAQ
Q: How can I generate a report of the auto orders that have one or more retries at processing the next order before a successful charge occurs?
A: A merchant comment will be added to an or "Retry successful". You can run the order comments report or perform an order export using a export mapping that contains the "merchant comments" field, then sorting the exported orders on the merchant comments field and then deleting the orders that do not contain "retry successful".
Q: Are there limitations to the PayPal payment option with auto orders?
A: Yes.
- NO COUPONS
- *If there are multiple auto order items items, they must all have the same schedule.
- Multiple "Customer-selectable" configured auto order items NOT SUPPORTED (we cannot be sure that they'll have the same reorder schedule.
- The current API integration with PayPal does not support recurring payments for digital items for new merchants.
PayPal policy is to not allow the addition of PayPal Enhanced Recurring Payments from paypal accounts which had the PayPal Pro integration and then subsequently reverted back to the standard Express Checkout Only configuration. (*The workaround to this, according to PayPal support, is to open a new account then integrate that account to your UltraCart account.
3rd Party API Permission for Auto Orders / Subscriptions:
If you have integrated using the third party API, then you'll need to make sure that the following permission is enabled: "Create and Manage Recurring Payments"
Q: How can I configure an auto order to trigger on a specific day of the month, regardless of when the auto order item is originally purchased?
A: The way this should be accomplished is to start off the auto order items auto order steps with a "pause" step and then set the delay until a future date. All new orders placed will pause rebilling until that date. As you ship for that month, just edit the item and set a new pause date.
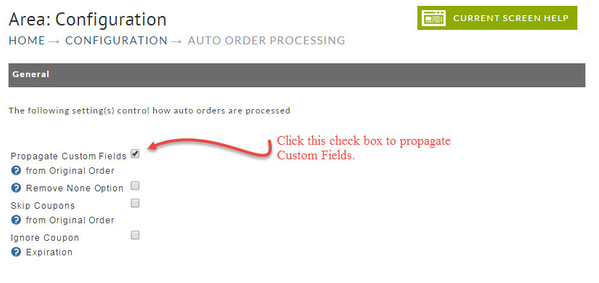
Q: Propagate Custom Field Data to subsequent Auto Orders.
A: The following demonstrates how to pass Custom Field Data to subsequent (Recurring) Auto Orders.
Navigate to Configuration
Auto Orders are configured within the Auto Order tab of the Item Editor.
More configuration of Auto Orders is covered at the following links:
Related Configuration
Auto Order Processing Configuration screen
Converting a Regular Order to Auto Order
Allowing the Customer to Cancel an Auto Order
Giving an Auto Order Customer One Free Item