Passing Custom Fields to UltraCart During the Checkout
- Jonathan Tew
- Hunter Schaeffer
- Loyd James (Unlicensed)
Passing Custom Fields to UltraCart During the Checkout
Introduction
This tutorial will explain how to pass custom fields to UltraCart during the checkout and then retrieve the information. Custom fields are primarily used to store identifiers from an external system to consume after an order is placed.
Understanding Custom Fields
UltraCart currently supports seven custom fields on a cart/order. The fields are named Custom Field 1 through Custom Field 7. The fields currently support the following amounts of data.
Field | Length |
|---|---|
CustomField1 | 50 characters |
CustomField2 | 50 characters |
CustomField3 | 50 characters |
CustomField4 | 50 characters |
CustomField5 | 75 characters |
CustomField6 | 50 characters |
CustomField7 | 50 characters |
| CustomField8 | Stored as internal order properties. |
| CustomField9 | Stored as internal order properties. |
| CustomField10 | Stored as internal order properties. |
Passing on a Buy Link
You can pass custom fields via a buy link by appending the following snippet:
&CustomField#=VALUE
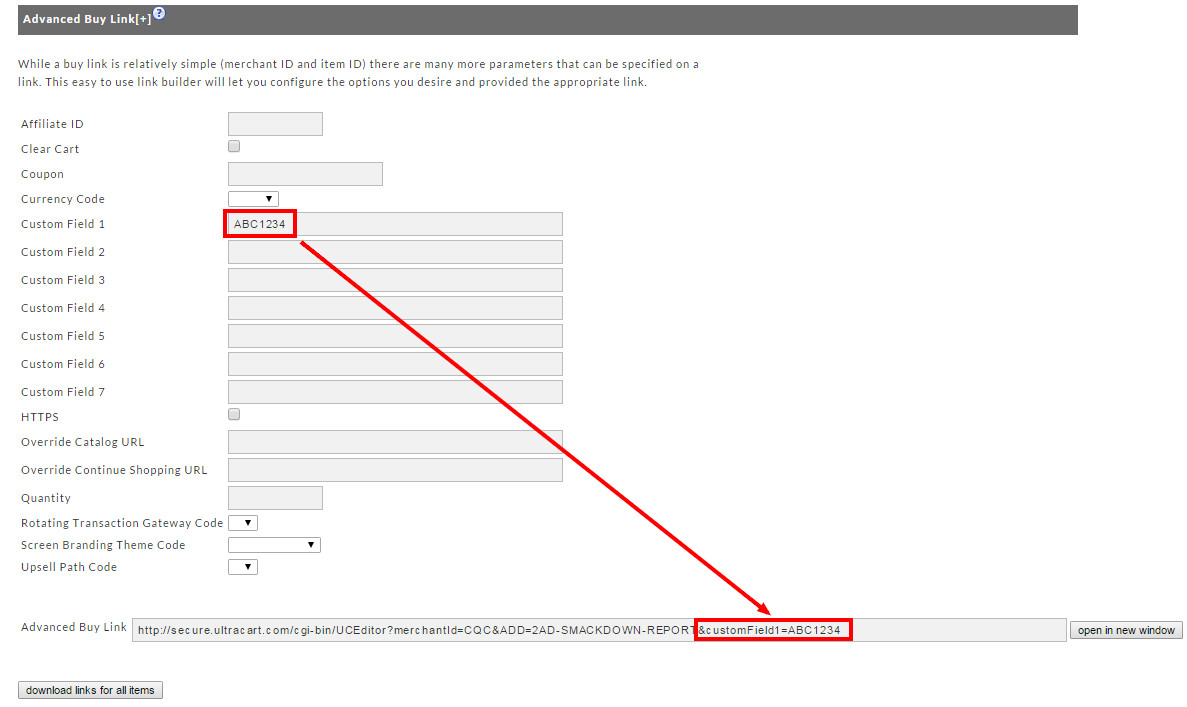
The Advanced Buy Link builder located at:
Main Menu → Item Management → Items → [links]
will allow you to create the custom snippet and append it to the buy link as shown below.
Passing custom field data from Buy Form code
The following example contains 2 custom fields". The first custom field (on line 4) is a hidden input field that passes "New Landing Page" into "CustomField1" to identify that the sale came from the new landing page rather then default store location. A second custom field "CustomField2" (line 10) is storing the value for a field asking the customer "What breed of dog(s) do you have?"
<form method="post" action="https://secure.ultracart.com/cgi-bin/UCEditor">
  <input type="hidden" name="merchantId" value="DEMO" />
  <input type="hidden" name="add" value="Bone" />
  <input type="hidden" name="CustomField1" value="New Landing Page" />
  <table class="uc-item-table">
    <tr class="uc-item-dog-breed-row">
      <td class="uc-item-dog-breed-label">What breed of dog(s) do you have?</td>
      <td class="uc-item-dog-breed-field">
        <input type="text" name="CustomField2" value="" />
      </td>
    </tr>
    <tr class="uc-item-qty-row">
      <td class="uc-item-qty-label">Qty</td>
      <td class="uc-item-qty-field">
        <input type="text" name="quantity" value="1" />
      </td>
    </tr>
    <tr class="uc-item-cost-row">
      <td class="uc-item-cost-label">Cost</td>
      <td class="uc-item-cost-value"><script type="text/javascript" src="https://secure.ultracart.com/cgi-bin/UCPrice?MERCHANTID=DEMO&ITEM=BONE&output=Javascript"></script></td>
    </tr>
    <tr class="uc-item-submit-row">
      <td></td>
      <td>
        <input type="submit" name="submit" value="add to cart" />
      </td>
    </tr>
  </table>
</form>
Inserting the Custom Fields into the checkout
If you require the use of the custom fields to collect additional information from the customer during the checkout, you can insert the custom fields into the checkout.
Storefront Checkout
Main Menu → Storefronts → (Choose SF Host) → (Storefronts Menu) Templates
With the storefronts templates, you'll need to remember to maintain the "responsiveness" of the pages for each device view. So make sure not to insert things like tables. Instead use CSS for the styling of the custom content. Storefront templates typically contain multiple template snippets so you may want to create your custom content to the templates as a snippet. That will make for easier template management when you perform theme updates.
Example HTML
Place the following code into a new snippet file
(Example: "cart_customfields.vm" place into the snippets folder of the activated theme.)
## This snippet contains custom fields for inclusion into the checkout
<div class="row js-show-shipping">
	<div class="columns small-16">

<div class="UcCustomTable">
    <div class="UcCustomTableTitle">
        <h2>Complete the following, if applicable.</h2>
    </div>


        <div class="UcCustomTableRow">

        <div class="UcCustomTableCell">
            <h3>Custom Field 1 Label</h3>
        </div>
        <div class="UcCustomTableCell">
            <input type='text' class="ucFormField" style="width:315px" name="CustomField1" value="$!customField1"/>/><br>
        </div>

    </div>
    <div class="UcCustomTableRow">
        <div class="UcCustomTableCell">
            <h3>Custom Field 2 Label</h3>
        </div>
        <div class="UcCustomTableCell">
            <input type='text' class="ucFormField" style="width:315px" name="CustomField2" value="$!customField2"/><br>
        </div>
    <div class="UcCustomTableRow">
        <div class="UcCustomTableCell">
            <h3>Custom Field 3 Label</h3>
        </div>
        <div class="UcCustomTableCell">
            <input type='text' class="ucFormField" style="width:315px" name="CustomField3" value="$!customField3"/><br>
        </div>
	<div class="UcCustomTableRow">
        <div class="UcCustomTableCell">
            <h3>Custom Field 4 Label</h3>
        </div>
        <div class="UcCustomTableCell">
            <input type='text' class="ucFormField" style="width:315px" name="CustomField4" value="$!customField4"/><br>
        </div>
	<div class="UcCustomTableRow">
        <div class="UcCustomTableCell">
            <h3>Custom Field 5 Label</h3>
        </div>
        <div class="UcCustomTableCell">
            <input type='text' class="ucFormField" style="width:315px" name="CustomField5" value="$!customField5"/><br>
        </div>
	<div class="UcCustomTableRow">
        <div class="UcCustomTableCell">
          <h3>Custom Field 6 Label</h3>
        </div>
        <div class="UcCustomTableCell">
            <input type='text' class="ucFormField" style="width:315px" name="CustomField6" value="$!customField6"/><br>
        </div>
	<div class="UcCustomTableRow">
        <div class="UcCustomTableCell">
            <h3>Custom Field 7 Label</h3>
        </div>
        <div class="UcCustomTableCell">
            <input type='text' class="ucFormField" style="width:315px" name="CustomField7" value="$!customField7"/><br>
        </div>
    </div>
  </div>
 </div>
</div>
Example CSS for the Custom Field Div's
(Place the CSS into the override.css file for the activated theme.)
<style type="text/css">
    .UcCustomTable
    {
        display: table;
    }
    .UcCustomTableTitle
    {
        display: table-caption;
        text-align: center;
        font-weight: bold;
        font-size: larger;
    }
    .UcCustomTableRow
    {
        display: table-row;
    }
    .UcCustomTableCell
    {
        display: table-cell;
        border: solid;
        border-width: thin;
        padding-left: 5px;
        padding-right: 5px;
    }
</style>
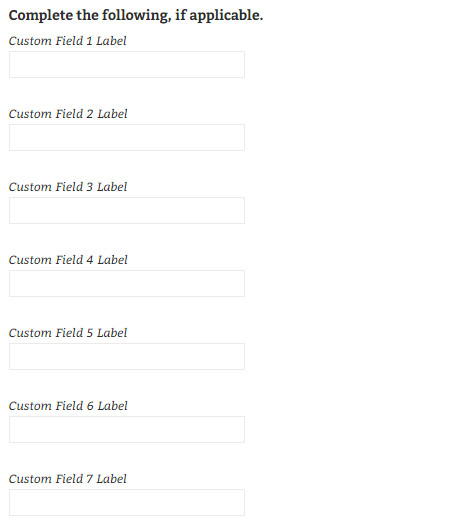
Preview of the fields appearing in the checkout:
Legacy Checkout
Main Menu → Configuration (Checkout) → Screen Branding themes → (Edit Theme) → Screens (tab) → Edit "Single Page Checkout" → "Below Shipping/Billing Address" (section)
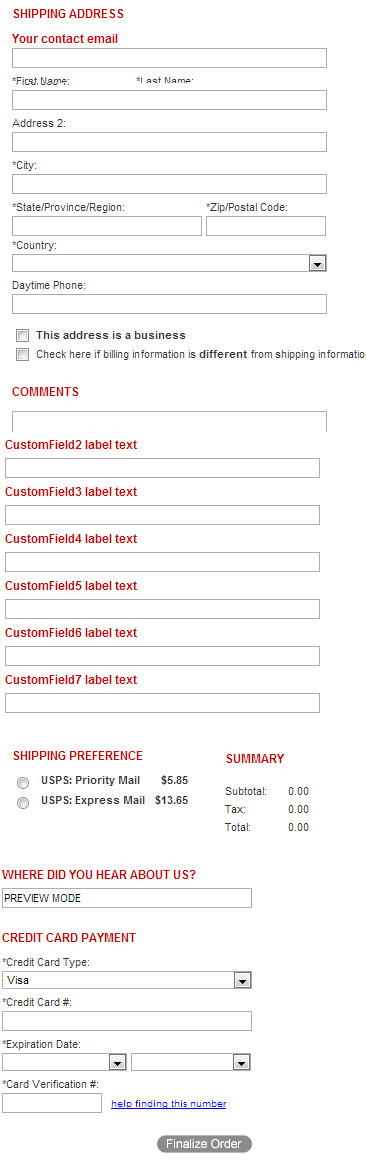
Example of placing the custom field HTML into the single page checkout editor:

<table><table id='CustomFields'>
<tr>
<td>
<span class="ucColorSubHeader ucCommentsHeader">CustomField1 label text </span>
</td>
</tr>
<tr>
<td>
<input type='text' class="ucFormField" style="width:315px" name="customField1"/>
</td>
</tr>
<tr>
<td>
<span class="ucColorSubHeader ucCommentsHeader">CustomField2 label text </span>
</td>
</tr>
<tr>
<td>
<input type='text' class="ucFormField" style="width:315px" name="customField2"/>
</td>
</tr><tr>
<td>
<span class="ucColorSubHeader ucCommentsHeader">CustomField3 label text </span>
</td>
</tr>
<tr>
<td>
<input type='text' class="ucFormField" style="width:315px" name="customField3"/>
</td>
</tr><tr>
<td>
<span class="ucColorSubHeader ucCommentsHeader">CustomField4 label text </span>
</td>
</tr>
<tr>
<td>
<input type='text' class="ucFormField" style="width:315px" name="customField4"/>
</td>
</tr><tr>
<td>
<span class="ucColorSubHeader ucCommentsHeader">CustomField5 label text </span>
</td>
</tr>
<tr>
<td>
<input type='text' class="ucFormField" style="width:315px" name="customField5"/>
</td>
</tr><tr>
<td>
<span class="ucColorSubHeader ucCommentsHeader">CustomField6 label text </span>
</td>
</tr>
<tr>
<td>
<input type='text' class="ucFormField" style="width:315px" name="customField6"/>
</td>
</tr><tr>
<td>
<span class="ucColorSubHeader ucCommentsHeader">CustomField7 label text </span>
</td>
</tr>
<tr>
<td>
<input type='text' class="ucFormField" style="width:315px" name="customField7"/>
</td>
</tr>
</table>
The above HTML code would render into the single page checkout like this:
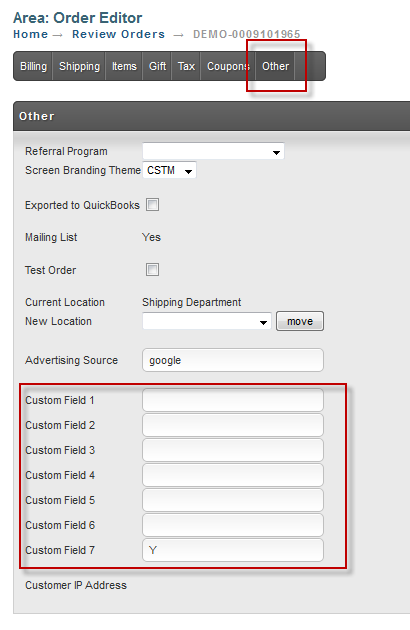
Seeing Custom Field Values in Web Interface
Whenever you see an order in the system you can click Edit Customer Information and then click the Other tab. The other tab will display the contents of the seven custom fields as shown below.
Using on the Receipt
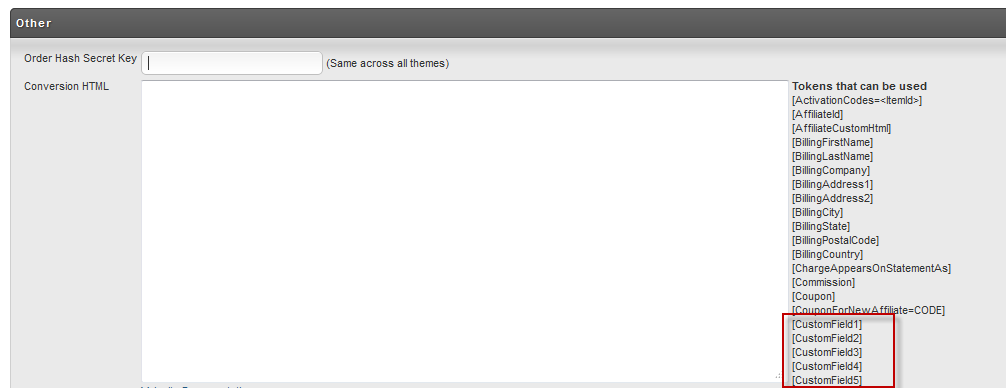
The values of the custom fields can also be used in conversion scripts on the receipt. If you navigate to:
Main Menu → Configuration → Screen Branding Themes → [edit] → Conversion and Tracking
You can use tokens like [CustomField1] within your conversion HTML. These will be replaced with the actual value from the order.
Retrieving Back the Custom Fields
There are 3 ways to receive back the custom fields that you passed in.
Export Orders
A merchant can configure an export to collect the custom field values. Exports are configured under:
Distribution Center API
This SOAP web service API is used by some third party fulfillment houses and shipping platforms to retrieve shipment information from UltraCart. You can read more about the Distribution Center Transport API here.
XML Postback
XML Postback is a method of communication whereby UltraCart notifies the merchant's web server of order activity by posting XML versions of the order to the merchant's server. You can read more about XML Postback here. XML Postback is configured under: