Back Office - Exporting Orders
- Perry Tew
- Loyd James (Unlicensed)
- Hunter Schaeffer
- Chris Torigian
The Exporting Orders screen allows you to configure export formats that will be used when exporting from certain sections of UltraCart. This allows for integration with a merchant's existing legacy back office accounting and shipping systems. UltraCart provides a variety of flexible export configuration options to meet the needs of a wide variety of merchants.
Exporting Orders
UltraCart can export in several formats from three different locations throughout the system but certain export settings must be defined prior to export.
The first step in exporting is to configure the export method(s) and mapping by selecting the Exporting Orders link from the configuration menu. If no settings have been previously defined, you will be greeted with the following
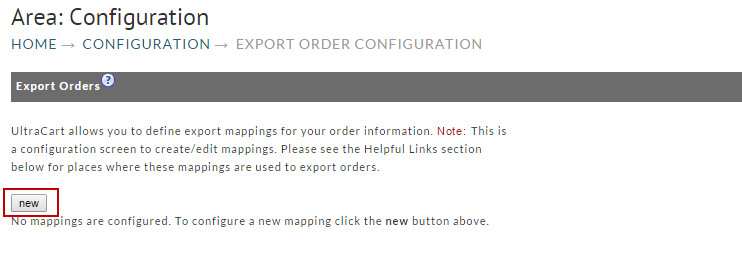
Click the "new" button to define an export mappings.
Merchants can create and save several different Export mappings and it's advisable to do so. Since you can actual execute the exporting orders from various areas (Accounts Receivable, Shipping Department and Order Management), it might be a good idea to have different field mappings for each.
Creating a new export
After clicking on the "new" button, you will be taken to the following screen. Below we will explain what each section of the Export Order Mapping does and how it works.
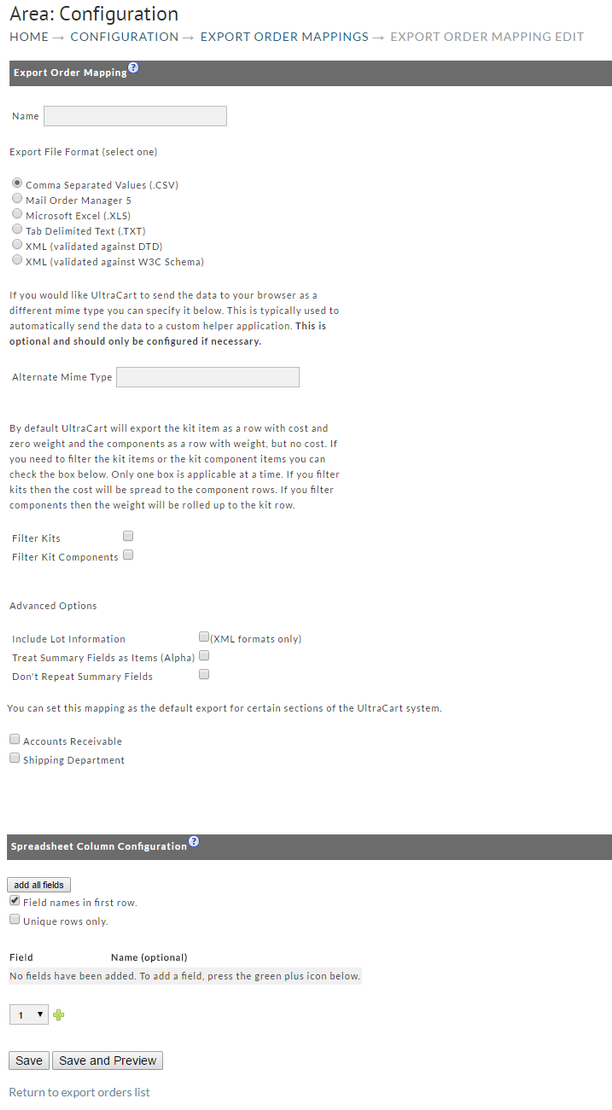
Naming the Mapping
In order to recognize and select a mapping format (when actually exporting orders) you'll need to name it. Type the name in the box to the right of the "Name" prompt.

Export File Formats
UltraCart can export information in XML (Extensible Markup Language), CSV (Comma Separated Values), TXT (tab Delimited Text) or Excel formats, and Mail Order Manager 5. XML has become the standard information exchange format between different systems. XML is the preferred format of UltraCart. XML can represent information that does not have a flat structure. Orders are an excellent example of information that does not conform to a flat structure because each order can contain numerous items, etc. Due to this fact the XML format can represent the entire order information while the CSV format can only contain summary detail (no item detail).

XML DTD or XML W3C Schema
UltraCart can export orders in 2 different XML formats: DTD and W3C Schema. The choice of export format depends mainly on which tools will be used to process the export. As a general rule, if you are utilizing the export file with Microsoft tools or Microsoft Access, you should use the W3C schema format. All other languages should generally utilize the DTD format. Please consult the documentation included with your processing tool for more information.
Alternate Mime Type
The default mime types for XML and CSV documents are application/xml and text/plain.
While these are the standard mime types associated with the formats, they often lead to the export information displayed inside the web browser. The information exported by UltraCart can pass to a custom helper application for processing by specifying a different mime type.
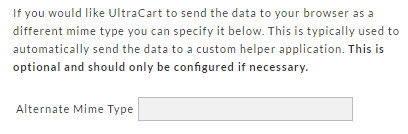
Type the alternate mime type in the box provided.
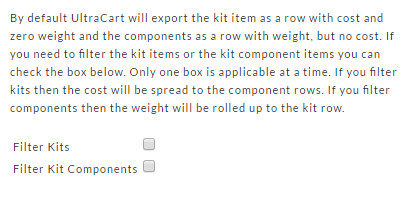
Filter Kits
By default UltraCart will export the kit item as a row with cost and zero weight and the components as a row with weight, but no cost. If you need to filter the kit items or the kit component items you can check the box below. Only one box is applicable at a time. If you filter kits then the cost will be spread to the component rows. If you filter components then the weight will be rolled up to the kit row.
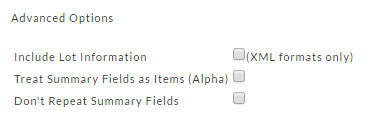
Advanced Options
Export Setting
When performing the actual order export from either Accounts Receivable or Shipping Departments, UltraCart will not prompt you for a mapping file. It will use whichever mapping file you set as the default at this field. If you do not set a default mapping, then UltraCart will export orders from that department in XML format. It's highly recommended that you create and set a default mapping for both accounts receivable and shipping departments so users know what type of file format the orders will export in. You can set one file format for both departments.

Click on the check box for the file format desired.
Spreadsheet Column Configuration (Mapping)
For merchants that choose to export using the Excel, CSV or TXT format, they must configure (map) the different pieces of information (fields) that are to be included in the export file. When you chose one of these export methods, a special section will appear to allow you to configure the fields.
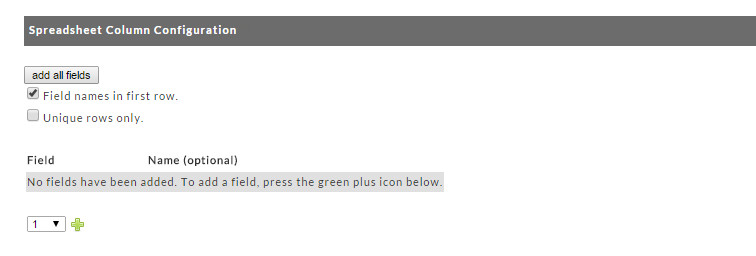
From this screen you can either select to "add all fields" or by using the drop down select the number of fields you would like to add to the export.
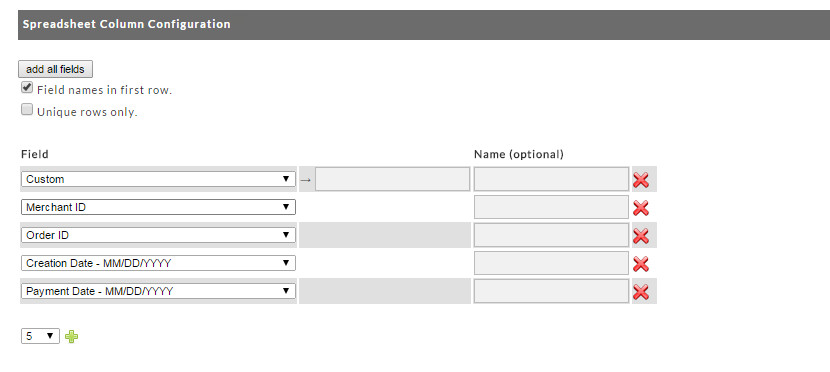
There are two columns in the field mapping screen; Field and Name (optional). A third column will sometimes appear for custom values (explained later).
Field Name | This column allows you to select the field(s) you want exported and in what order. Simply select each field in the order desired as you go down the column. If you populated all boxes and need to add more, click the "add more fields" button in the title bar. |
|---|---|
Add all Fields | You can populate the Field column with all of UltraCart fields by clicking the "add all fields" button located in the title bar. |
Filed Names in first row (checkbox) | This feature, when checked, will place the Field name or optional name (if configured) in the first row of the exported file. This is very helpful for merchants that import into an existing data base file and need to match up the fields. |
Name (optional) | This field allows you change the Field Name to one of your liking in the output (exported) file. Type the name for each field you want to change in the text box to the right. |
Custom Value* (optional) | The first field listed in the drop-down list for the Field Column is "Custom". You can add several Custom Value fields anywhere you chose. When selected, the Name column will shift to the right making room for a new column and text box. Here you can enter any data that you want to appear at that specific point in every record. It will not become part of the UltraCart Order record, only the export. |
Below is an example where the merchant configured (mapped) the export to insert 2 Custom fields; a Depot Number at the beginning of each record and a "Department Code" just after the Shipping Date field.
Custom Field 1-7
UltraCart facilitates the ability to send arbitrary data (up to Seven fields) that becomes part of the order record (does not appear on receipts).
An example of usage might be where a Merchant tracks orders coming from different web sites by simple adding the custom field that is passed via the buy link. To create the Custom Field, the merchant adds a statement (html) to all (or particular) buy links. The statement to add is: "&CustomField1=SiteName ". You replace "SiteName" with an identifier of your web site that is meaningful to you. In the following example we will use a Merchant ID of AVKITS and a custom field of "AviationShop".
"https://secure.ultracart.com/cgi-bin/UCEditor?MERCHANTID=AVKITS&ADD=TSHIRT&CustomField1=AviationShop"
Mapping the Custom Field
Within the selectable field listing is Custom Fields 1 thru 7. Simply select each custom field desired and enter a name (optional) of your liking.
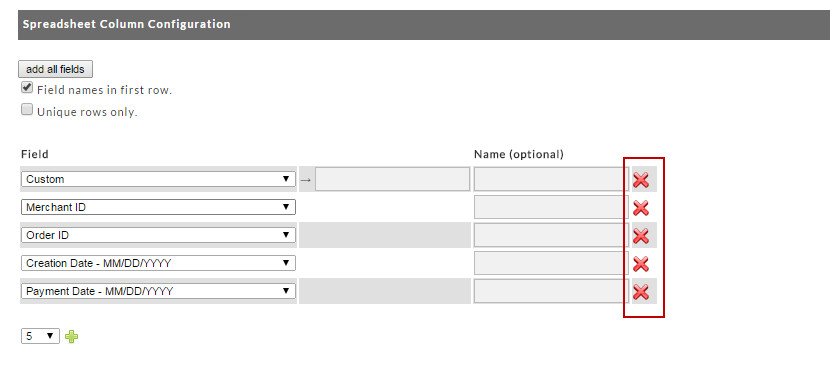
Remove a mapped field*
There may be a time you need to remove a field after you have configured and saved the file. To do so, click the red x for the field you need to remove and then click the "save" button. When you return to this mapping file (clicking the edit button), you'll see that your field has been removed and all other fields have been moved up.
Save and Preview
When finished with configuration of your export, click the "save" button or the "save and preview". Preview will display the XML type in a browser window. CSV, TXT or Excel formats will download a small example of the file.
User Permissions
User Login Permissions
In order for a user to run a the order export, they will need the following user permissions:
- Edit Settings (Required to be able to edit the "export mappings" used to generate the order exports)
- Access Accounts (Receivables (required to run the export from the export order page)
Frequently Asked Questions
Question: I want to export all my orders, Are there any limitations to the exporting of my order data?
Answer: If you are a long time merchant or a very high volume merchant you may encounter a limitation to the export data to 20,000 records per export for the *.XLS file format (XML exports will not encounter than record limitation). If you have more than 20,000 records you wish to export in *.XLS, you'll need to export the data in batches by reducing the date range to smaller increments of time to accommodate the 20,000 record limit.