Upsell After
This document covers the upsell after process for legacy screen branding theme checkouts and storefronts that do not have the Visual Builder enabled themes.
Upsell Offers using Storefront Visual Builder enabled themes
Navigation
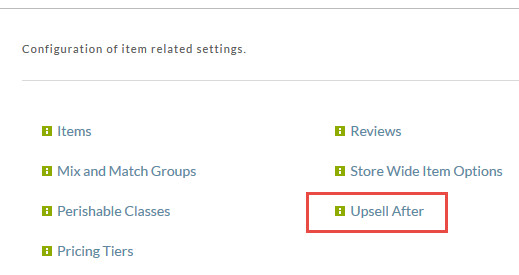
Main Menu → Configuration → Items → Upsell After
Upsell After
Upsell After offers allow you to present your customers with one or more offers for additional products after they click the finalize order button. Customers who have committed to purchase from you are very likely to add additional products to their order at this point in the purchase process. For example if you sell printers a logical upsell would be the USB cable or additional toner cartridge. The customer may have forgotten to add these to their cart while browsing, but would be interested in adding them to their order.
Offers - An offer is the individual sales offer shown to the customer. The customer can be shown as many offers as you want to configure.
Paths (Optional) - Allows the merchant to organize the sequence of offers that are shown to a customer. Most merchants should have a single path. Multiple paths can be used when split testing different sequences or when specific paths are hard coded on item buy links
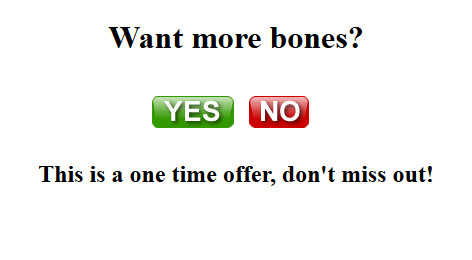
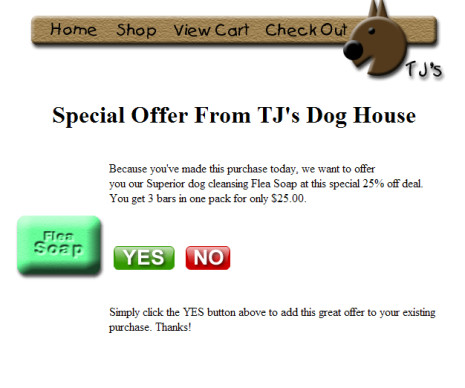
The following is a sample of what an upsell screen might look like with inserted graphics and text.
You can add screen branding to it as well see the example below where you see the header placed in it.
What type of items should I Upsell?
Qualifiers for Upsell could be anything that is either related to the item being purchased, a service that might appeal to the customer, or a product that would appeal to the target demographic of the customer that is purchasing. Let's say that you sell a Body Building Supplement Drink Mix. You might want to Upsell your Quick Energy Protein Bars. This is a complementary product that may not have otherwise been seen by the customer.
How does the Upsell system work?
After the customer clicks the finalize order button the system checks to see if any Upsell offers are triggered by the items that they are purchasing. If the customer meets the criteria then the Upsell pages will be displayed, one after another, in priority order, until all the Upsells are shown. A timer is set on the customer's shopping cart to make sure their shopping cart turns into a completed order even if the customer closes the browser during the Upsell pages. This allows the merchant to run the customer through a gauntlet of typically one to seven pages of products. Each Upsell page will feature a single product. The customer will be asked to click yes or no as to whether they want to add the item to their cart. If the customer clicks "yes", the item is added. UltraCart will recalculate totals (tax, shipping, etc) and the payment will then be processed.
After the customer submits their credit information, and before the first upsell page, the order is considered complete. So don't worry – if the user leaves on an upsell page, the transaction is still processed as an order.
If you have two upsell pages, and the customer chooses "YES" on the first upsell, and then leave, the transaction is still processed as an order, and the customer is charged for their cart contents plus the first upsell.
UltraCart sets a timer (default is 45 minutes), and after that time, if the receipt page hasn't show, the order is finalized regardless.
Note: If the customer leaves before entering all their information, this is considered an abandoned cart.
Upsell After Configuration
There are two sections to UltraCart's Upsell section; Offers and Paths.
Store Wide Options
Do not offer customers anything they've purchased in the past.
This feature is based on the customer email address and will block the upsell if they have purchased any of the items being offered in the past.
Offers
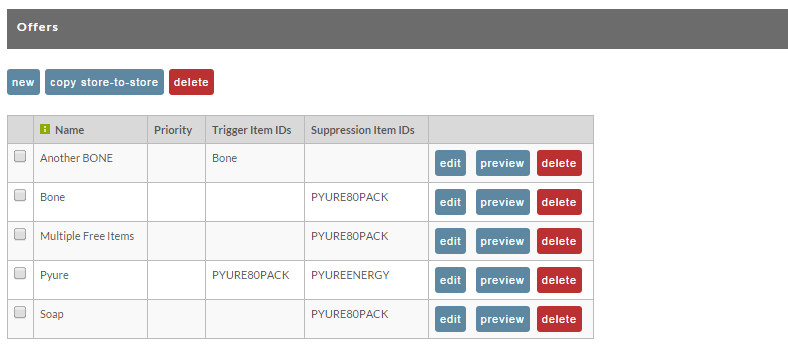
To add a new Upsell Offer, click on the "new" button to the right of the Offers title. You will be taken to the Upsell After Offer Editor screen. To see how an upsell will look during the checkout process you can click the preview button. Use the "trigger item" and "suppression item" configuration fields, to determine the logic of which offers are displayed according to the customers' initial selection of items at checkout.
Upsell Offer Editor
The Upsell After offer editor is where you define the details of the upsell after offer(s) that will be presented to your customers during their checkout, when they meet the defined criteria.
Navigation
Home → Configuration (Checkout) → (Advanced view) Upsell After
Editor Sections
The Upsell Offer editor has 4 sections to it:
- Items (Required)
- Options
- Trigger/Suppression
- HTML (Required)
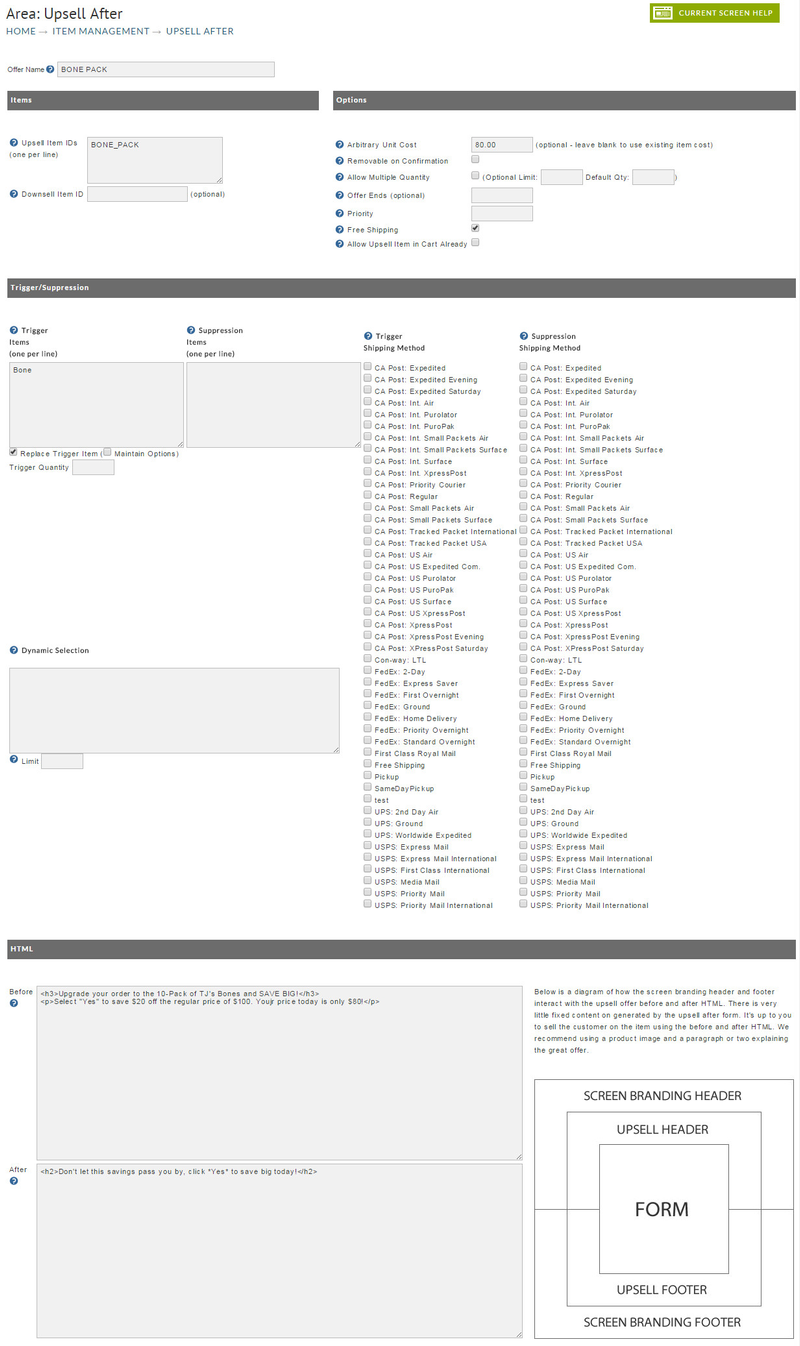
Each offer has numerous options that are configurable on it. Below is a screenshot of the upsell offer editor and a description of each of the configuration fields.
There are a lot of different configuration options on an upsell offer. The tables below provides descriptions of what each configuration field does.
Each offer will have a Offer Name which will be your description of the offer. After you have given the offer a name, you will then need to configure at least the required sections of the upsell after offer.
Items Section
| Field | Description | Required |
|---|---|---|
| Upsell Item IDs | The upsell item(s) are the items that will be added to the customers order if they select yes for the offer. Most commonly you'll have a single item configured here. If you list multiple Item ID's here, the customer will be presented with a drop down menu to choose the item they want (for example the could be prompted to choose a size of the item. | Yes |
| Downsell Item IDs | If the customer clicks NO to the upsell offer, then this item is automatically added to their cart. A good example of an downsell item is a trial sample of another product if they say no to purchasing the non-trial version. A downsell item should be free and should also not increase the cost of the customer's shipping, since they are selecting NO to the offer. So, in most cases the downsell item will be left blank (unconfigured) unless you have some sort of FREE item/sample item to include into the customers order at no cost. |
Options Section
Field | Description |
|---|---|
Arbitrary Unit Cost | By default UltraCart will offer the customer the upsell item at it's normal cost. Setting an arbitrary unit cost will allow you to offer the customer the same item at a different price. |
Removable on Confirmation | Checking this box allow for a confirmation page to be shown after the customer goes through all the upsells. This provides one last chance to confirm their order or remove an upsell item before completion. |
Allow Multiple Quantity | If this box is checked, a quantity field is displayed to the customer. You can also limit the maximum they can purchase through an upsell (limit 5 per customer for example) and set the default starting quantity. |
Offer Ends | A date when this offer ends. This should be entered in MM/DD/YYYY format. |
| Priority | If you have multiple upsells without a path configured then the offers will be shown in priority order. One (1) is the first or highest priority. If two different upsells have the same priority number, the higher priced upsell will be shown first. |
Free Shipping | If this check box is selected then any shipping methods that are configured with the "Qualifies for free shipping" checkbox selected at the shipping method editor level that qualifies for the checkout will be displayed. Must configure Free Shipping Methods IF you do not have any of your configured shipping methods configured with the "Qualifies for free shipping" checkbox, then no free shipping options will be provided to the checkout. |
Allow Upsell Item in Cart Already | The default logic is to suppress an upsell offer if the cart already contains the item, with the assumption that the upsell offer is typically offering a discount off the regular price, so if they were already wanting to buy it at regular cost you wouldn't want them to then see a better deal. Select this checkbox in order to override that default suppression logic. |
Trigger/Suppression Section
Field | Description |
|---|---|
| Trigger Items | When one of the items listed in the trigger items is placed into the shopping cart, this upsell will be triggered during checkout. If this box is left blank then the upsell will be shown to all users as long as suppression criteria is not satisfied. |
| Replace Trigger Item (check box) | When checked the trigger item is removed from the order if they say yes to the upsell item. This feature is typically used to replace a 1 month supply with an upsell item, like the 3 month supply. |
| Maintain Options | This is an optional setting to the "Replace Trigger Item" setting. If the trigger item has options then those options will be applied to the upsell item if possible. (This allows you to maintain options such as size on a shirt, etc.) |
| Trigger Quantity | The required quantity of the trigger item. The default is one. |
| Suppression Items | If any of the items in the cusotmers cart are on the suppression items list, then the upsell will not be shown. |
| Trigger Shipping methods | If the customer selects any of the Shipping methods listed here for shipping, it will trigger the Upsell to be shown. |
| Suppression Shipping Method | If the customer selects any shipping method that is listed here it will cause the Upsell to be suppressed (not shown). |
| Dynamic Selection | A velocity script used to dynamically calculate the offers to present the customer. Programmers Only Dynamic selection scripting is for implementing complex logic and is considered very advanced. You will need to have a programming skill set and be familiar with the Velocity scripting language in order to implement dynamic slection. See: Velocity - The Need for Speed - Catalog |
| Limit (Optional) | This is an optional setting to the "Dynamic Selection" setting. The dynamic selection velocity code could produce a large number of results depending upon that logic that you implement. By specifying a limit UltraCart will automatically trim down the results produced by the velocity code to a responsible number of offers. |
HTML Section
| Field | Description |
|---|---|
| Before | An HTML block that appears before the simple Yes/No form. Please see the graphic to the right that shows how the screen branding interacts with the page display. |
| After | An HTML block that appears after the simple Yes/No form. Please see the graphic to the right that shows how the screen branding interacts with the page display. |
Using Graphics in your Before/After HTML
Storefront - New UI
Before your graphic can be displayed in the offer screen, you'll upload it in the file manager in the storefront menu:
Main Menu → Storefront → Choose Storefront host → (Storefronts menu) File Manager
<img src="https://demo.ultracartstore.com/FleaSoap.gif" />
Screen Branding Themes - Old UI
Before your graphic can be displayed in the offer screen, it must be uploaded to the Graphics Library. For more information, see the Screen Branding/Graphics Library section of the UltraCart Reference Manual. The following is a sample HTML image source tag that you would use to display a graphic that resides in UltraCart's Graphics Library:
<img src="/cgi-bin/UCGraphic?MERCHANTID=DEMO&FILENAME=FleaSoap.gif" />
Custom Yes/No buttons in the Upsell Offer
This setup is not valid for StoreFronts.
Altering the appearance of the Yes No buttons
You may use css to alter the appearance of the Yes No buttons.
The buttons are outputted within the following html block (which is subject to change; test your screens!)
<table class="ucUpsellButtonTable">
          <tbody><tr>
            <td>
              <div id="ucUpsellYesButtonId" class="ucUpsellYesButton">
                <input border="0" type="image" class="ucUpsellYesButtonOverlay" alt="Yes" src="/checkout/images/spacer.gif" name="yes">
              </div>
            </td>
            <td>
              <div id="ucUpsellNoButtonId" class="ucUpsellNoButton">
                <input border="0" type="image" class="ucUpsellNoButtonOverlay" alt="No" src="/checkout/images/spacer.gif" name="no">
              </div>
            </td>
          </tr>
        </tbody></table>
The buttons are input images pointing to spacers. They are surrounded by <div> blocks that use a background image to show the actual button. This allows for maximum browser compatibility.
Button | Attribute | CSS Class Name |
|---|---|---|
Yes | background image | ucUpsellYesButton |
Yes | size (height and width) | ucUpsellYesButton and ucUpsellYesButtonOverlay |
No | background image | ucUpsellNoButton |
No | size (height and width) | ucUpsellNoButton and ucUpsellNoButtonOverlay |
Here's an example you could add to a style tag with the <before> section, placed in between opening and closing (<head> ...button code here... </head>) head tags as the first part of the of the HTML section of the upsell offer editor:
.ucUpsellNoButton {
background-image: url(https://www.mysite.com/reallycoolbuttons/no.gif);
background-repeat: no-repeat;
height: 45px;
width: 82px;
}
.ucUpsellNoButtonOverlay {
height: 45px;
width: 82px;
}
.ucUpsellYesButton {
background-image: url(https://www.mysite.com/reallycoolbuttons/yes.gif);
background-repeat: no-repeat;
height: 45px;
width: 82px;
}
.ucUpsellYesButtonOverlay {
height: 45px;
width: 82px;}
Swapping the order of the Yes No button
Some merchants wish to make the No button appears before the Yes button on a page. This requires additional html code, but can be achieved.
First, hide the default buttons.
.ucUpsellButtonTable { display:none; }
In the footer section of your upsell html, add the following, styling them as you see fit.:
<table>
    <tr>
        <td>
            <img src="/checkout/images/upsellNo.gif" onclick="ucSelectNo()" style="cursor:pointer">
        </td>
        <td>
            <img src="/checkout/images/upsellYes.gif" onclick="ucSelectYes()" style="cursor:pointer">
        </td>
    </tr>
</table>
This will display the two buttons, with the No button first. The onclick events will handle the form submission.
Multiple sets of yes no buttons on an upsell page
Merchants employing this usually have a long upsell page, and wish to place yes/no buttons a third of the way down the page, and then again at the end of the page.
Steps Involved
- Hide the existing buttons
- Add your buttons
Hide the existing buttons
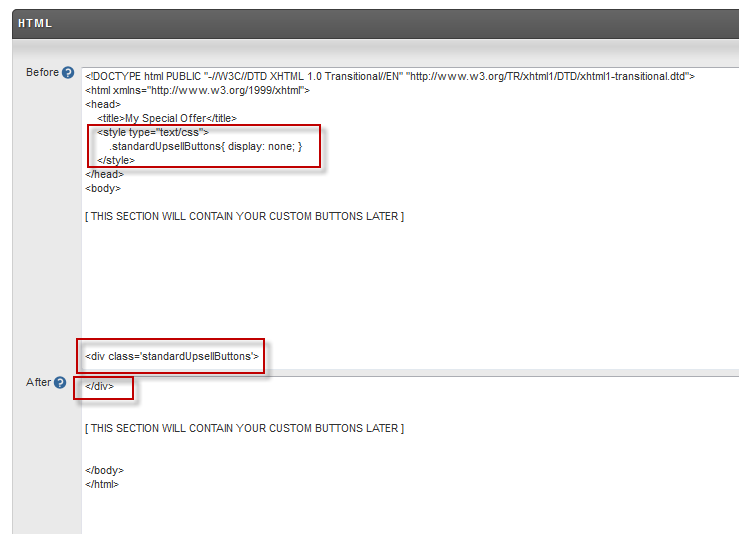
The upsell after configuration page has text fields labeled Before and After. These text areas allow you to place html markup before and after the <form> section of the html page. Within the <form> section are the standard yes/no button. To hide the button, you need to wrap the <form> section of the page within a div that is hidden.
- Add the opening div tag at the bottom of the
Beforesection. - Add the closing div tag at the top of the
Aftersection. - Add css to stylize the div tag such that it is invisible.
The image below illustrates these three steps.
Add your buttons
The upsell page, when generated by UltraCart, will contain numerous javascript helper methods. Two of them (ucSelectYes and ucSelectNo) are needed to add custom buttons. Because you cannot edit the html within the form element, any buttons you add in the Before or After section will be outside the <form> tags. Simply adding <input> elements in the Before or After will not work.
The standard method is to use large, eye-catching images for the yes and no buttons, wrapping them in hyperlinks that call ucSelectYes and ucSelectNo.
Here is a sample block for a yes and no button:
<table width="485" align="center">
    <tr>
        <td>
            <a href="javascript:ucSelectYes()">
                <img src="http://www.mystore.com/images/upsell_yes_big_button.jpg" />
            </a>
        </td>
    </tr>
    <tr>
        <td>
            <a href="javascript:ucSelectNo()">
                <img src="http://www.mystore.com/images/upsell_no_big_button.jpg" />
            </a>
        </td>
    </tr>
</table>
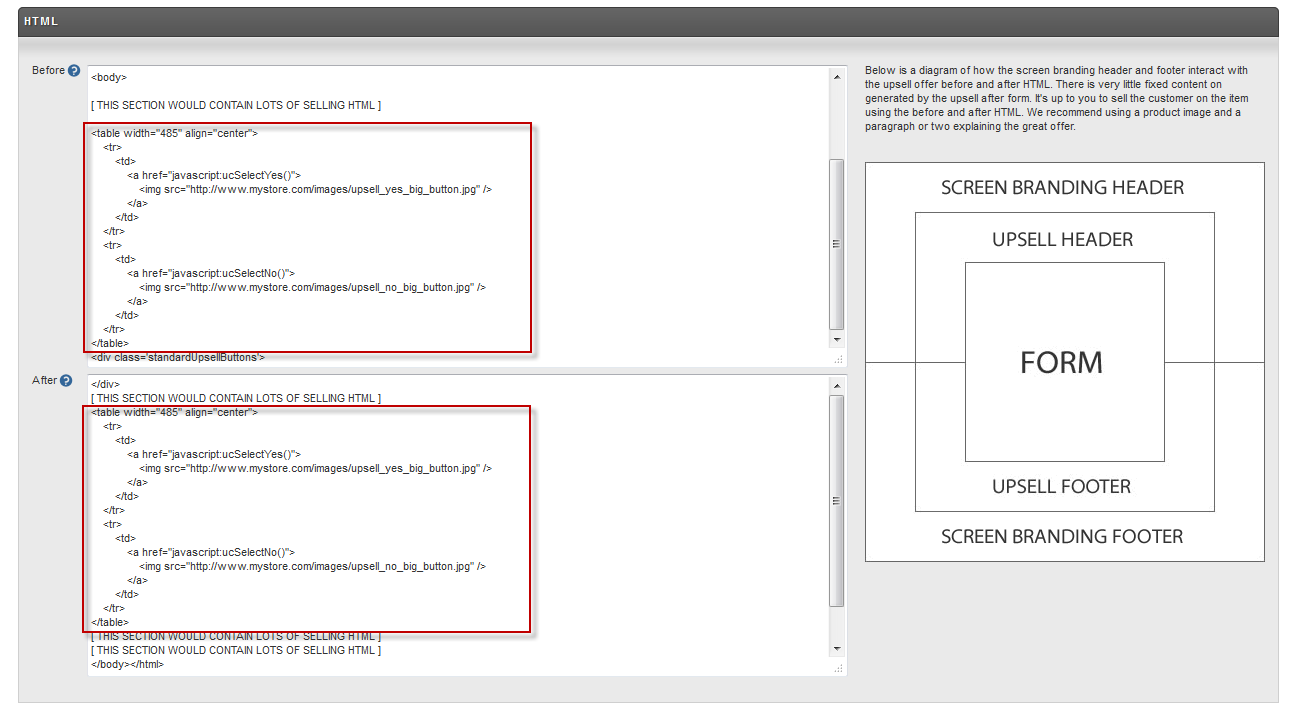
If this were your yes/no buttons, you could repeat the code block above wherever you wished to place buttons.
The image below shows two sets of custom buttons on an upsell page. You could have as many as you deem necessary.
Paths
To add a new Upsell Path, click on the "new" button underneath the Paths title. You will be taken to the Upsell Path Editor screen.
Paths
Paths are not item specific "paths". Each path must include all active upsell after offers. IF you have more than one path, then the percentage should be equal a total of 100% between all paths, creating a rotating set of active upsell after offers based on a percentage of the sale traffic. In a scenario where you have multiple paths, say three (Paths "A", "B", "C"), you could have Path "A" set to 50% traffic, Path "B" set to 30% of the traffic & Path "C" set to the remaining "20% of traffic. Each one could have a different set of the configured upsell after offers enabled.
Path Traffic
Having multiple paths set to 100% traffic will result in the first path running all the time and the other path's ignored.
Path Visualizer
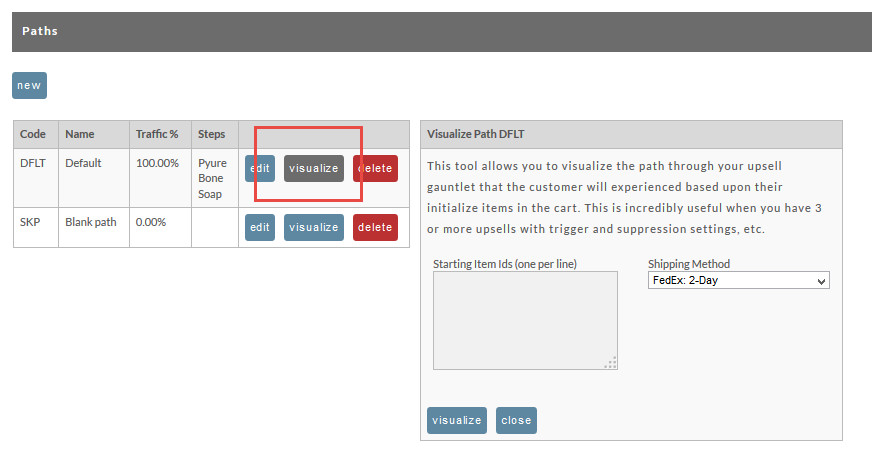
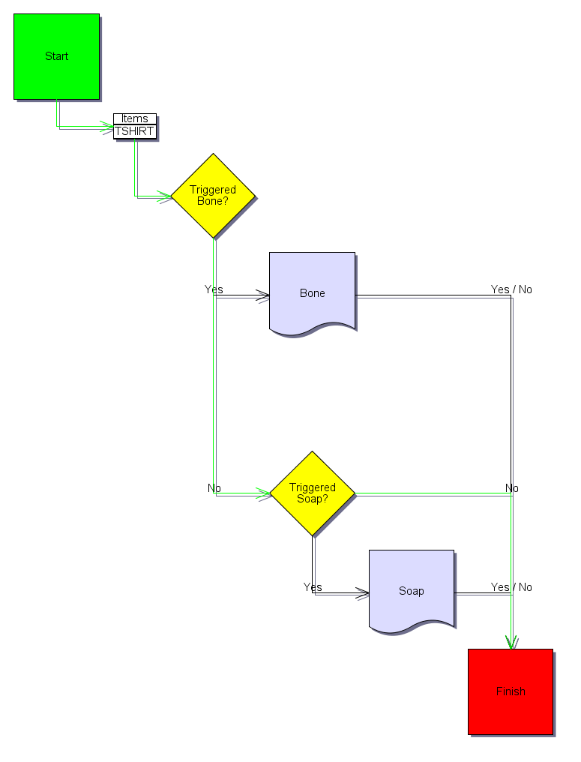
The path visualizer is a simple tool that allows you to visualize the different routes through the upsell path that the customer can end up going. Below is a screen shot of the upsell visualizer and explanation of the starting parameter fields.
Field | Description |
|---|---|
Path | The path that you want to visualize. |
Starting Item IDs | Enter the item ids that the pretend customer has in their cart when they enter the upsell portion of the checkout. These starting items will be used to determine matches on the trigger/suppression items. |
Shipping Method | Select the shipping method that the customer chose during the checkout process. This shipping method will be checked against the trigger/suppression shipping method settings. |
Below is an example of the output generated by the upsell visualizer.
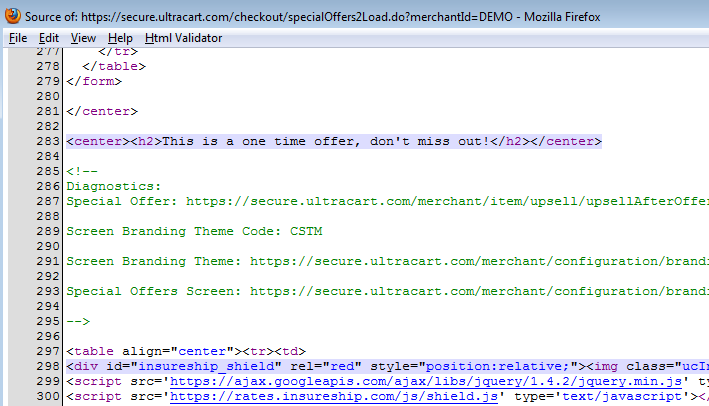
The Upsell tool is very flexible. But, with so many options for determining the trigger or suppression of an offer, there may be situations where you'll be viewing an upsell page and wonder why a particular offer is being displayed or not. An easy way to trace a page back to its configuration screens is to view the source.
Near the bottom of the page, but above your custom footer, will be a comment section called Diagnostics. Within that comment is the theme code and links to edit both theme and Upsell.
Just select the url you need and paste it in another window.
Advanced Javascript Methods For Upsell Customization
We've already given you a taste for using the JavaScript methods in the tutorial Multiple sets of yes no buttons on an upsell page. This document will describe all of the JavaScript methods available on the page upsell after page.
ucSelectItem
function ucSelectItem(value, quantity);
You can select a specific item on the upsell by calling:
ucSelectItem("ITEMID", 1);
ucSelectMultiple
function ucSelectMultiple(multipleSelectionDetails);
You can select a specific items on the upsell by calling the method with a CSV string like itemId,quantity,itemId,quantity,...
ucSelectMultiple("FOO,1,BAR,2");
With this method it is your responsibility to code up a form on the page to collect the customers answers and then call this method with the multiple selection details string that you build up.
ucSelectYes
function ucSelectYes();
You can select this upsell by calling the method:
ucSelectYes();
ucSelectYesWithQuantity
function ucSelectYesWithQuantity(quantity);
You can select this upsell with a quantity by calling the method:
ucSelectYesWithQuantity(2);
ucSelectNo
function ucSelectNo();
You can decline this upsell by calling the method:
ucSelectNo();
Upsell After FAQ
This document covers common questions regarding Upsell After.
Order failed during the auto closing of an upsell order
We got an order from a customer, and it was rejected because
This order failed during the auto closing of an upsell order.
Alternatively, we see this message appearing in the merchant comments for the order:
Whenever someone enters into the upsell section of the checkout process the system starts a 45 minute timer. At the end of the 45 minute timer the system automatically finalizes their order. This occurs if the customer closes out their web browser before going all the way to the receipt. If the credit card fails to charge successfully during the finalization step then the order goes into the Accounts Receivable with a note on it. You should followup with the customer to obtain valid credit card information so that the order can be processed.
Since the upsell after is captured at whatever state the customer leaves it, you may find some orders captured with many of the fields that are normally required left blank.
How long can a customer be inactive during the upsell after?
When a customer enters the upsell process the system sets a flag on their shopping cart session and starts a 45 minute inactivity time. Each time the customer progress through an upsell the timer resets. If the 45 minute timer expires (because the customer leaves the checkout process or is inactive for too long) then the system turns the cart into an order.
Is the PayPal Express Checkout payment compatible with upsell after offers?
Yes, but with limitations. For example, if the initial purchase item is a non shippable item, it won't be able to trigger an upsell offer that contains a shippable item (this is due to the fact that the shipping calculation steps within paypal would not have been triggered during the initial checkout.)
Which order tokens are valid for use in the upsell after offers?
The following order tokens are functional in the upsell after offer screens:
| Order Token | Value Displayed |
|---|---|
| [PaymentMethod] | The payment method used |
| [CustomField1] | Value stored in CustomField1 |
| [CustomField2] | Value stored in CustomField2 |
| [CustomField3] | Value stored in CustomField3 |
| [CustomField4] | Value stored in CustomField4 |
| [CustomField5] | Value stored in CustomField5 |
| [CustomField6] | Value stored in CustomField6 |
| [CustomField7] | Value stored in CustomField7 |
| [Email] | Email Address |
| [ShippingFirstName] | Shipping Address First Name |
| [ShippingLastName] | Shipping Address Last Name |
| [ShippingCompany] | Shipping Address Company Name |
| [ShippingAddress1] | Shipping Address Line 1 |
| [ShippingAddress2] | Shipping Address Line 2 |
| [ShippingCity] | Shipping City |
| [ShippingState] | Shipping State |
| [ShippingPostalCode] | Shipping Postal Code |
| [ShippingCountry] | Shipping Country |
| [ShippingPhone] | Shipping Phone |
| [ShippingDayPhone] | Shipping Day Phone |
| [ShippingEveningPhone] | Shipping Evening Phone |
| [BillingFirstName] | Billing Address First Name |
| [BillingLastName] | Billing Address Last Name |
| [BillingCompany] | Billing Address Company Name |
| [BillingAddress1] | Billing Address Line 1 |
| [BillingAddress2] | Billing Address Line 2 |
| [BillingCity] | Billing City |
| [BillingState] | Billing State |
| [BillingPostalCode] | Billing Postal Code |
| [BillingCountry] | Billing Country |
| [BillingDayPhone] | Billing Day Phone |
| [BillingEveningPhone] | Billing Evening Phone |
| [Total] | Total amount for the order |
| [Shipping] | Shipping amount on order (includes handling charges) |
| [SubtotalAndShipping] | Combined amount for order subtotal and shipping |
| [Subtotal] | Amount for items (after any discounts, if any) |
| [SubtotalBeforeDiscount] | Amount for items in the order before discounts |
| [Discount] | Total of applied discounts |
| [totalquantity] | Total quantity of items in order |
| [coupon] | Coupon code of applied coupons |
| [ProductIds] | List of Item ID's in the order |
| [ProductQuantities] | Quantities of the items in the order |
| [ProductCosts] | CSV list of the total line item cost of what's in the cart. |
| [ProductCostsWithoutDecimal] | CSV list of the total line item cost of what's in the cart, without decimals |
| [ProductDescriptions] | The configured item description of item(s) in the order |
| [CustomerServicePhone] | Customer Service Phone for the screen branding theme applied during checkout |
| [CustomerServiceEmail] | Customer Service email address for the screen branding theme applied during checkout |
Q: Can I fire tracking code on the upsell page instead of the receipt?
A: No.
Reason: During the upsell process, UltraCart has not attempted a payment or generated an order ID. If you try to fire a conversion pixel on the upsell page then you will suffer the following limitations:
- You will not have an order id to pass to the 3rd party.
- You will not know that the payment was successful and could fire it when a declined card happens which would result in the affiliate expecting to get paid.
- You would not be accounting for the full revenue of the order.
Q: Can UltraCart fire the conversion pixels when the upsell closer generates the order in the background?
A: No.
Reason: The upsell closer is a background process that turns idle abandoned carts from the upsell process into orders. Conversion pixels are typically JavaScript code and have to be fired by the same web browser that contains the cookies originally set for the conversion to be tracked properly.
Q: Is there a way to track affiliate sales for upsells that abandon?
A: Yes, if you use UltraCart's internal affiliate system.
Reason: UltraCart's affiliate system persists the information normally stored in only cookies by other affiliate systems onto the actual shopping cart record. When the upsell closing process occurs, UltraCart is able to account for the affiliate commission as well.
Q: I have to have XYZ third party affiliate system. What can I do about tracking?
A: Make the upsells reasonable. Customers want to see their receipt. If you don't make the customer watch a 30 minute video before you allow them continue through the upsell then the customer will typically drive to the receipt (clicking no on everything they don't want). Also, don't make the upsell sequence feel like the Upsell Guantlet of Doom that the customer thinks will never end. Show them a few upsells and generate the additional revenue.
Q: I need to bypass the default upsell after path for a specfic item purchase link, can I do that?
Sometimes you may need to by-pass your configured upsell offers.This can be accomplished by creating an additional upsell after path, configured with none of the steps enabled within the path and saving the path with zero percent traffic. Then on the buy link of the item, append the new "empty" upsell after path to the buy link URL using the "upsellPathCode" parameter:
Q: I have an upsell offer that has options on it and its not running during the checkout process even though it meets the trigger and suppression criteria, why is that?
A: The upsell after tool supports options on the upsell item only if the option is a drop-down list. No other option types are not supported at this time and will be suppressed during the checkout.
Q: We are a long time merchant. We are presently have upsell after offers configured and they are going through the Screen Branding Themes checkout, using a custom API checkout form on the front-end. How does the Upsell After offer integration differ among the various implementations? (Custom Checkout and legacy screen branding themes, and newer storefronts themed checkouts?
A: There is no real difference in functionality between the legacy screen branding theme based checkout and the Storefront themed checkout, as it applies to the Upsell After Offer portion of the checkout process (other than the actual layout of the Upsell After offer screens. You'll definitely want to migrate towards the SF from the legacy as it gives a superior mobile experience.
You can determine which upsells that a customer sees by configuring a path:
https://ultracart.atlassian.net/wiki/display/ucdoc/Upsell+After#UpsellAfter-Paths
You may configure one path that is suitable for brand A and another path that is suitable for brand B.
To trigger a specific path, there are two ways to accomplish this:
• Legacy Screen Branding or StoreFront checkout pass the UpsellPathCode parameter to the UCEditor buy link URL:
https://ultracart.atlassian.net/wiki/display/ucdoc/Parameters+that+can+be+passed+to+UCEditor
• REST Checkout API set the upsellPathCode property on the cart and perform an update prior to the checkout handoff call.
https://ultracart.atlassian.net/wiki/display/ucdoc/UltraCart+REST+Checkout+API#UltraCartRESTCheckoutAPI-Cart
As you can see from this documentation, paths can be specified regardless of the checkout methodology that you’re employing.
Enabling Legacy Screens
If you have a list of questions regarding StoreFronts, let us know and we’ll get those answered as well. If you just really like the legacy screen branding approach, our support can enable access to that functionality on newer accounts for you. We discourage using it since StoreFronts is superior, but we understand institutional knowledge and process can be compelling reasons to continue using it.
Related Documents
Advanced JavaScript Methods for Upsell Customization
Customize the Yes No buttons on an Upsell After screen
Multiple sets of yes no buttons on an upsell page
