Adjusting Margins, Borders and Padding
- Jonathan Tew
- Loyd James (Unlicensed)
Understanding the Box
In HTML, all elements are considered boxes. You may even hear people refer to this as the "box model" when reading about design and layout. The visual builder makes working with the boxes easy by allowing control over the Margin, Border and Padding settings. Before diving in to changing the settings, let's go over what the box model looks like visually.
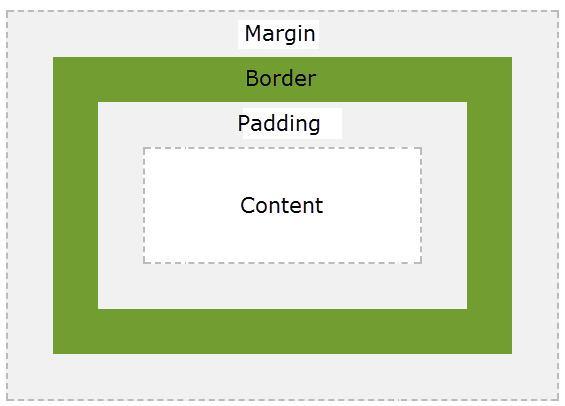
There are really a few things to understand about the diagram above:
- Padding adds space between the content of the element and the border.
- Background colors/images only cover the Content and Padding areas described above.
- Margin pushes the element away from the surrounding elements on the page helping to create space.
With these simple concepts in mind, you are ready to adjust the way elements look on your page without knowing any HTML or CSS!
Margins
After opening the Element Settings, most elements will contain a Margin, Border and Padding sections. Let's cover Margin first. The section will look like this:
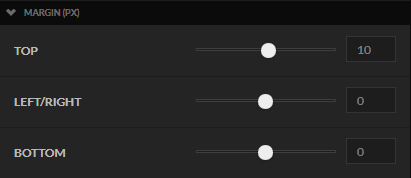
You can adjust the margin for the top, the sides, or bottom by dragging the slider or by entering a new number into the input field. Since the element will adjust in real-time, it's easy to drag the slider around to see what you think looks good.
It's also worth noting that all margin values are in pixels.
You might notice that the slider is in the middle even when the value is at zero. The visual builder allows for negative margin which is an advanced concept used to pull elements over the top of other elements. If you're interested in reading more about negative margin, we'll leave that up to Smashing Magazine's Definitive Guide to Using Negative Margin.
Borders
Borders are a great way to divide two elements on a page visually. The border section of the settings looks like this:
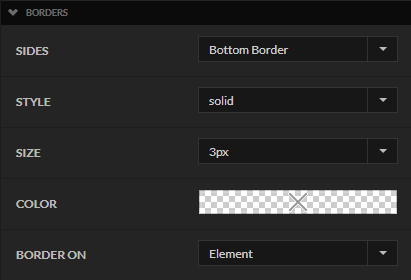
You can control which sides the border appears on. For example if I'm working with a headline and set the border to the bottom only I can achieve this look:

I can then quickly adjust the Size of the border from the default of 3px to 1px and achieve this look:

There is also a color setting for the border. See Changing the Color of Elements for more information on how to adjust colors. The final border setting we want to talk about is "Border On". Some elements such as headline allow you to move the border from the element to just the Text. By changing Border On to "Text" we can achieve the following look.

Padding
The padding settings for an element looks like the screenshot below.
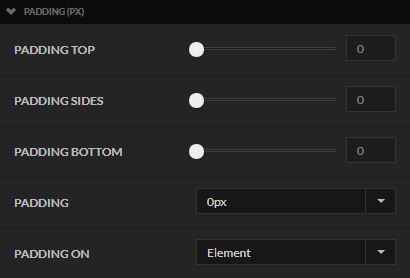
You can control individual padding on the Top, Sides or Bottom using the first three settings. Alternatively there is a forth setting labeled "Padding" which gives you a way to set the padding to 5, 10, 15, 20 or 25 pixels on all sides. Let's take a look at a headline element with a complete border around it, but no padding.

By changing the Padding setting to 15 pixels, we can quickly achieve this look:

Similar to the Border, we can choose to put the "PADDING ON" only on the text. Typically you will only do that if you're also putting the "BORDER ON" to the text as well. For fun let's look at what moving the padding and border to the Text instead of the element would look like on this headline.
