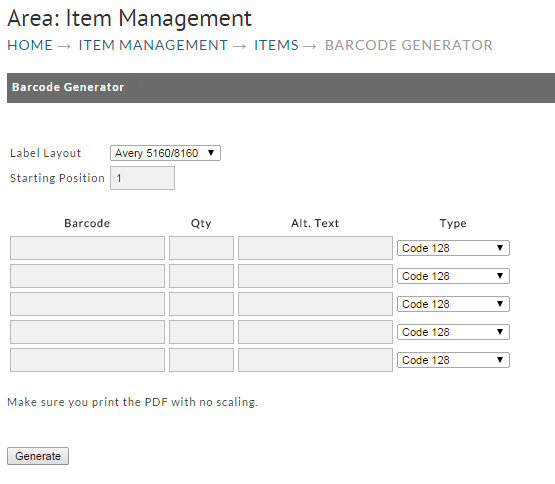
Barcode Generator
- Perry Tew
- Hunter Schaeffer
- Chris Torigian
Introduction
The Barcode Generator Tool in UltraCart allows you to quickly create printable barcode labels for your items. Whether you're managing inventory or streamlining fulfillment, this feature provides a simple way to generate barcodes using the supported Avery 5160/8160 label layout.
Prerequisites
Prerequisite: Ensure your items have valid UPC or EAN codes saved under the Item Editor tab if you intend to use those as barcode data.
Access to your UltraCart account
Items already created in Item Management
Avery 5160/8160 compatible labels
Printer capable of printing on label sheets
Step-by-step Instructions
Option 1: Generate Barcodes from Item Management
Main Menu → Items → Item Management
Navigate to Item Management
Go to Main Menu → Items → Item Management.Select Items
Check the box next to each item you want to print barcodes for.Click the Barcode Icon
In the upper-right corner, click the Barcode icon to open the generator with your selected items pre-loaded.
Set Quantity and Alt Text
Qty: Specify how many labels you want for each item.
Alt. Text (optional): Enter custom text to appear below each barcode. If left blank, the barcode data will be used.

Set Starting Position
If using a partially used sheet, set the Starting Position to determine which label to print on first (left to right, top to bottom).Click Generate
Click the Generate button. A new window will preview the PDF.Print Your Labels
In the print dialog:Set Page Scaling to None.
Print the labels using Avery 5160/8160 sheets.
Tip: Test print on plain paper before printing on label sheets.
Example

(Screenshot image showing the selection and printing process for barcode from the item management area, by selecting the item or items and then clicking the print barcodes icon.)
Barcode Generator Form
You can also navigate to the Barcode Generator page and manually enter the itemID's, quantity, Alt Text, and select the barcode type (i.e. "Code 128") then click the 'Generate' button.
Main Menu → Items → Tools → Barcode Generator [link]
Complete the following fields to set up your barcode printing:
Label Layout - Avery 5160/8160 is the only label format.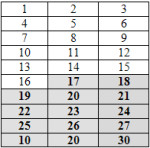
Starting Position – If you want to begin printing at a certain point (usually in the case of a partially used sheet) indicate which label to begin at in this field. Count labels left to right starting in the upper left corner. For example, to print labels in the shaded area of the sample on the right, you would enter "17" as a starting point.
There are four pieces to the Barcode:
| Name | Discription |
|---|---|
| Barcode | enter your barcode data (typically the UPC or EAN number). |
| Qty | enter how many labels you want printed of this particular barcode. |
| Alt. Text | whatever you enter here will be printed along with the code. |
Type – From the drop-down menu, select the type of linear barcode you want to use. The default is Code 128.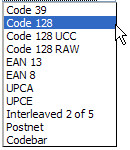
Make certain your "page scaling" in the PDF print dialog box is set to NONE. Click the "Generate" button when ready to print. Your browser software should display a preview a new window. Select "Print" from the File menu to print. Don't forget to load the labels in your printer.
Question: what is encoded into the barcode? Is it simply the itemID or is there additional information encoded into it?
Answer:
The barcode on the item tab of the item editor is typically a 12 digit number representing the item UPC code. (See UPC Barcodes for more details.) After processing barcodes using the barcode generator, the barcode on the top of the packing slip is the OrderID, and the Item UPC code is the only thing in each individual barcode.