Loyalty Program
- Chris Torigian
- Hunter Schaeffer
- Loyd James (Unlicensed)
- Jonathan Tew
Overview
The new UltraCart Loyalty System allows you to setup a loyalty program where your customer(s) can earn points based on the purchases they make. Your customer can then use these points to receive discounts in the form of coupons or gift certificates on future purchases. The configuration has three basic areas for now: Tiers, Rewards, and Campaigns. We will go over each section below in more detail.
To setup the Loyalty progam, navigate to:
Main Menu → Configuration → Checkout → Loyalty
Below is the page you will see when you first navigate to the Loyalty page. We will go into more detail about each section below.
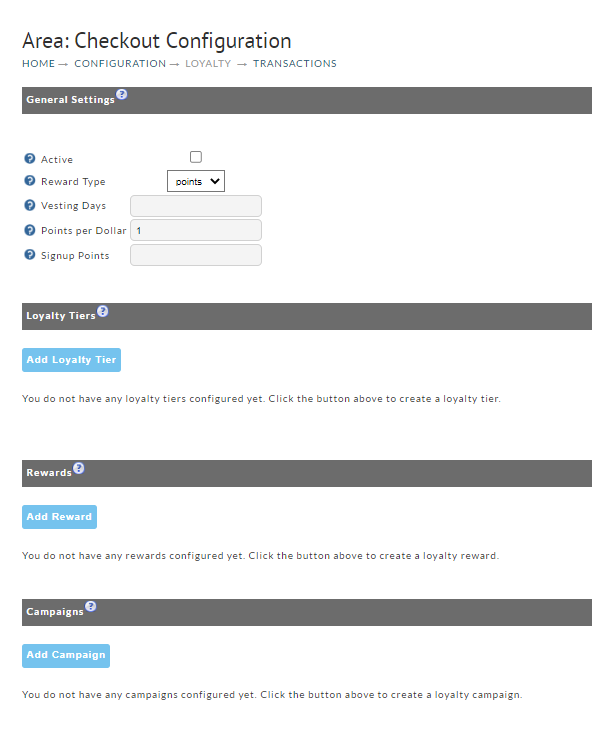
General Setting
| Field Name | Description |
|---|---|
| Active | Enable the Loyalty Program to be active. |
| Reward Type | Points or Cash |
| Points Per Dollar | The number of points the customer will earn for each dollar they spend. |
| Signup Points | The number of points the customer will earn just for signing up for the loyalty program. |
| Vesting Points | The number of days before the points become available for the customer to us. |
Loyalty Tiers
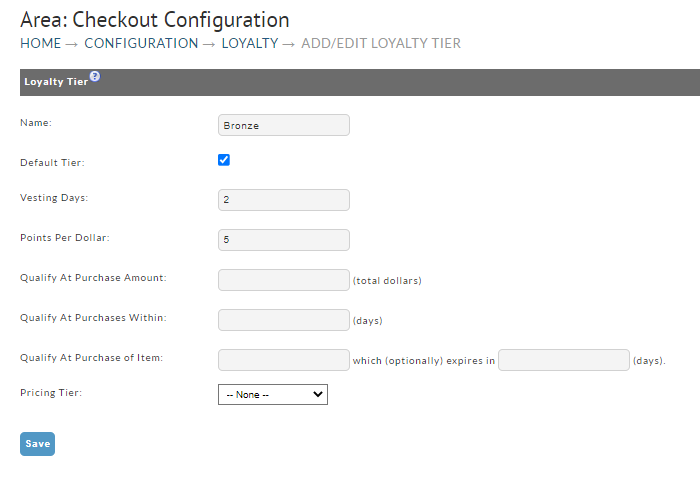
Allows you to setup different loyalty tiers for customer so that one group can earn more points or have different rewards. Simply click on the "Add Loyalty Tier" button to be taken to the setup page as shown below. This section will look different based on the Reward type. Below is an example of both types.
Points
Cashback
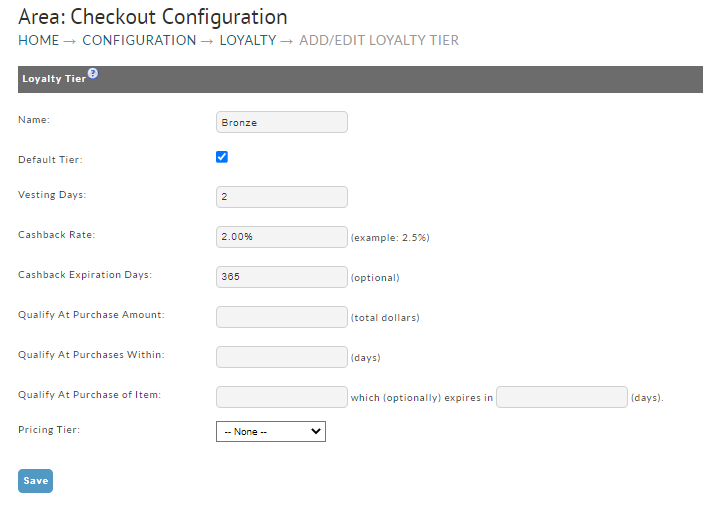
| Field Name | Description |
|---|---|
| Name | This is will be the name for the tier that is created. |
| Default Tier | Determines if this tier is the Default or not. All new customers will start with the Default Tier. |
| Points Per Dollar | The number of points the customer will earn for each dollar they spend. |
| Cashback Rate | The percentage of the customer order they will get back as cashback / gift card. |
| Vesting Days | The number of days before the points become available for the customer to use. |
| Qualify at Purchase Amount | Customer will qualify for this tier when their purchase amount exceeds this dollar amount. *This is an accumulative threshold |
| Qualify at Purchase Within | Customer will qualify for this tier if they have a purchase within this number of days. *This is an accumulative threshold |
| Qualify At Purchase of Item | The customer will only receive points / cash if they purchase the item listed. |
| Pricing Tier | The customer is assigned to this pricing tier when they qualify for the reward tier. |
Rewards
Allows you to setup the different rewards a customer can earn using the points they have earned.
This only applies to reward points. You will not see this section if you are using the Cashback method.
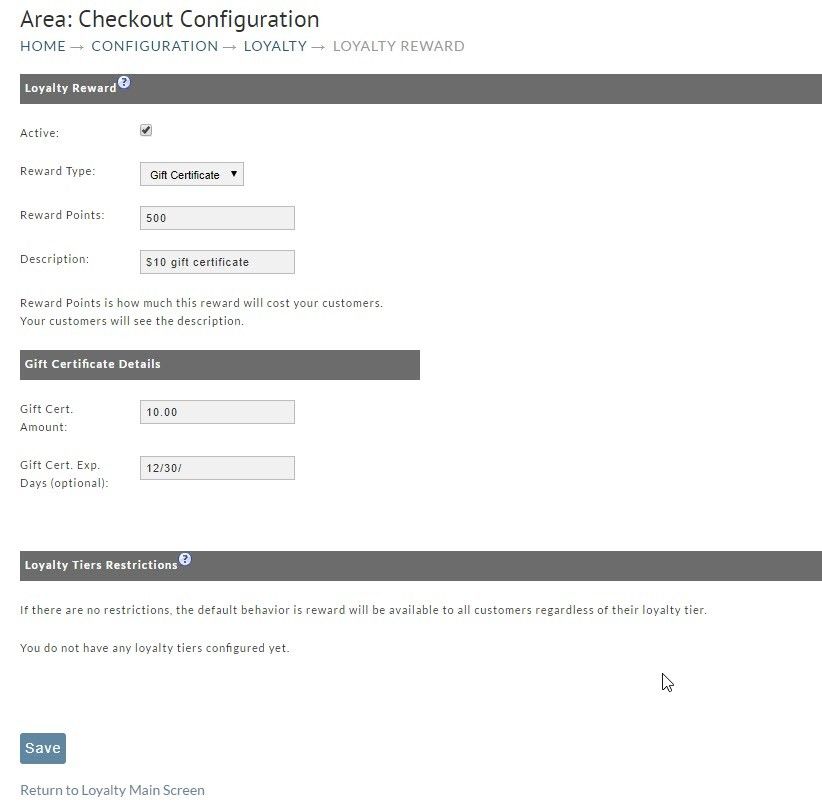
| Field Name | Description |
|---|---|
| Active | Determines if this reward is active or not. |
| Reward Type | Can currently set the reward type of Coupon or Gift Certificate |
| Reward Points | The number of points needed to redeem this reward. |
| Description | The Description the customer will see for this reward. |
| Gift Cert. Amount / Coupon Code | Depending on the reward type, the customer will either receive a coupon code or a gift certificate amount. |
| Gift Cert. Exp. / Coupon Exp. Days | The number of days the customer has before this reward expires. *Optional. |
Customer View in My Account Customer Portal
The customer can view their accrued Loyalty Rewards points by logging into their My Account Customer Portal customer profile.
- The customer logs into the "My account, Customer portal"
- They click on 'Loyalty Reward' in the My Account menu
- They will see a summary of the 'Current Points' and also 'Points needed for next reward'. Available rewards appear just below the points summary section.
- If there are available rewards appearing, the customer will click the 'Claim Reward' button.
- The claimed reward will appear in in the next section 'Claimed Rewards'
- The customer can begin the shopping with the coupon by clicking on either the coupon description or coupon code (they are both hyperlinked), which will apply the coupon to the cart for immediate shopping/redemption. (Alternatively, they can copy the code and enter it into the apply coupon field in the shopping cart checkout.)
StoreFront Theme
You must be running an update to date StoreFront Visual Builder based theme such as Element, Hero, Lifty, Jewel, Poppy or Natural VB or Native. The MyAccount loyalty functionality is not present in non-visual builder themes like MrTeas.
Ledger Entries in the Customer Profile Editor
Please note that since this is a ledger, there isn't a delete option, you’ll enter either positive or negative entries to make adjustments to a customers' cashback or points totals.
The location of the ledger entry differs for Cashback and Points programs, se below for details.
Loyalty Cashback Ledger Entry
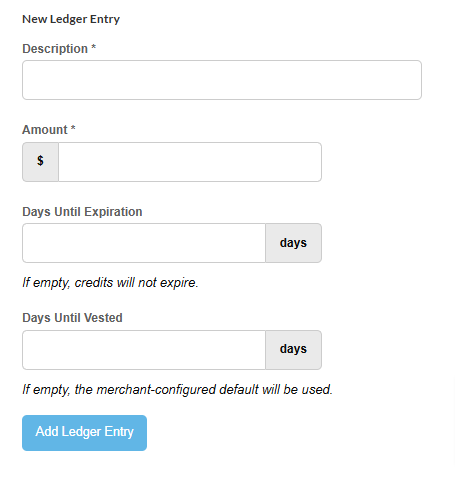
The Ledger Entry tool allow for manual adjustments to the customer profile Loyalty / Cashback ledger
FAQ:
Q: How can we cancel a credit that has been applied to a customers' cashback ledger?
A: To cancel a credit to a customer profile:
Navigate: Operations → Customer Profiles → Manage
Find the customer profile and click edit
Click on the Accounting/Tracking tab
Scroll down and use the "New Ledger Entry" section.
(Note: The amount should be entered as a negative amount to reduce their balance and as a positive to increase their cashback balance.)
Loyalty Points Ledger Entry
For Loyalty points programs, the ledger resides in the Loyalty Program configuration page, not in the customer profile editor.
Main Menu → Configuration → (middle menu) Checkout → (Second section) Loyalty
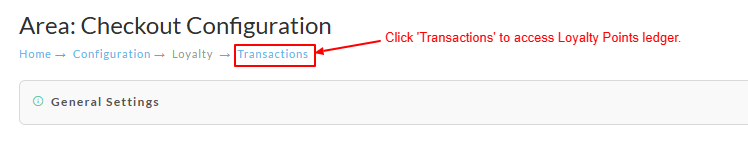
Click 'Transactions' to access Loyalty Points ledger.
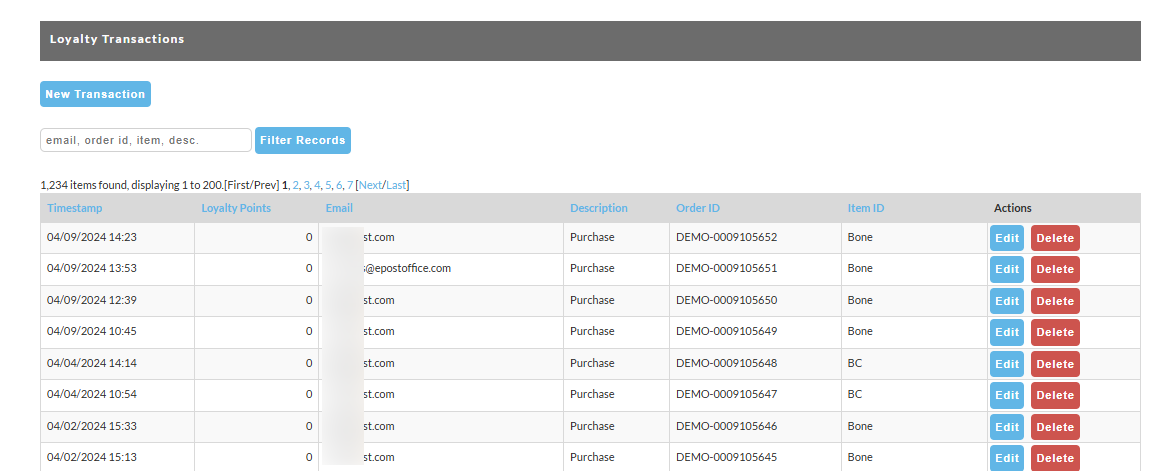
The global ledger is displayed. You can use the filter to filter on the following:
- Email Address
- OrderID
- Item
- Description
To enter a new transaction, click the 'new Transaction' button.
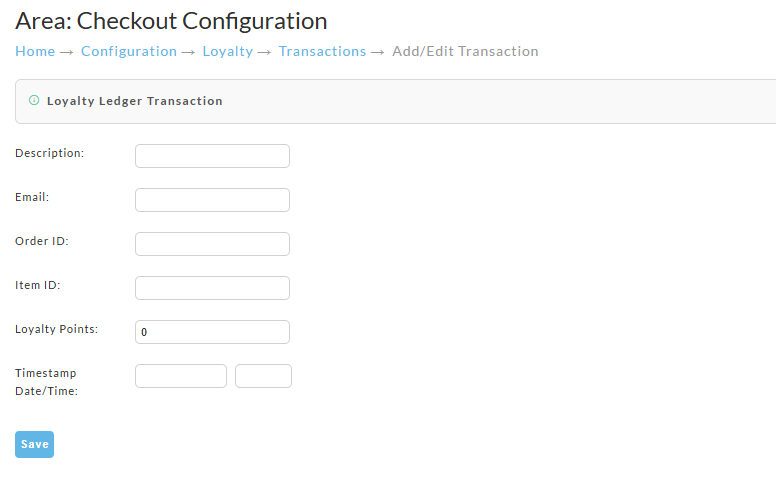
| Field (*Required) | Description |
|---|---|
| Description* | Enter a short description of the ledger entry. |
| Email* | Customer Email Address |
| Order ID | OrderID, if applicable to a specific order |
| Item ID | ItemID, if applicable to a specific item |
| Loyalty Points* | Enter a positive value or negative points, depending upon the desired adjustment |
| Timestamp Date/ Time* | Enter a date and time. If you want the points to be immediately available, backdate according to the number of vesting days you have configured for your point program, other wise enter the current date. |
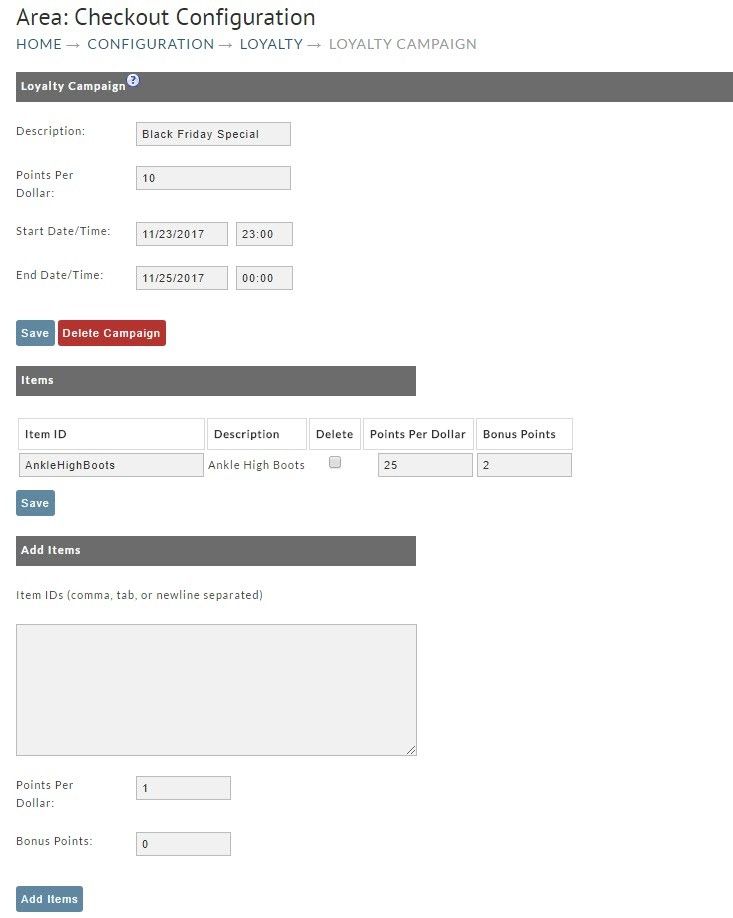
Campaigns
Campaigns allow you to setup specials where customers can earn extra points or cashback from purchases made during a set time period or for a specific set of items. For example; Black Friday sales.
Related Documentation
Issuing a unique coupon to customers to share and earn loyalty cashback