...
| Table of Contents | ||
|---|---|---|
|
Change Log
| Date | Change |
|---|---|
| 07/24/2013 |
|
Introduction
The Back End Order Entry (referred to as BEOE hereafter) is a web application allowing merchants to enter orders for customers. It is commonly used for phone and email orders and is popular among call centers.
...
Navigate to:
| Panel |
|---|
Operations → Order Management Tools (section) Back End Order Entry |
...
→ Manually Add Order |

Requirements
You need a modern browser to use this web application properly.
...
Permissions
Navigation
| Panel |
|---|
There are three User Permissions that govern the use of the BEOE tool.
...
1 & 2 are required to use the BEOE.
| Info |
|---|
#3 above is a new permission as of 7/24/13, created to address the issue of allowing a call center full access to a merchant's customer database through wildcard searches. |
...
Creating a template is easy. At whatever point you're satisfied with the information you've entered and wish to create a template, click the Save as Template button at the bottom of the screen. Give the template a short name and you're done.

The newly created template will appear at the top of the screen as a button.
...
Click Edit Templates at the top of the screen, select the template you wish to delete, and click the Delete Selected button. If you need to change a template, delete it and re-save it.


Item Management
...
To add a single item to an order, use the entry field on the main item table.


As you type, the BEOE will search for matching items. A list will appear below the field with a relevancy score and description. Click on an item from the list to select it.


| Tip |
|---|
Hitting enter in the Item ID field will add the item with a default quantity of 1. This is a quick way to add an item. |
...
Adding Multiple Items at once
To add multiple items at once, click the Add Multiple Items button above the Item table. From there, enter the items and click Apply.


| Info |
|---|
This is a legacy feature from version 1. It used to be a lot quicker than adding a single item one at a time. It's not so much anymore. The single add is much faster. You may use the multiple add field if you like, but it's not a tremendous time saver. |
Item Search
Item search provides "look-up as you type" searching for items displaying a larger table of results. This screen is useful if you have long item descriptions.


Quick Items
Editing Quick Items
Click the Edit Quick Items button at the top of the screen. A panel will display allowing you to add or remove quick items. You may define multiple quick items for the same item using different quantities. This is very popular with merchant at trade shows who are selling a few items in different quantities.


Using Quick Items
- Click the
Quick Itemsbutton. - Select one or more Quick Items. They will turn green when selected.
- Click the
Add Selectedbutton to add those items to the cart.

Customer Management
...
To create an order tied to an existing customer, click the Customer Search button at the top of the screen.


Enter your search criteria and click the search button to find the customer. One or more listings (if found) will be displayed.
Click to select the appropriate one.


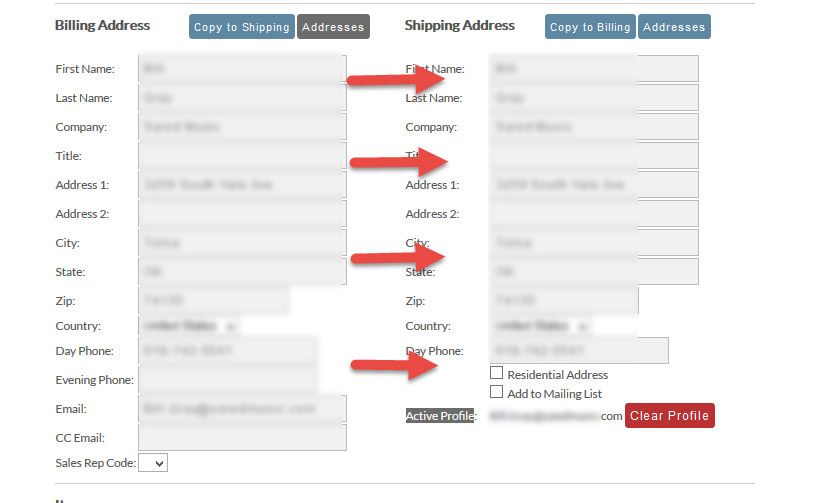
Selecting a Customer Profile Address
...
Clicking an Address button will list all addresses associated with a customer profile. Click an address to load it into the order.


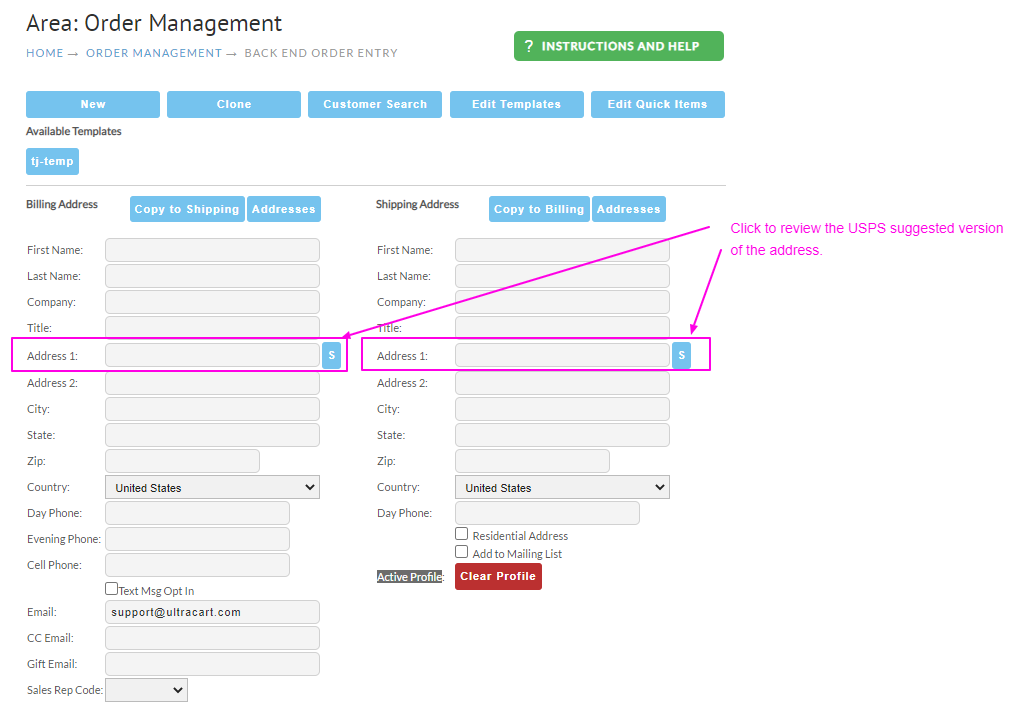
Address Standardization
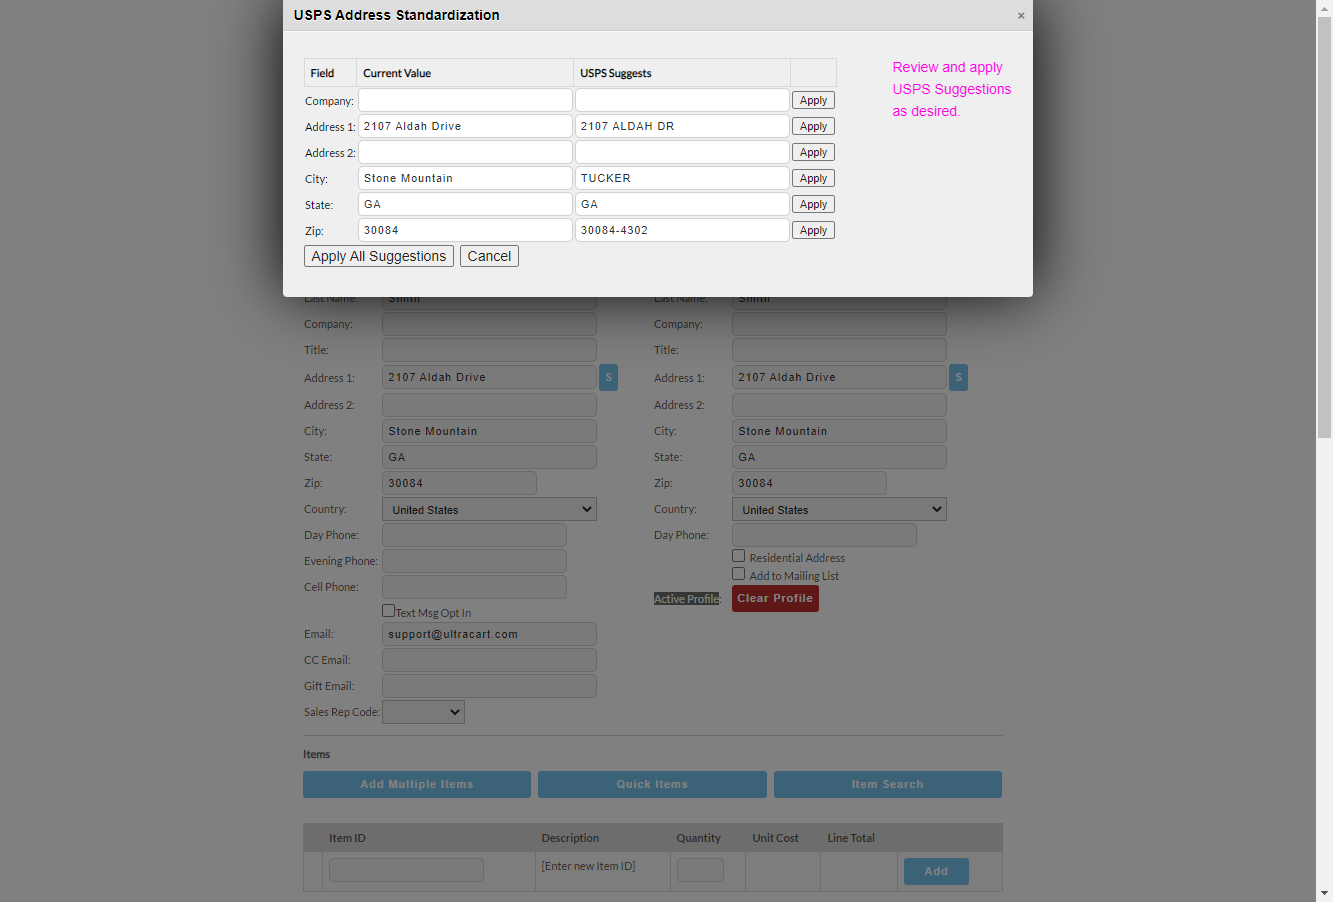
In the Billing Address and Shipping Address section, the blue 'S' Button to the right of the Address 1 field, is the "Standardize" button. Clicking this button will open a popup window that will show the address as entered and the suggested address based on the U.S.P.S. Address Standardization API. You can use this to update the enters address to match the way it appears in the U.S.P.S. database.
The Standardize pop-up will appear like this:
Smart linking by Email
...
If you enter an email belonging to an existing customer, a link icon will appear next to the customer.


Clicking on the link will activate the customer profile for the current order.


Creating a new Customer Profile
Creating a new customer profile is a passive act. All that is required beyond a normal order is a password. If you supply a password, then a customer profile is created when the order is placed.


| Note |
|---|
You cannot change passwords with this field. You may only establish new customers. |
...
To remove a customer profile from an order, click the Clear Profile button next to the profile indicator at the bottom of the shipping address section.

SMS Opt-in
The customer can be opted into SMS for enhanced shipment tracking as well as SMS marketing campaigns and flows via Storefront Communications.

Miscellaneous Section

| Field | Description | ||
|---|---|---|---|
| SBT/Storefront | Select the SBT/Storefront with which the order should be associated. | ||
| RTG Code | If you have rotating gateways configured, use this field to assign the gateway that should be use to process the order. (If not selected, the gateway will be selected based on the traffic allocation or item level assignment.) | ||
| Advertising Source | If applicable, select the advertising source from the drop-down list. | ||
| Affiliate Priority Code | This field is used to validate the a priority code that is provided by the customer. For more regarding affiliate priority codes, see: Merchant Links#PriorityCodeScript | ||
| Pricing Tiers | Manually assign a pricing tier pricing to the order.
| ||
| Password | |||
| Gift Message | For gift orders, enter the gift message here. | ||
| Coupons | To apply regular coupon(s) to an order, one at a time, select the coupon code from the drop-down list. | ||
| Gift Certificate | When applicable, enter the gift certificate here. |
Payment Processing
At the bottom of the BEOE application is the payment processing section. There are a series of buttons that look like this:
...
Credit card is your most popular form of payment. The credit card number field can contain dashes if you like to enter the card number in that format. While the CVV2 (Verification Number) may be required for your regular customers, you do have the option to not require it in the BEOE application. This will skip the validation on the UltraCart side of the processing. You payment gateway may still decline the order for CVV2 not present depending upon how it is configured. The three checkbox options are worth elaborating on further.
| Option | Description |
|---|---|
| No real-time charge | This will capture all of the order information and send the order to Accounts Receivable for review and later processing. Please note that when using this option, the CVV2 will not be stored on the order for PCI compliance reasons. |
| Skip processing | When this option is checked the order skips the payment processing phase and moves on to shipping. This means that you are not collecting any further payment from the customer. |
| Skip Fraud Score | When this option is checked, all of the fraud prevention rules that you have configured on the account are bypassed. |
Cash

Use this method when taking cash payments are a customer present environment. For example if you are processing orders at a trade show booth with the BEOE running on an iPad.
...
When an order has finished, a receipt will display on the screen for easy printing.
...
Troubleshooting Shipping Tool
The back-end Order Entry tool is useful for troubleshooting your shipping configuration. Upon calculating shipping you find a hyperlink that will appear just below where the available shipping methods would be listed titled "Packing Solution". This link will provide you a snapshot of the underlying details used to perform the shipping estimate calculation.