Versions Compared

Key

  • This line was added.
  • This line was removed.
  • Formatting was changed.

Table of Contents

...

Section NameDescription
Status

The Status field indicated the current status of the auto order as:

  • Enabled
  • Disabled
  • Cancelled by Customer
  • Cancelled by Merchant
  • Cancel After


To modify that staus of the order, select the new status from the drop-down list , then click the save button at bottom of the page to save the changes.

Affiliate

The Affiliate section displays a field for "Override Affiliate ID", where you can enter an affiliateID to the order.

Payment Information

The Payment Information section is the section where you'll be able to update the customers credit card details, as well as review or edit the Billing Attempts and Next Billing Attempt date.


The number of billing attempts will determine when the auto order will automatically disable due to failed processing attempts.
See: Auto Order Processing#RetrySettings

This field indicates the next date the credit card will be processed after failure. The default is every 3 days. If the card fails after 3 attempts, the Auto Order will be set to inactive (the check mark in the Enable Field will automatically be removed).

Billing (Address)The Billing section allows you to review and edit the billing address for the future orders.
Shipping (Address)The Shipping section allows you to review and edit the shipping address for the future orders.
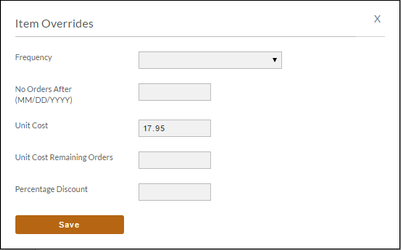
Items

The Items section is where you can review and modify the rebill item(s) as well as the rebill schedule.

In this section you can:

  • Add additional items to the auto order

    Info
    titleAdding a one time item to an existing auto order record

    Non auto order configured items can now be added into an existing auto order record. 

    1. Click the 'Add' button then enter the single purchase itemID into the dialog window then click the 'add' button in the dialog window.
      You'll see a message iin a blue infomation box after the item as been added stating:
      "Added XXXXXX to order. Adjust the next shipment date from the default, etc."
    2. Scroll down to the items section and adjust the next shipment date to match the existing items in the customer s auto order record. (It will initially be set to "01/01/2030", so if you do not edit the "next shipment" date the items will not be properly synced.
    3. Next, click the "edit" button in the "Overrides" column, which will initially be set to "Frequency: Monthly", then enter into the "No Orders After (mm/dd/yyyy)" field enter a date after the next order processes, then save the changes.
    4. Click the save and reload button and then inspect the Future tab to confirm that the next order shows the correct rebill schedule.


  • Modify the Quantity of existing items in the auto order.
  • Change the Next Item ID for the future order.
  • Change the Next Shipment Date (or processing date for non shippable auto orders.
  • Review and modify the Next Preshipment Notice
  • Review and modify the Number of Rebills so far
  • Apply the following Overrides →

Image Modified

Frequency - Use this drop down menu to apply a new frequency for the auto orders.

No Order After - Use this to set a date into the future that will end the auto orders. This is often used when a customer calls to cancel but agrees to one or more orders before cancelling.

Unit Cost - Use this to override the defaulted cost of the item.

Unit Cost Remaining Orders - If you have applied a Unit Cost override that is only temporary, enter the number of future orders the overridden unit cost should apply before reverting back to the defaulted item unit cost.


Info
If the Unit Cost has been overridden and the Unit Cost Remaining Orders is left blank, then the overridden unit cost will continue for the remainder of the active auto order.


...