Review Orders Screen
The Review Orders screen is the main order search and invoice viewing tool for your order records.
Navigation
Help! My records trail off the screen!
1. Go full screen (instructions are below)
2. Use the Column and Row orderings tools located int he "Result Display Settings" that appears in the search results page (See section below.)
3. There's a scroll bar at the bottom of the orders list. Use that to see the columns trailing off the screen along the far right side of the page.
A Tour
As part of our site redesign, we've added some new features to the merchant site. Here's a tour of the Order Review features in case you're unfamiliar with them.
Full screen mode
To the far right side of the "View all orders (in any stage)" search page, you'll see a button labelled "Toggle Full Screen". Clicking this image will toggle full screen mode. This will not affect your browser window size, but it will hide the UltraCart title and navigation sections, freeing up real estate for result sets. The web page will store a cookie saving your preference for full screen (or not). 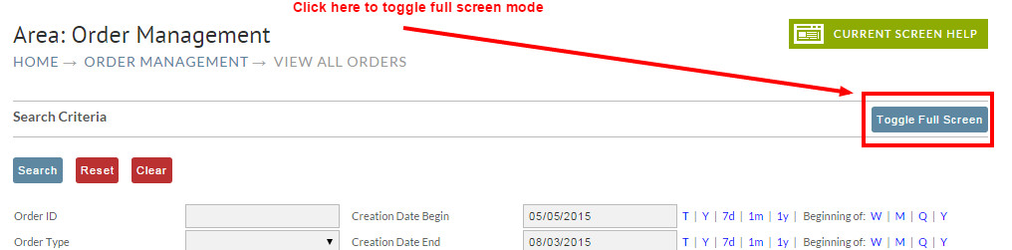
Filter Options
The filter options allows you to specify which records you wish to see. The fields below are mostly self explanatory.
The Order ID field accepts wild cards (asterisks), so you may search for an order using leading asterisks (*19452), trailing asterisks (2010*), or both.
Clicking Display Results Below will generate an html listing on the same page. This listing will respect both the Row and Column Ordering you specify (see below for ordering details). Clicking the Download Report button will spawn a PDF report to a new window. It will respect your Filter Options and Row Ordering, but will not consider any Column Ordering or hiding. Is this something you desire? 
Row and Column Ordering
The Row and Column Ordering panel contains two lists. The first is Column Ordering, the second is Row Ordering. Column Ordering affects which columns appear on a report and in which order. Row Ordering affects the order of the data. The Row Ordering is passed to the underlying database queries. Examples showing the effects both follow. 
The lists operate in the same manner. Drag and Drop the fields up and down to change their order. For example, in the picture below, Email is the third column on the report. 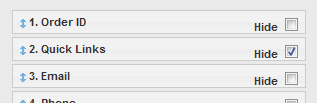
To move it to the second position, I click on it and drag it upward. 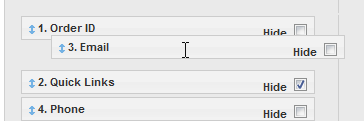
Notice below, that when I drop it, the order has changed, and the fields have re-numbered themselves. Email was No. 3, and is now No. 2. 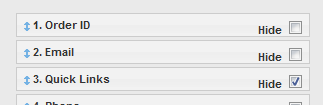
Column Ordering also has the additional feature of a hide checkbox. Clicking the checkbox will hide a column from a report.
The Effect of Column Ordering
The default report shows 23 columns of data. Unless you have a monitor running a resolution 1900 pixels wide, that crams up the screen with data. In the screenshot below, the data is literally spilling off the page. Tsk tsk. 
So, let's eliminate some fields we don't need, while at the same time, shifting important fields fields to the left of the report.
For a fictitious example, consider my needs as follows:
- I only do business in the United States, so I don't care about the Country fields. I hide them.
- Many of my customers are individuals, so the Company fields provide little value. I hide them too.
- For the same reason above, Bill To Name and Ship To Name are usually the same. I hide one of them.
- Of the dates, I'm only concerned about Payment Date. I'll hide the other two.
- I'll also hide RMA. I don't need it for this report.
- I wish to feature Bill To State and City more prominently, so I'll shift them to the front of the report.
Here's what my Column Ordering will look like: 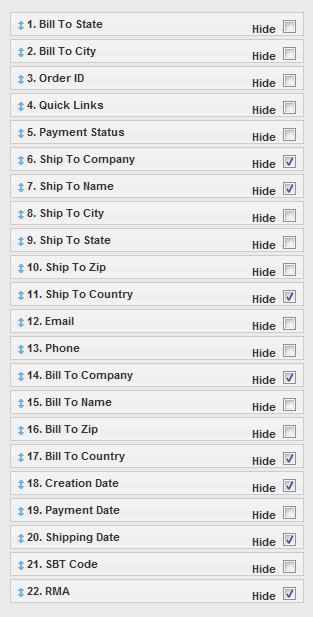
After clicking Save Changes and reloading, my report is much smaller and will display on lower resolutions. And it contains only the information I need. 
The Effect of Row Ordering
While the Column Ordering changes I made above are good, I wish to sort my report by State and City. So I'll make the following changes to my Row Ordering, save them, and reload my report.
Before I make these changes, my report sorts by the default of Order ID (descending). 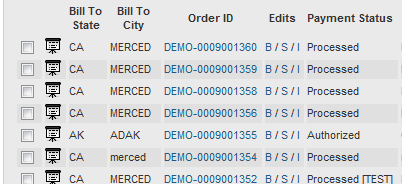
After moving state and city to the top... 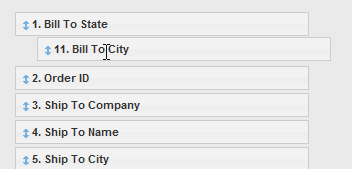
My report contains the sort order I desire. 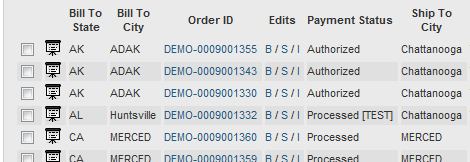
Order Slide Show
The Slide Show is a panel that displays a single order along with applicable actions that may be performed against that order. The actions display to the left of the order.
Beyond just being able to quickly review orders, the big benefit of the slide show are the checkboxes at the top. 
The slide show checkboxes are tied to the checkboxes in the Orders panel below. So you may browse your orders, and check ones you wish to display in detail.
Starting a Slide Show
You may begin a slide show three different ways:
1. Click the slideshow icon for an order. 
2. Click an order ID. 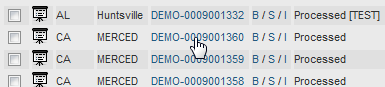
Moving through a Slide Show
To move forward or backwards in a slide show, click the order IDs at the top of the panel. There are usually three Order IDs displayed: 1) previous order in the list, 2) current order, and 3) the next order in the list. 
Click the previous or next order will display that order. Clicking the current order will refresh the currently displayed order (if you wish to do that for whatever reason).
Performing Actions
Single Order Actions
Actions against a single order may be done by displaying an order in the slide show and clicking an action to the left. Please note that actions will open a new window. 
Action Group | Action | Description |
|---|---|---|
Edit |
| |
customer information | This button allows you to edit the billing, shipping, coupons, taxes, items, and other attributes about the order. | |
items | This button takes you straight to the item editing for the order. It's provided as a shortcut | |
Payments |
| |
chargeback dispute | If you have configured UltraCart to handle chargeback processing, this will initiate the dispute process. | |
complete refund | Start the refund process out with a complete refund of the order. This is typically used when an order is returned and the merchant wants to provide a 100% refund. | |
complete refund (then reject) | Start the refund process out with a complete refund of the order, but when the refund is successful reject the order at the same time. This button is typically used to refund the customer and cancel the order right after a customer has placed it and changes their mind. | |
partial refund | Initiates the refund process. The merchant will decide how much of the order is refunded. | |
remove buySAFE bond | Removes the bond from the order and cancels it with buySAFE. This button should only be used if the payment has not been processed. If the payment has already been processed then the partial refund button should be use to refund just the bond. | |
resend receipt | Resends the receipt email to the customer | |
transaction history | View all the transaction history records stored by UltraCart. This is where you can find the gateway transaction ids, etc. | |
| ||
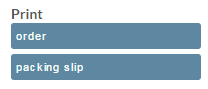
order | Reprints a PDF of the order. Useful for accounting purposes. | |
packing slip | Reprints a PDF of the packing slip. | |
reprint labels | Reprints any labels generated through label servers like Express1.com as a PDF file. Use this if the printer acts up and destroys the original copy. | |
Shipping |
| |
packing solution | Provides a copy of the packing solution so the merchant can see how UltraCart recommends packing the order. Useful for large shipments and troubleshooting configurations. | |
resend shipment confirmation | Resends the shipment configuration email to the customer including any tracking numbers that have been entered. | |
| Assign RMA # | Allows you to assign an RMA number to the order. The RMA number will be added to the order record and is a searchable field in the "View all orders" search page. (*This feature is under development.) | |
retransmit to dist. center | If the order is being handled by a fulfillment house, this button will resend the order to the fulfillment house. | |
Tools |
| |
| assign to affiliate | Assigns order to an affiliate using either their affiliate ID or email address associated with their affiliate account | |
| auto order | Opens the Auto Order editor. | |
| beoe: clone order | Clones the order details to the beoe in order to create a new order. | |
| beoe: clone w/out items | Clones the order details to the beoe in order to create a new order, excluding the items from the previous order. | |
cancel auto order | Cancels any auto order that this order is associated with. This does not have to be the original order in the sequence. | |
auto order | Takes the user to the auto order editor if one is associated with this order. | |
Allows copying of the order. | ||
copy to new cart | Generates an HTTP link for a new cart with the same contents and information as this order. | |
copy to short link | Generates a bit.ly shortened HTTP link for a new cart with the same contents and information as this order. | |
ebay Data | If this order is associated with eBay, this button will display all the XML information received from eBay to generate the order. This is good for troubleshooting any eBay orders. | |
digital delivery reset | Reset the download counters for the order and resend the customer a new download link. | |
digital delivery report | A report of the download attempts for this order. | |
establish fraud filter | Sets up new fraud filters based upon the credit card information, address information, and IP address of the customer. | |
assign to affiliate | Associate this order with a specified affiliate. | |
remove from affiliate | Remove the commission for this order from the associated affiliate. | |
replacement shipment | Initiates a replacement shipment based upon this order. | |
resend EDI confirmation | Resends advanced shipment notices (ASN) and invoices to the EDI trading partner associated with this order. |


Bulk Order Actions
You may perform certain actions against a large number of records by selecting (checking) those records in the Orders list and clicking one of the buttons at the top of the panel. 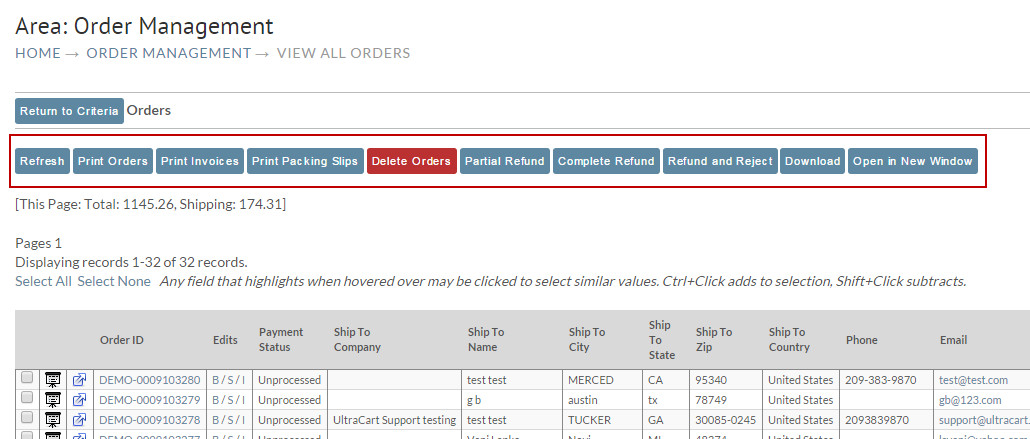
Payment Status
The order list has a Payment Status column, below is a description of the various statuses listed in that column:
| Status | Description |
|---|---|
| Unprocessed | Placed order in either Pre-orders or Accounts Receivables (or marked as 'skip payment processing from A/R department) |
| Authorized | Placed order that has a credit card authorization but has not performed the capture the pending authorization. Typically this has to do with the "Auth then Capture" authorization model, in which the authorization occurs during the initial payment of the order and the capture occurs when the order is marked as shipped in the shipping department. |
| Approved | A placed order of a payment type that requires either manual or automatic approval, such as:
|
| Declined | An order sent to the A/R due to the payment being declined. Decline related settings See also: Also, if you have upsell after offers configured, orders captured during an auto closing of an upsell after can be designated as declined: Upsell After |
| Quote Received | An order was created using the "Quotation" selection during checkout, which is awaiting review and approval.(See Quotes Tutorial) |
| Quote Sent | The received quote has been reviewed and sent by the merchant back to the customer. (See Quotes Tutorial) |
| Processed | A placed order that has been processed for payment. |
| Processed (Pending Clearance) | A placed order paid via Amazon Payments in which the order has been authorized and is awaiting the instant payment notification that the payment has cleared. (see FAQ about Amazon Payments#Q:WhydoAmazonPaymentordersgointopendingclearance?) |
| Refunded | Either a "Partial Refund" or "Complete Refund" was performed form the Review Orders page. |
| Rejected | Order has been marked as rejected by one of the following ways:
About Rejected Orders Rejected order are retained for 1 year only, regardless of the Order Retention configuration. |
| Skipped | Order has been marked as Skipped by one of the following ways:
|
| Unprocessed |
Payment Status
The Payment Statuses are hard coded to the various payment types and related order processing steps and are not directly editable by the merchant.