UltraBooks - Sending orders to QuickBooks™
Introduction
Many online merchants use Intuits industry leading QuickBooks™ accounting software to maintain their company books. UltraCart has enhanced support for Merchants using QuickBooks™ with the addition of our QuickBooks™ integration tool called UltraBooks.
UltraBooks allows UltraCart merchants to import data directly to QuickBooks™ software. There's no need to deal with file formats and data conversion as UltraBooks does it all for you. Once configuration steps are complete, merchants simply run UltraBooks and it handles all the communication and importing between UltraCart and QuickBooks™.
Background
UltraBooks is an installed Microsoft Windows application that connects up to the central UltraCart system and downloads orders into Intuit's United States editions of QuickBooks™ version 2004-Current (Pro, Premium or better versions).
****The software is not compatible with Mac, Online, Canadian, International, or Simple Start versions of QuickBooks™.
When the UltraBooks program is launched it will prompt you for the same login information that you use to access your UltraCart account. UltraBooks then securely downloads all the new (completed) orders.
What Type of Data will UltraCart Import?
UltraBooks will create customer profiles for your customers automatically if they do not already exist. After creating the customer profile, UltraBooks will create a sales receipt or, in the case of purchase orders, an invoice for each completed order (i.e. marked as shipped). Those using QuickBooks™ Merchant Services (QBMS) will also have credit card transaction information imported.
Getting Started
To begin the UltraBooks Configuration navigate to:
Main Menu → Configuration → UltraBooks
Required Software
In order to use UltraBooks you must first download and install all the required components onto the same PC that QuickBooks™ is installed (for server installations see the note at end of the installation section). It's recommend that read through all the UltraBooks documentation before you install the software discussed below.
- .Net Framework
- The .NET Framework version 3.5 redistributable package includes everything you need to run applications developed using the .NET Framework.
- The download exe file (dotnetfx.exe) is approximately 23698 KB as of this writing and may take considerable time to download.
- From the main UltraBooks screen, click on the link ".net Framework". and download the file to your system.
Once the file has been downloaded, double click the dotnetfx.exe icon which will usually take only a minute or two to install. This software will perform its work in the background when you run UltraBooks.
v3.5
Please note that while you may have a later version installed, such as .NET 4, the UltraBooks integration presently requires the v3.5 version of the .NET framework. Each version of the .NET framework work independently (different applications require different version). So, you can have the v3.5 and later versions installed at the same time. Just make sure that whatever version of the .NET framework we show listed in the download section of the UltraBooks configuration page is installed on your computer.
QuickBooks 2009 through 2014 (Pro, Premium, Accountant or Enterprise)
Quickbooks Online Not Supported
Quickbooks Online is not supported. UltraBooks uses an API that is not available to the online version.
Quickbooks Point Of Sale (POS) version is also not supported.
- QuickBooks™ SDK QBFC 7.0
- This file resides on UltraCart's server and will download from there. Double click on the link "QuickBooks™ SDK QBFC 7.0". The file should download and install automatically.
- UltraBooks v2.6
This file also resides on UltraCart's server and needs to be downloaded to your system. Click on the link "UltraBooks v2.6". Once you have downloaded the file you will need to "extract" it using your favorite utility (WinZip, WinRAR archiver, etc). In order to make it easier to locate the files after extracting, it's suggested that you place the downloaded, compressed file into its own folder. Once that's done, double click on the Setup.Exe file to execute the extracting and installation of UltraBooks v2.6.
Uninstall previous versions
When installing a new version of the Ultrabooks, you'll first need to uninstall the existing version first, then install the latest version. This requirement is due to the fact that the settings are saved in the windows registry, so if you do not perform the uninstall, the new install won't actually be a complete fresh install, which could end up causing problems depending on the causes between versions of the UltraBooks application.
Installing Software
It's time to actually download the required software and configure your UltraCart account for UltraBooks. In UltraCart, navigate to:
Main Menu → Configuration → (middle menu) Back Office → UltraBooks
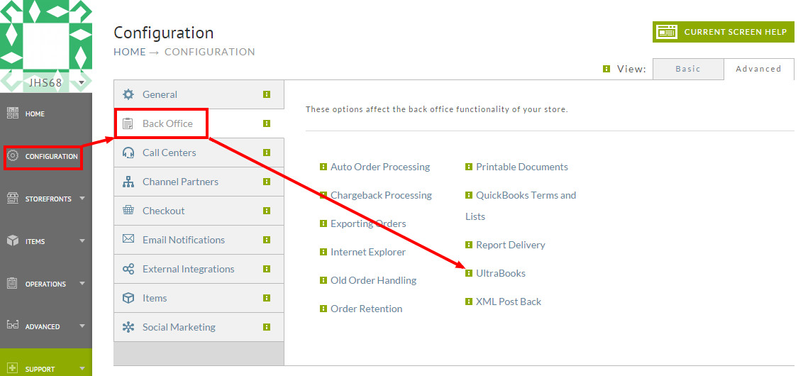
After clicking on the UltraBooks link you'll be taken to the UltraBooks configuration screen (shown below).
There you'll find instructions for installing the required software. We've even provided hyperlinks that will take you to the install process for each application.

After installing the required software, enter the configuration mode by clicking the Configuration Mode button on the bottom of the UltraBooks screen.
Note Regarding Server Installations
Question: We run our Quickbooks from our server, do we have to install UltraBooks on the server or can each user needing to use it install UltraBooks on their workstation?
Answer: It is okay to install UltraBooks onto workstations, provided that each employee will be downloading the orders into the same QBW file.
Configuration Mode
QuickBooks Codes
Clicking the Configuration Mode button at the bottom of the Configuration Screen will enable your merchant account for QuickBooks™ configuration and present the "UltraBooks™ Configuration Mode" screen. There, you will be shown a list of your specific areas that will need accounting codes.
Assigning accounting codes allows UltraBooks to match up and properly categorize data in UltraCart to data in QuickBooks™ each and every time you download data.
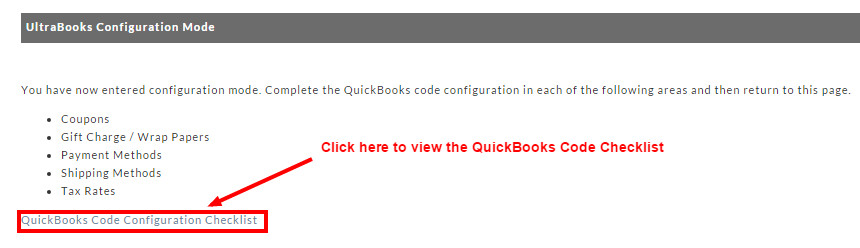
Click on the QuickBooks Code Configuration Checklist link to be taken to the Unconfigured QuickBooks Codes Screen. Each time you return to the main UltraBooks configuration page, you will be presented with the list of pending items until all have been configured.
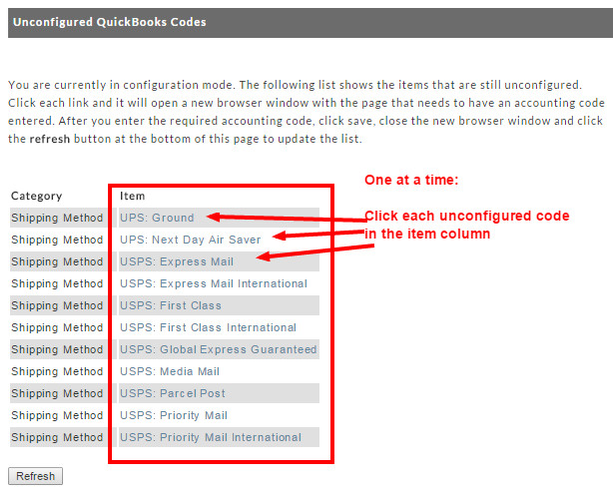
Unconfigured QuickBooks Codes
This is an extremely helpful screen for the entering of the QuickBooks Codes. It will list all the UltraCart items that have yet to be assigned appropriate QuickBooks Codes. In addition, each item is a link that when clicked, will take you to the appropriate screen for configuration. The next time you return to the Unconfigured QuickBooks Codes screen, that particular item will no longer be listed. It's imperative that you complete all the items and that the codes match perfectly with those in QuickBooks.
Coupon QuickBooks Codes
Each of your "active" coupons (Main Menu -> Configuration -> Checkout -> Coupons) must also have a QuickBooks™ code associated with it. Edit each of your coupons and enter the corresponding QuickBooks™ code in the field.

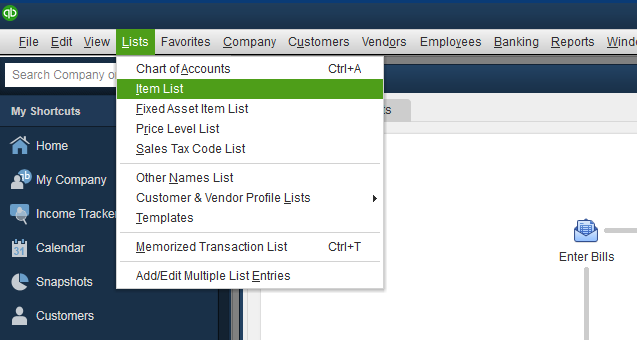
Typically merchants have a single Item called "Discount" in their QuickBooks™ file that they associate with all of their UltraCart coupons. Click on Lists -> Item List in QuickBooks™ to review your discount items.
Creating a QuickBooks™ Discount Item
Note: Once you create a discount item, you cannot change it to another type.
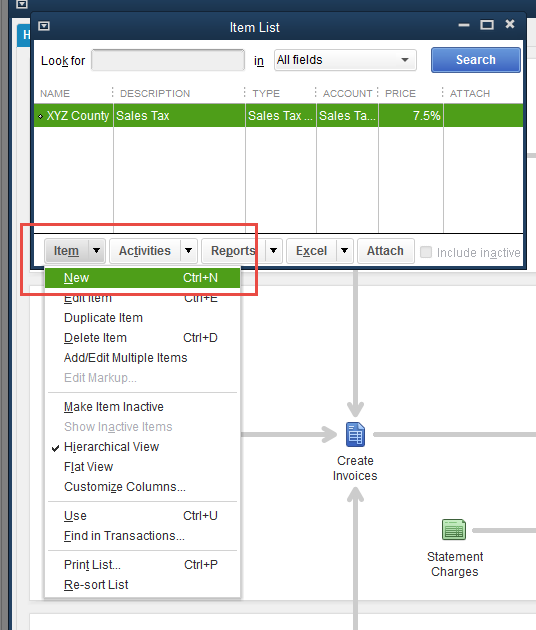
- Go to the Lists menu and click Item List.
- Click Item at the bottom of the list and then click New.
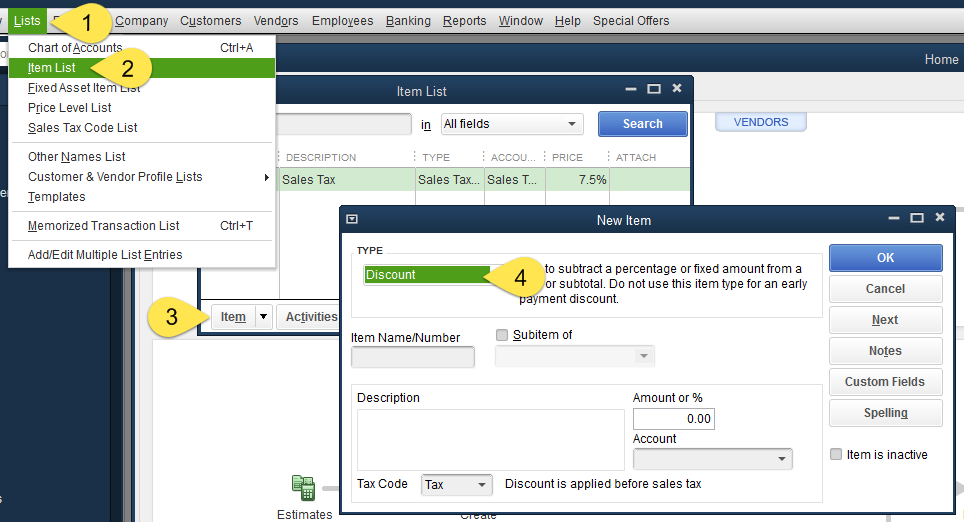
- In the New Item window, click the Type drop-down list and choose Discount.
- Enter an item name, such as Discount.
- Enter the description that you want QuickBooks™ to put on your sales forms when you apply the discount.
- Enter the discount amount or percentage:
If the discount is a percentage, enter the number of the discount followed by the % symbol. For example, 5% tells QuickBooks™ to multiply the previous line by .05. In the case of downloaded UltraCart sales, you will want to leave the Amount field blank.
- Enter the account that you use to track discounts you give to customers. You can use either an expense account or an income account. When an income account tracks discounts on sales, the account is often called a "contra-income" account.
- Click the Tax Code drop-down list and choose a tax code for this item.
If you select a taxable code, the discount you specify on taxable sales is applied before the sales tax is calculated. If you select a non-taxable code, the discount is applied after the tax is calculated.
- Click OK or click "Next" to create another item.
Payment Method QuickBooks Codes
In UltraCart navigate to:
Configuration → Checkout (section) → Payments
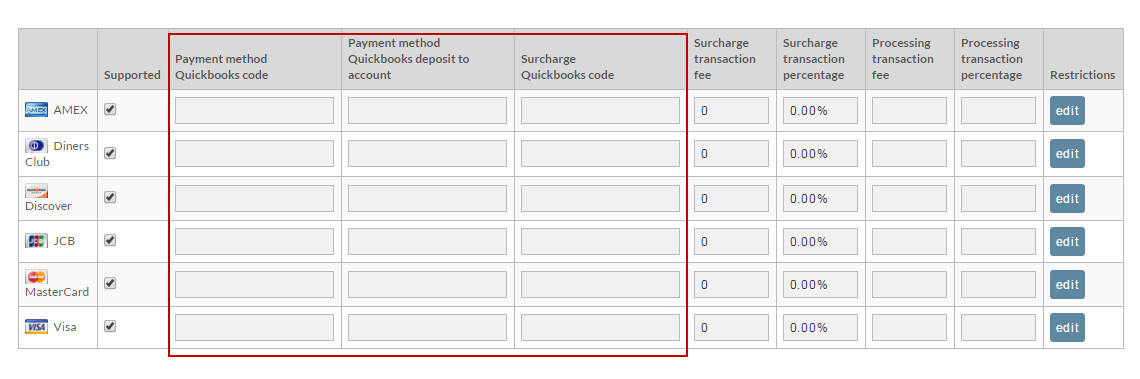
For each of the payment methods you have enabled in UltraCart you will need to specify what the corresponding code is in QuickBooks™.
Run QuickBooks™ and from the drop down menus click on Customers -> Enter Sales Receipts. You can also access this from the Home window. Click on the "Create Sales Receipts" button.
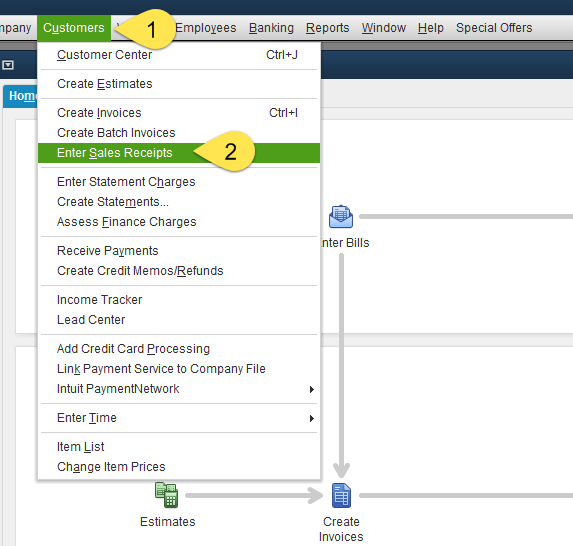
Then, click the drop-down under Payment Method
Lastly, click on the Payment Method desired or, click "Add Item" if it doesn't exist.
Deposit to Account
Also located on the UltraCart Configuration -> Payments screen is a field called QuickBooks™ deposit to account. This is the account you want the funds to be deposited into in QuickBooks™ when the sales receipts are added. By default, if this field is left blank the funds go into the "un-deposited Funds Account". The following are sections of the payments screen depicting the location of those codes.
COD
Credit Cards
Paper Checks / Money Orders / Electronic Checks
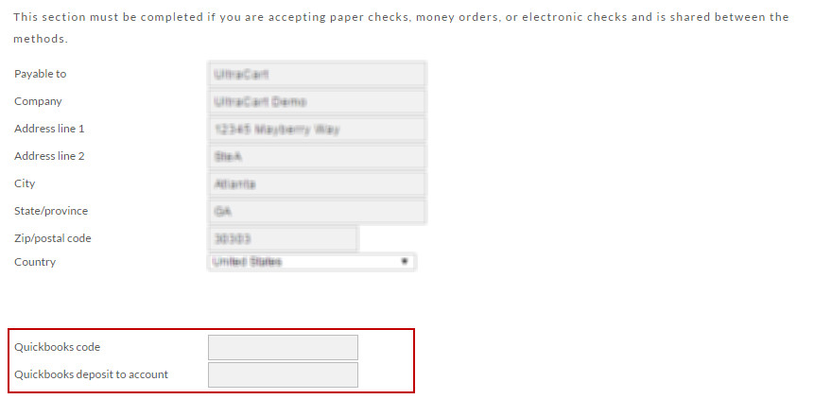
PayPal
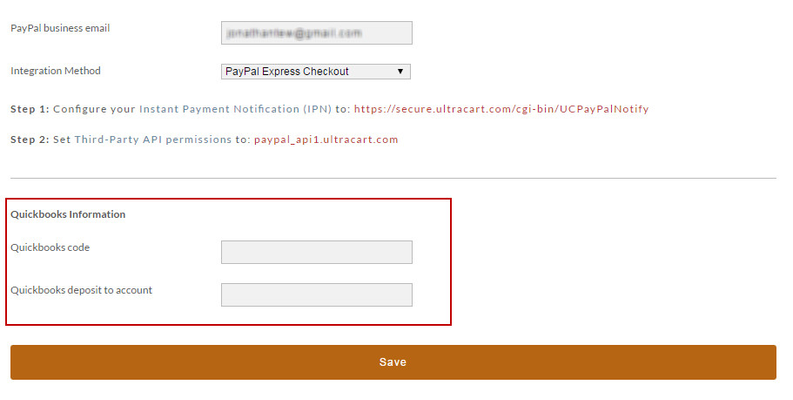
To specify a different account click on the Chart of Accounts in QuickBooks™ and enter the name of the account you want to deposit funds into. Please note this is the NAME of the account and not the number!
![]()
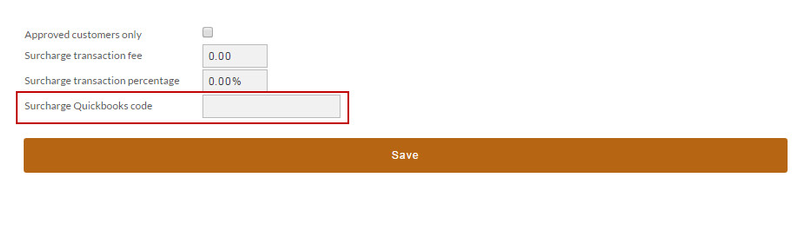
Surcharge QuickBooks™ Code
The Surcharge QuickBooks™ code depicted above for Credit Cards and COD are to allow merchants to charge for those special services payment options. These codes come from the Item List in QuickBooks™. You'll probably need to create new Items in the QuickBooks™ Item List for these surcharges. The Item List can be found under the "Lists" menu or by clicking on the "Items & Services" icon on the Home screen. You'll see a row of menus at the bottom of the Item List window. Click on the Item drop down and select "new" to create a new item. Remember to enter the "name" you assign the item into the Surcharge QuickBooks™ Code field.
Each of your unique tax jurisdictions inside of UltraCart must have a corresponding entry in the QuickBooks™ system. To make this part of the configuration easier, UltraBooks can automatically add the missing tax jurisdiction to your QuickBooks™ file during the import process if it exists in UltraCart. So it is very important to configure the QuickBooks™ Codes inside of UltraCart for each tax jurisdiction.
Shipping Method QuickBooks Codes
Each of your shipping methods needs to have a QuickBooks™ code associated with it. Click on Configuration -> Checkout -> Shipping -> Methods. Then for each of the methods click on Edit -> Other (tab). In the QuickBooks™ code field enter the corresponding item name in QuickBooks™.
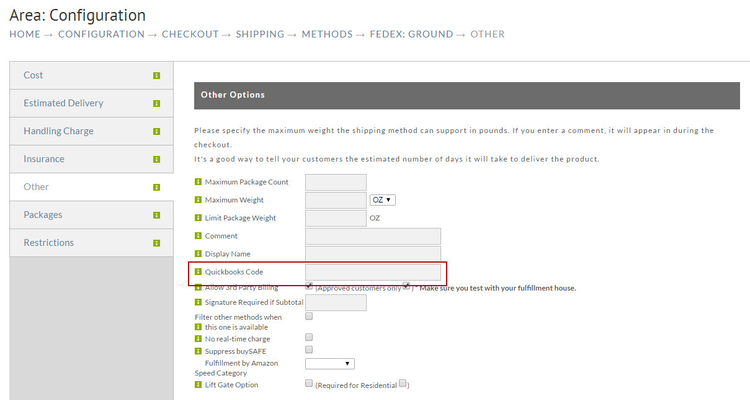
Most merchants typically set up a single Item in QuickBooks™ that represents their shipping costs such as "Shipping and Handling". Click on Lists -> Items List inside of QuickBooks™ to view your item list. Add an item for Shipping and Handling if it does not already exist.
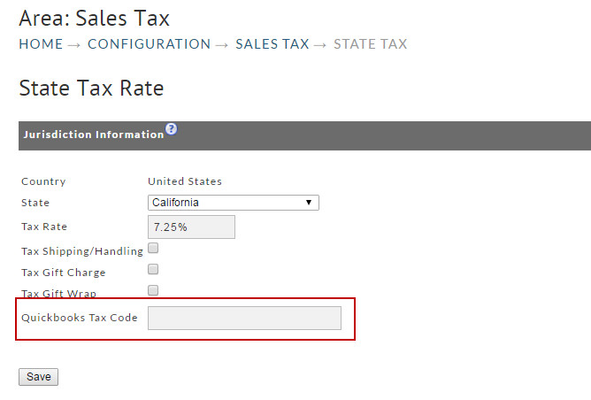
Tax Rate QuickBooks Codes
Click on Configuration -> Sales Tax. Start drilling down into your States, then Counties, then Cities going as deep as you have configured tax . At each level configure the QuickBooks™ tax code. During the import process, UltraBooks will present you with an import dialog if a sales tax item isn't configured in QuickBooks™ and needs to be.
The typical naming convention for the code is "<state abbreviation> Sales Tax" at the state level, then "<state abbreviation> <county> Sales Tax" at the county level, and finally "<state abbreviation> <county> <city> Sales Tax" at the city level. An Example for a state sales tax code would be: "CASalesTax". For more information on configuring your sales tax within UltraCart, see page .
Setting up Sales Tax in QuickBooks
This section only discusses where to set up your Tax Items and Codes in QuickBooks™. You may want to learn more about sales tax concepts. QuickBooks™ will help you understand how QuickBooks™ uses sales tax items, rates, and codes to track the sales tax you collect from your customers and pay to your tax agency. The QuickBooks™ help section has a tutorial about tracking and paying sales tax that should be very helpful to the novice.
Turn on Sales Tax in QuickBooks
. First you need to make sure you have turned on Sales Tax if you haven't done so already.
- Go to the Edit menu and click Preferences
- In the Preferences window, click Sales Tax in the list on the left.
- Click the Company Preferences tab.
- For the question "Do You Charge Sales Tax?" select "Yes".
There are several other settings that you will need to make decisions on. You may need to get expert advice for your company tax settings
Sales Tax Codes
Depending on your state and local sales tax requirements, the preset taxable (TAX) and non-taxable (NON) sales tax codes you see may be the only ones you'll need. If your tax agency requires you to specify additional sales tax codes to track taxable and non-taxable sales, such as for non-taxable out of state sales, refer to QuickBooks™ Help for more information on how to set up additional sales tax codes and for some examples of commonly-used non-taxable sales tax codes.
To add a sales tax code
- Go to the Lists menu and click Sales Tax Code List.
- Click Sales Tax Code at the bottom of the list and then click New.
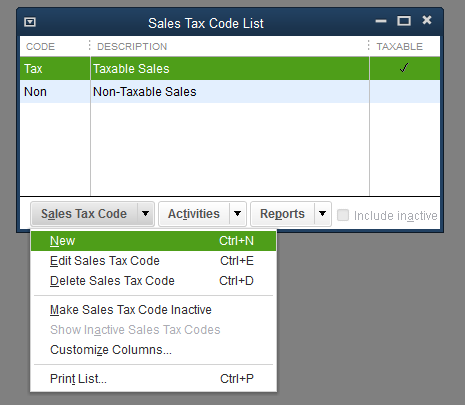
- In the New Sales Tax Code window, enter a sales tax code you want to use and a description for it.
- Choose whether the code is Taxable or Non-Taxable.
- Click OK.
Sales tax items, rates, and tax agencies
QuickBooks™ uses sales tax items to calculate and add sales tax charges when you make a taxable sale. When you set up a sales tax item, you assign it a sales tax rate and associate it with the tax agency to which you pay the sales tax.
- Still in the Sales Tax Preferences window, click the "Most common sales tax" drop-down list and choose <Add New>. The New Item window opens with Sales Tax Item already selected in the Type drop-down list.
- Enter a sales tax name. Use the name that you assigned for this location in UltraCart. This name appears as one of the choices in the Tax field on your sales forms.
- Enter a description for the way this sales tax item will appear as a line item on your sales forms. The description prints on your sales forms after the final line item. You can't edit it on the forms themselves. Users frequently use the name of the sales tax item as the description.
- Enter the sales tax rate. The percentage you enter is the rate you set up in UltraCart. For example, your sales tax rate for XYZ County might be 8.25% (or 8 and 1/4 cents per dollar purchased). This rate also appears on your sales forms.
- In the Tax Agency drop-down list, select <Add New>. This will open the New Vendor window where you'll set up the tax agency (a vendor) to which you pay this sales tax.
- In the Vendor Name field, enter the name of your tax agency. For example, in California, sales tax is paid to the Board of Equalization. You can enter the other information now, such as the address and opening balance, or you can do it later.
- Click OK to close the New Vendor window.
- Click OK to close the New Item window.
- Repeat steps 1 through 8 for each sales tax item you need to set up for your business.
Selling to Non-taxed customers
If your out-of-state sales aren't taxed, set up a single sales tax item with a 0% rate. You also need to set up sales tax codes to track your non-taxable out-of-state sales. This is required even if you were not going to have any out-of-state sales at all.
Other Codes (Gift Certificates / buySAFE)
If you are selling gift certificates to customers then you will need to create an item called "Gift Certificate" which will be used when the customer redeems the certificate.
If you are using buySAFE on your store then you will need to create an item called "buySAFE" which will be used to account for the fees collected.
When to Import into QuickBooks
The 2nd part to the above screen allows you to indicate when (under what circumstances) you want to import orders into QuickBooks. The options are based on the state or status of your orders.
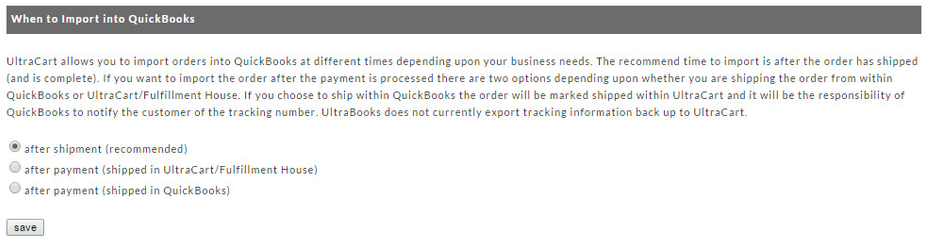
As seen above, the three options to import orders are:
- after shipment
- after payment (shipped in UltraCart/Fulfillment House) or
- after payment (shipped in QuickBooks)
The recommended time is after the order has shipped (and is complete). If you want to import the order after the payment is processed there are two methods depending upon whether you are shipping the order from within QuickBooks or UltraCart/Fulfillment House.
If you choose option 3; to ship after payment (shipped in QuickBooks), the order will be marked shipped in UltraCart. It will be the responsibility of QuickBooks to notify the customer of the tracking information (number). UltraBooks does not currently export tracking information back to UltraCart.
Matching UltraCart Items with QuickBooks Items
Different scenarios required different actions
It's absolutely necessary to set up UltraBooks Items that exactly match each of your UltraCart Items. When doing so, one of the following scenarios will apply:
| SCENARIO (If) | ACTION (Then) | |
|---|---|---|
| 1 | Your Items already exist in QuickBooks™ but not in UltraCart | Create your UltraCart Items using the exact same name you used for your QuickBooks™ Items |
| 2 | Your Items already exist in UltraCart but not in QuickBooks™ | Create your QuickBooks™ Items using the exact same name you used for your Item ID's |
| 3 | Your Items DO NOT exist in either program | Create both using the exact same name |
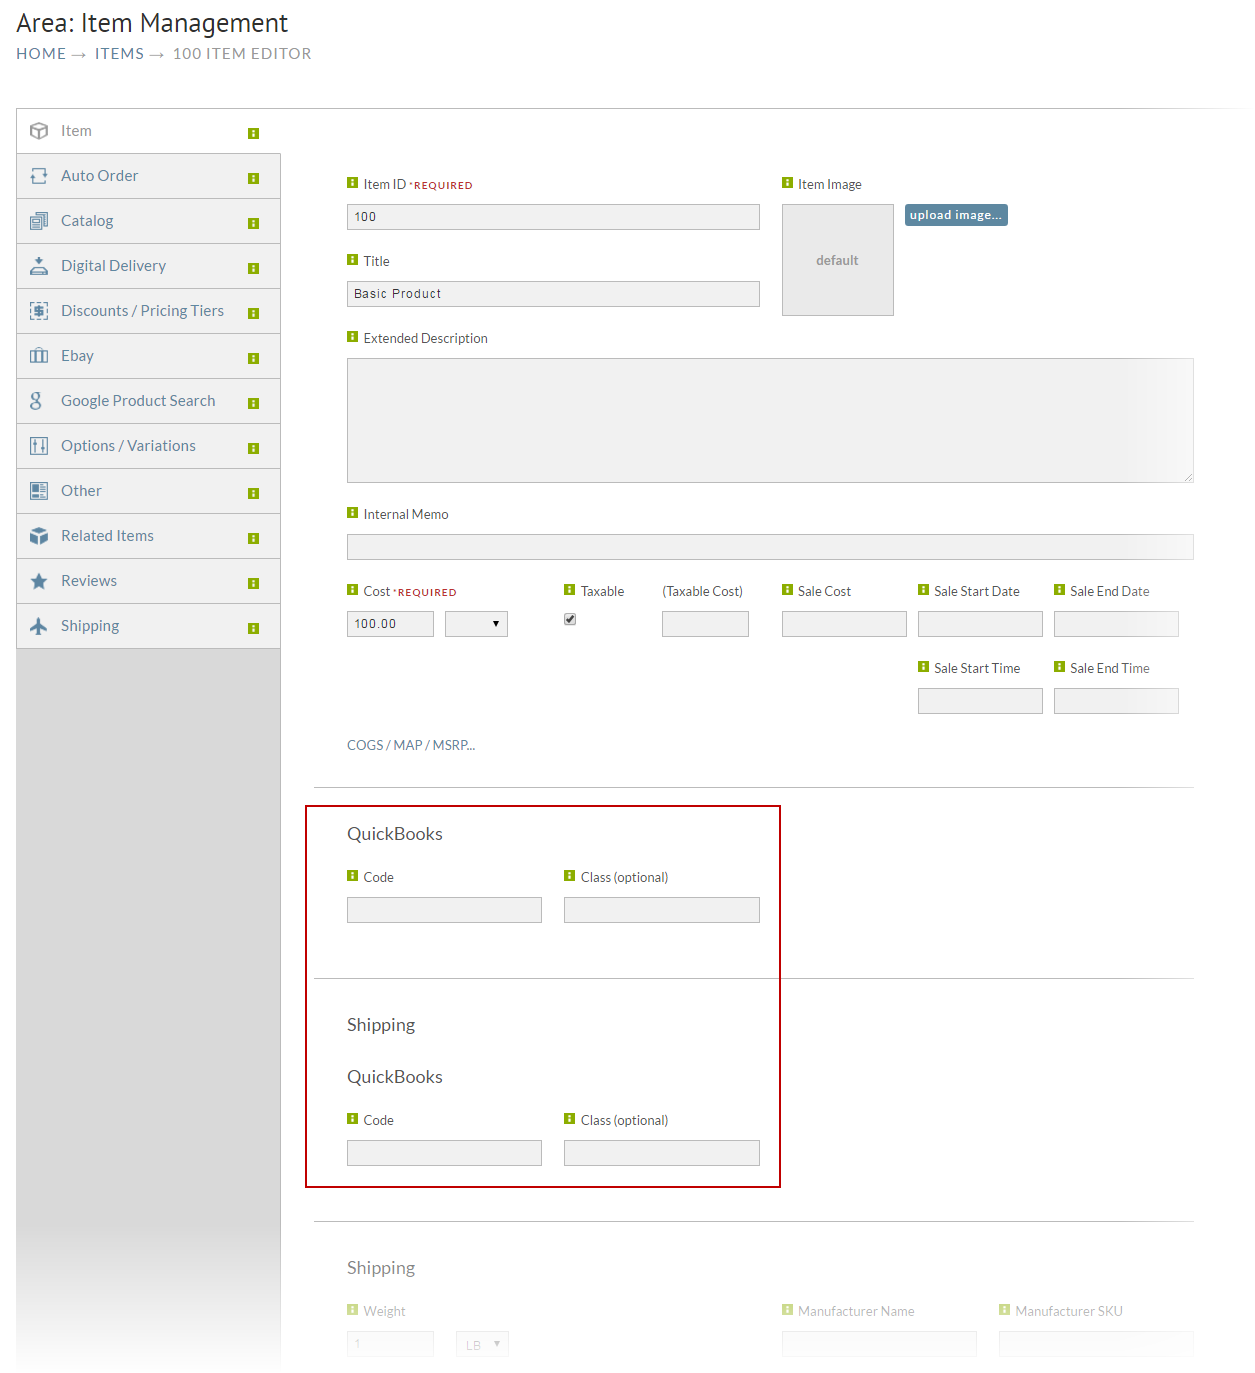
| 4 | Your Items already exist in both UltraCart and QuickBooks™ but with different names | You'll need to enter the exact QuickBooks™ Item name into the QuickBooks™ Class field at the Item Editor level in UltraCart (see screen shot below) |
Although it's not common, Scenario #4 above does indeed occur. One's first thought is to either change all the Item ID's in UltraCart to the same as QuickBooks™ (not recommended) or vice versa. That is one way of doing it (for new accounts) but we have an easier solution. You can leave the Item names in both applications as they are and simply enter the QuickBooks™ Item name into the QuickBooks™ Code field for all your UltraCart Items. See the screen shot below for an example.
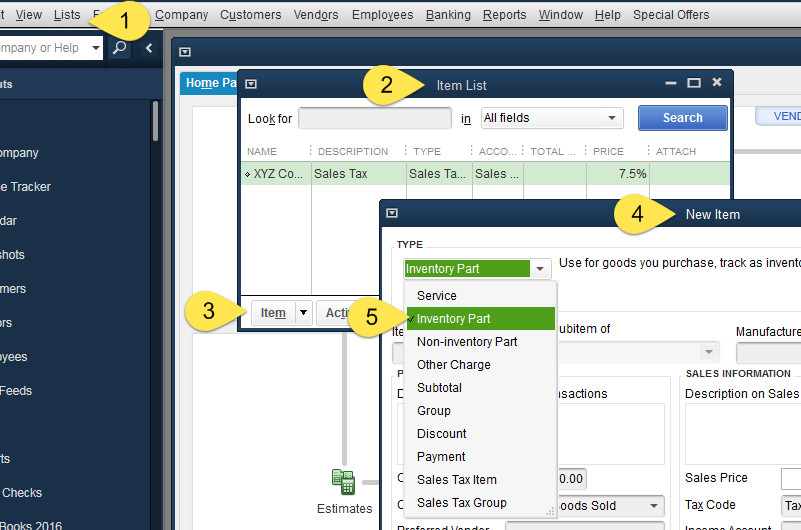
Manage Inventory in QuickBooks
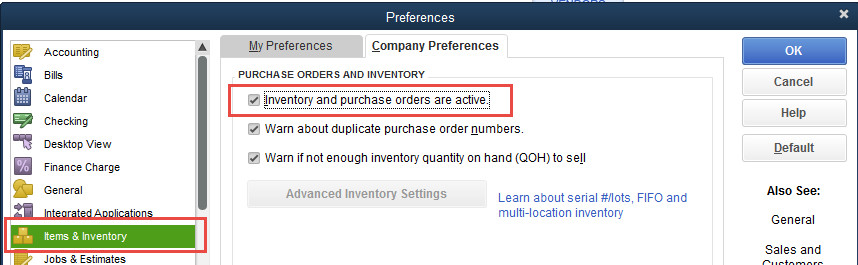
If you plan to manage inventory via QuickBooks™ there's one important configuration. When you create a "New Item" in QuickBooks™, you not only want the name to exactly match that of the Item in UltraCart, you also need to set the Item Type as "Inventory Part". If you do not see Inventory Part in your list below, you need to turn inventory management on within your QuickBooks. Edit → Preferences and make the changes shown below.
Create New QuickBooks Item
In your QuickBooks program navigate to:
Home → Lists (menu item) → Item List →
From the Item List window, click the Item button (bottom left corner) and select New from the top of the pop up list.
Select Inventory from the Type field drop-down menu. Configure the rest of your Item details and click the button when finished.OK
How UltraCart stores data
Once an order is placed all the data is packaged up and stored separately from your configuration information. So if you configure a shipping method and use it on an order before configuring the QuickBooks™ code for that new shipping method, you will receive an error message during import about something not being configured that you can not work around without the assistance of UltraCart Support. Always configure the QuickBooks™ code for everything before using it.
Using Sequential Order Ids
If you are currently using date/time based order Ids you should switch to numerically sequential order IDs. The date/time format is too long for QuickBooks™ to store and makes matching up orders between the systems difficult. Click on Configuration -> Order ID Scheme to verify your order ID configuration. We typically recommend that merchants start at 10000 and a width of 8 on their order ID scheme.
If you decide to stick to using the date/time based order ID then UltraBooks will allow QuickBooks™ to assign the next sales receipt number automatically and will place the UltraCart order number in the memo.
Going Live with UltraBooks
After configuring all of the required Accounting Codes, the following screen will appear. Please read the disclaimer statement. 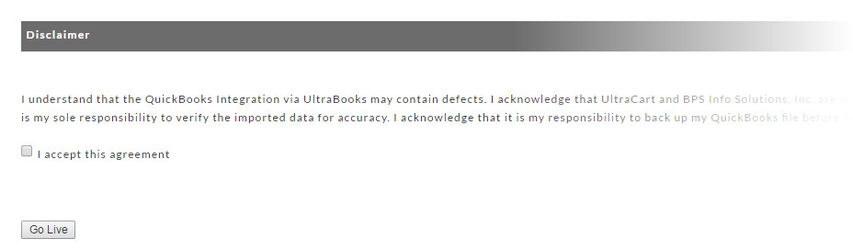
Click the box to the left of "I accept this agreement" and then click the "Go Live" button. The following confirmation screen will appear.
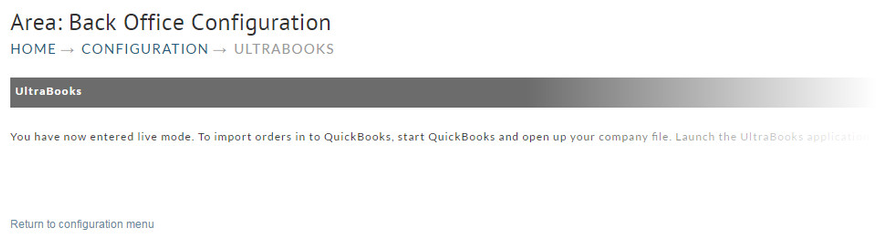
After you have entered live mode, all new orders placed on the system will be eligible for export to QuickBooks™. Any existing orders placed on the system before entering live mode will not be eligible for export to QuickBooks™. If you are interested in importing all your historical order data, please contact support@ultracart.com. Reminder: All the required software must be installed, on the same PC as your QuickBooks™ installation, in order for UltraBooks to work properly.
Running UltraBooks
Prior to launching your UltraBooks program from your Start button, make sure you have your QuickBooks™ company file open in the background.
Start → Program files → UltraBooks → UltraBooks
The application will prompt you for your UltraCart merchant login information. Enter your Merchant ID, Login (user name) and Password.

The first time you run UltraBooks you will receive a series of confirmation dialogs confirming that you would like UltraBooks to be able to access your QuickBooks™ company file.
You will need to answer all of the questions in the affirmative.
If you are using a multi-user QuickBooks™ environment then this application confirmation process must be completed by an Administrative level user.
Each and every time you run UltraBooks, a window will appear with two large buttons; Import Orders and Settings. We'll first talk about Settings.

UltraBooks Settings
Every merchant should, prior to conducting their first import of orders, click the Settings button and configure their specific import options as needed.
Upon clicking the Settings button you will be presented with the UltraBooks Options Screen. There are four areas of concern: Proxy Server, Customer Import, QuickBooks™ (version) and Order Import.
Anytime you change settings within UltraBooks you will need to close and reopen the program for those changes to take effect.

Proxy Server
| Option | Results (box checked) |
|---|---|
| Use a proxy server | This is only used by merchants behind a firewall that requires a proxy server to get to the internet. By clicking this box you can then specify the Server Address and Port (number) |
Customer Import
| Option | Results (box checked) |
|---|---|
| Uppercase all name information | All customer names will be converted to upper case during import. |
| Import by company name instead of last name, first name when possible | Whenever a company name is present, the record will be imported by such. |
| Import individual customer sales under customer record | ALL retail orders import as the same customer. You must configure the customer first. |
Linking Customer to Customer Profile
An UltraCart Customer profiles can be linked to a specific customer record in QuickBooks. This configuration will ensure that orders placed via the customer profile will be linked to the same customer regardless of the billing/shipping address details provided in the order. This can be useful with wholesale customers that may have many locations for which they place orders.
QuickBooks™
| Option | Results (box checked) |
|---|---|
| Canadian Version | Allows use of the Canadian version of QuickBooks™. |
Order Import
| Option | Results (box checked) |
|---|---|
| Import all orders as invoices | ALL orders will be imported as Invoices. (Normally, Credit Card orders are imported as Sales Receipts and Purchase Orders as invoices). |
| Mark all items as non-taxable if no tax is charged | In most cases, this is good to have checked. |
Mark Invoices as "to be printed" in QuickBooks | When you select Print Forms/Invoices in QuickBooks™, all invoices will appear in a list for batch printing. You can still de-select certain ones prior to printing. |
| Import credit card information (Requires QuickBooks™ 2006 or 2005 (R5 and later)) | Few merchants will consider this option for obvious security reasons. |
| Import QBMS Transaction Information | This feature is for merchants that have the QuickBooks™ Merchant Services payment gateway configured. It will import the transaction information for orders that were processed via QBMS. |
| Import Terms | Some merchants have terms spelled out in the checkout that will become part of the order. This options will insure those terms are imported to become part of the QuickBooks™ sales record. |
| Import Sales Rep | The Sales Rep name is configured on the Customer Profile and will be imported along with the order. |
| Import Class | The Class is configured on the Customer Profile and will be imported along with the order. |
| Import Referral Code into Memo | This is a special field. It will not apply to 99% of merchants. |
| Allow QuickBooks™ to assign the invoice/sales receipt | This would be used if you are making direct entry into QuickBooks™ as-well-as importing. This will help avoid collisions. |
| Ignore kit component items | This is only used by merchants that have kits in their Item Configuration. |
| Sales Receipt/Invoice Number Prefix _ | If you want to precede your Sales Receipt of Invoice with a special Prefix, enter it into the box provided |
| Default Invoice Terms _ | QuickBooks™ invoice form allows merchants to set various payment terms. Here you can define the Default term when the Invoice is created during import. |
Importing Orders

Clicking the "Import Orders" button will begin the download process. You must have the appropriate QuickBooks™ file open prior to importing. When the download and importing of order files has completed successfully, you will see the following screen.

You may receive an error during import. These errors are usually contributable to mismatched QuickBooks™ codes in either your UltraCart or QuickBooks™ accounts. If you are unable to determine the cause or remedy, contact UltraCart support.
Common Tasks
Re-importing an Order
UltraBooks will only export orders that are in the "completed" state (have been marked as shipped). Once exported via UltraBooks, they will be tagged as "Exported to QuickBooks™".
If, for some reason, you want to re-export an order, you'll need to reset its export status. To do so, log in to your account and navigate to:
Main Menu → Order Management → Review Orders
In the search screen, enter the order ID or whatever search criteria necessary to locate the order. Once you have located the order:
- click on the order ID to bring the record into the order editor.
- click on the "Edit Customer Information" link.
- click on the "other" tab.
- locate the "Exported to QuickBooks™" field.
- remove the check mark by clicking on it.
- click the Save button at the bottom of the screen.
That particular order is reset to be exported to QuickBooks™ the next time your run UltraBooks.
Importing Historical Orders
After you have done your initial configuration you can import historical orders (orders placed before UltraBooks configuration) by navigating to the Batch Order Operations page, where you will have choices for flagging order(s) for downloading by entering in either the list of orderIDs (or the range of orderIDs) the clicking the button "reset exported to QuickBooks".
Manually Entering Orders into QuickBooks
If you're going to enter sales receipts or invoices manually into QuickBooks™ in addition to having UltraBooks import information, make certain that you do not use a number that will conflict with UltraCart orders. For instance manual sales receipts/invoices may be done in the 1000-9999 range while UltraCart orders would be in the 10000+ range. UltraBooks assumes that if the invoice/sales receipt with the same number exists then it needs to be deleted and replaced by the new one in the event that the merchant is re-downloading order information. It has no way of distinguishing something that is hand entered from something that is downloaded and dealing with it in any other way.
Processing Refunds
If the refund takes place before the order is exported to QuickBooks then the transaction will reflect it.
If the refund takes place after the order has been exported to QB then it currently has to be manually adjusted within QuickBooks.
UltraBooks Errors and Troubleshooting
Troubleshooting UltraBooks - Ultrabooks.log
UltraBooks generates a log file that is located in the "Documents" folder of your computer.
UltraBooks support may need the file for troubleshooting import issues and unexpected errors.
TIP: The log file can grow large over time. So, we recommend that you first rename or delete the log file, then run UltraBooks again to replicate the problem (this will generate a new log file containing only the logged details of this single session.) Next, close Ultrabooks and on your computer, gather the log file which is located by clicking the windows "Start" button then clicking on "Documents" in the top right side of the Start Menu. The log file is titled "ultrabooks.log". Send the log file to support@ultracart.com along with your description of the observed issue.
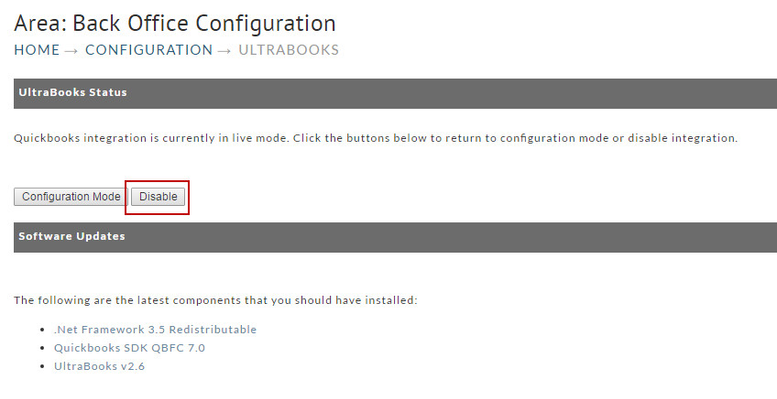
Disabling UltraBooks
If you should decide to disable UltraBooks integration, navigate to;
Main Menu → Configuration → UltraBooks
Pressing the "Disable" button will prevent future downloading of orders. There will be no warning dialog for this action. However, the codes you have entered will remain intact. You can again configure UltraBooks without having to re-enter the codes (except for any additions that you may have made in Coupons, Gift Charge / Wrap Papers, Payment Methods, Shipping Methods or Tax Rates.
Frequently Asked Questions (FAQ)
Question: I am trying to log into UltraBooks but I'm getting a message that says I need to activate my IP?
Answer: When you receive this prompt, you will need to log directly into the UltraCart website and complete the IP Activation step there. Upon successfully completing the IP activation, you will be able to go back to the UltraBooks application and log in with your user.
Question: Can UltraBooks be used with cloud-hosted Quickbooks hosting services?
Question: We recently upgraded Quickbooks and now we cannot get UltraBooks to connect to download orders?

Go to the Edit menu and click Preferences.
In the Preferences window, click Integrated Applications in the list on the left.
Click the Company Preferences tab.
Make sure the Don't allow any application to access this company file check box is cleared.
Click OK to save your preferences.
Leave QuickBooks open and remain logged in as the Administrator.
Open your UltraBooks application log in and click the download button to initiate the connection to Quickbooks.
Switch to QuickBooks by pressing or choosing QuickBooks from the taskbar.
If you see a message asking whether the UltraBooks should be allowed access to your company file, click Yes.
Open the integrated applications preferences
Highlight UltraBooks name in the list of applications to specify that you are allowing access.
Select Properties.
Select the Allow this application to login automatically check box.
Select the Software Access user (from step 2 above) and click OK. You can select any user with full access rights, such as "Admin".
Click OK to close the preference screen.
Now your add-in application will be able to access your company file data even if QuickBooks is not running.
Question: I am using inventory assemblies in QuickBooks. When I export orders from Ultracart into QuickBooks the parts of the inventory assemblies also show up on the sales receipts which is messing up my inventory counts. How can I configure the downloads so that only the item sold shows up?
Answer: Launch UltraBooks application then click on the options button and check the box "Ignore Kit Components". Click the save button. Close UltraBooks and relaunch it to have the save changes take affect.
Question: We recently updated our Quickbooks and we have multiple people in our organization using UltraBooks to import our orders and recently one of our bookkeepers is unable to connect?
Answer: Quickbooks has a limitation restricting 3rd party applications connecting to QB's where the QB's server has multiple QB files open at the same time.
See: http://www.smartvault.com/support/kb305-error-0x80040438-the-application-trying-to-connect-to-quickbooks-is-not-supported-while-multiple-instances-of-quickbooks-are-running/
Example of the error captured in the log:
