Introduction
Options / Variations - There is a good explanation on the differences between Options and Variations here.
Navigation
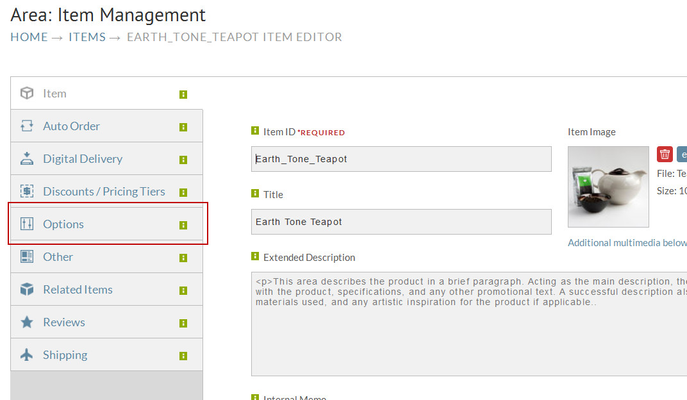
Home → Item Management → Items → Click on the Item ID you would like to edit
Item Options allow customers to select criteria for an item when that item has several choices (options). For instance, a merchant might offer a t-shirt that comes in three different sizes. "T-Shirt Size" would be the item option in this example. You are theoretically defining different store items (by size, color, etc.) under one Item ID (SKU).
Although the Item Options feature is easy to set up and reduces the number of actual store items, merchants with many items should give some serious thought before considering this feature. Having the same SKU (Item ID) may cause difficulty in the following areas:
- The inventory system will not track the Item Options.
- Fulfillment centers have a difficult time with "pick and pack" without separate SKUs.
- Importing orders into accounting systems can also be difficult
- Options will not work with Kits
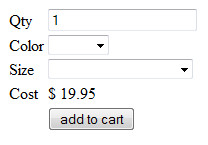
The following illustrates where the Item (drop down value) Option will appear on the checkout screen.

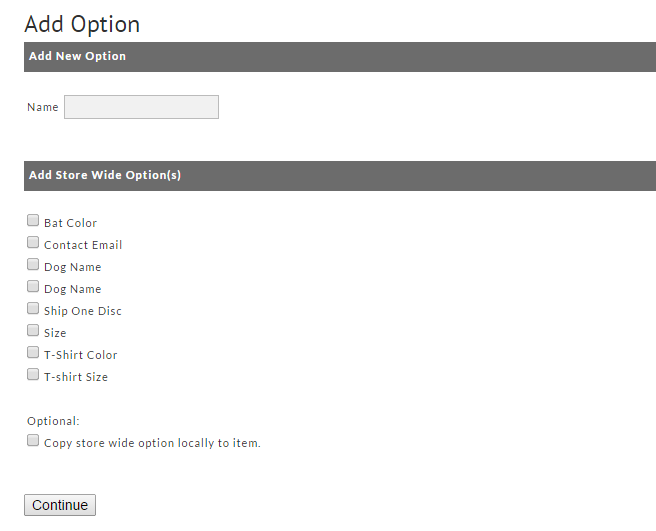
Add Option
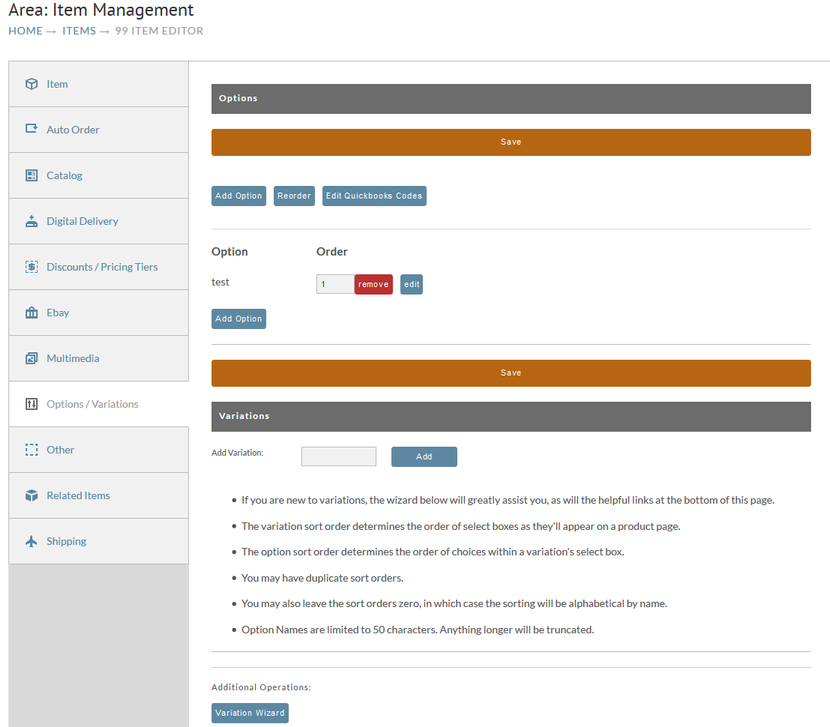
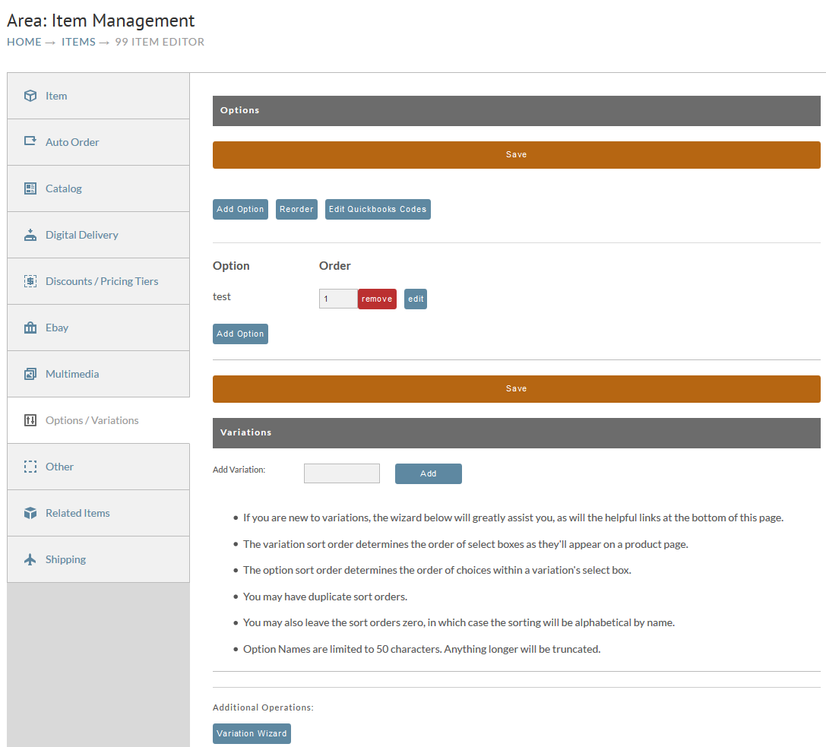
Navigate to the Item Editor screen, click on the "Options/Variations" tab. The following screen will display a "No options are defined…" message until options are added. To add your first option, click on the "Add Option" button.
At the Add Option screen you set a name for the option. In our example the merchant would specify "T-Shirt Size" in the "Create a New Option for just this item" field. Then click on the "Continue" button. The field "Add Store Wide Option(s)" will be discussed later in this chapter.
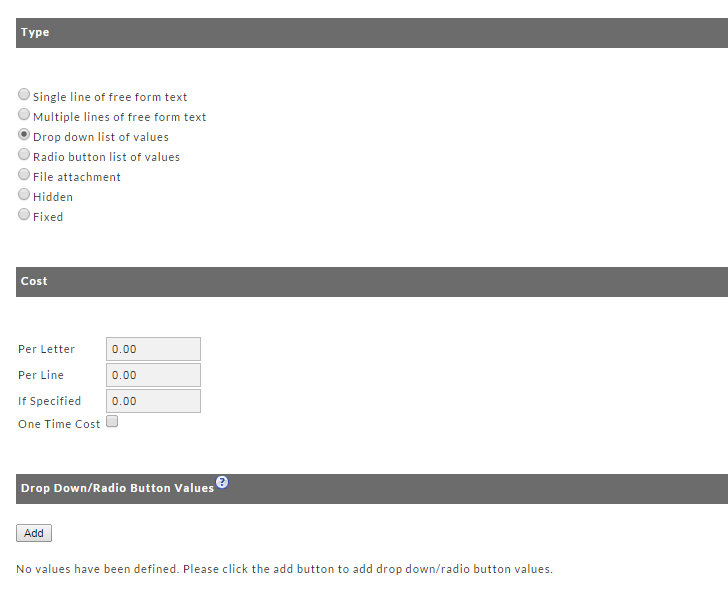
After clicking the "continue" button, the Option Editor Screen will appear. This screen is divided into five sections; Description, Check-Out Settings, Type, Cost and Drop Down/Radio Button Values. The last section, Drop down/Radio button list of values (shown in example below), will only appear if Drop Down or Radio Button list TYPE is selected.
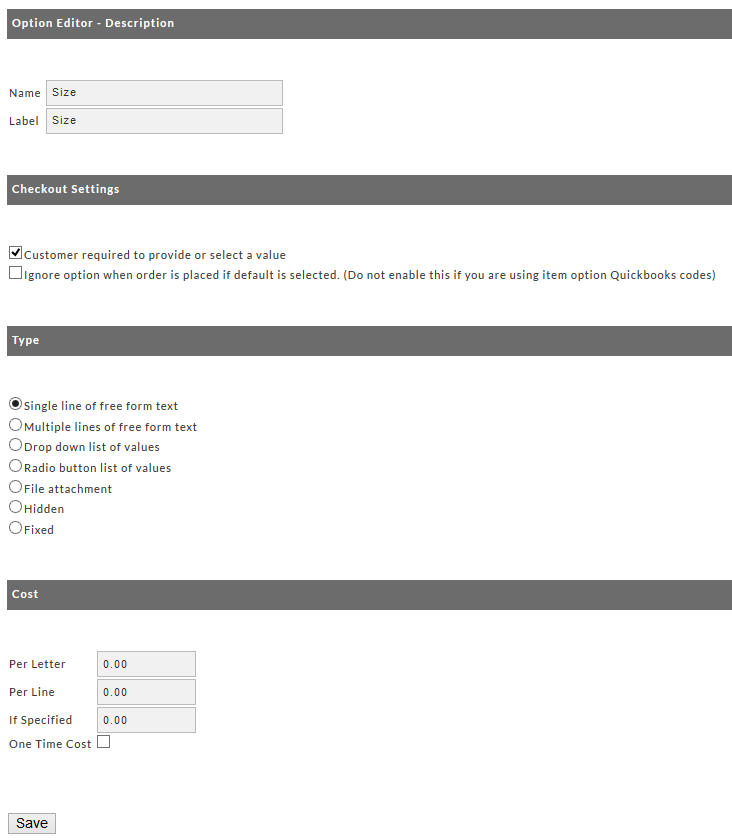
Description (fill-in)
- Name – the name of the option. For instance "T-shirt size". This will be automatically entered from your entry in the previous Add Option Screen. It can be changed at this screen if desired.
- Label - The label is what appears in the customer's shopping cart, on the order invoice, and on the packing slip. This is often a shorter version of the Name such as "Size"
Checkout Settings (check box)
- Customer required to provide or select a value – If you check this box, an "error" message will appear during checkout if and when the customer fails to provide or select a value. Customers cannot proceed with the checkout until they have selected or provided a value for the option.
- Ignore Option when order is placed if default is selected - Some merchants define numerous values for many of their options. This can cause considerable clutter on the printed documentation (i.e., order, packing slip, etc.). Selecting this option will prevent printing of the option value if the "default" option is selected at checkout.
Type (radio button)
There are seven possible types of item options. Click on the radio button to the left of the choice desired to see the configuration options related to that option type.
- Single line of free-form text - If this setting is specified the option will appear at checkout as a single line input field where the customer can specify free form text.
Multiple lines of free-form text - If this setting is specified the option will appear at checkout as a multiple line input field where the customer can specify multiple lines of free form text.
Max Character Limit
The maximum character count for the text import field is one thousand (1,000) characters.
- Drop Down List of Values - If this setting is specified the option will appear at checkout as a drop down list. Merchants will specify values for the list immediate below this section (only appears when option is selected).
- Radio Button List of Values – If this setting is specified the option will appear at checkout as a user selectable list. Customer will be able to select only one (1) of the values in the list. Merchants will specify values for the list immediate below this section (only appears when option is selected).
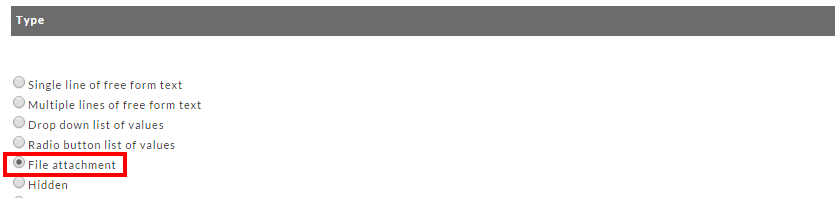
- File attachment –This setting is used when it's necessary for the customer to upload a file to the order. An example would be where a customer must upload a graphic (logo) that is printed onto the item purchased (onto a ball cap for instance). This option will appear as a blank text field along with a "browse" button that when clicked, will allow the customer to navigate within their system to locate the "upload" file. There will be an "upload" link for the file the customer sent on the final order record in your UltraCart account.
- Hidden – Use this setting when you want to have a special option that is NOT shown on the checkout. This is most often used when a merchant builds a special form on their web site that passes information to UltraCart. A merchant can create an Option (hidden) to pass a unique ID (for example) to help identify the order. Given that scenario, the merchant does not want to have the option visible in the cart.
- Fixed - The value passed to the cart is displayed in the checkout but is read-only, so its not editable by the customer.
Drop Down Value List
Once you have selected the Drop Down list of Values TYPE the Drop Down/Radio Button Values section will appear at the bottom of the Option Editor screen.
To add your values, click on the "ADD" button which will take you to the Add Drop Down Values screen.
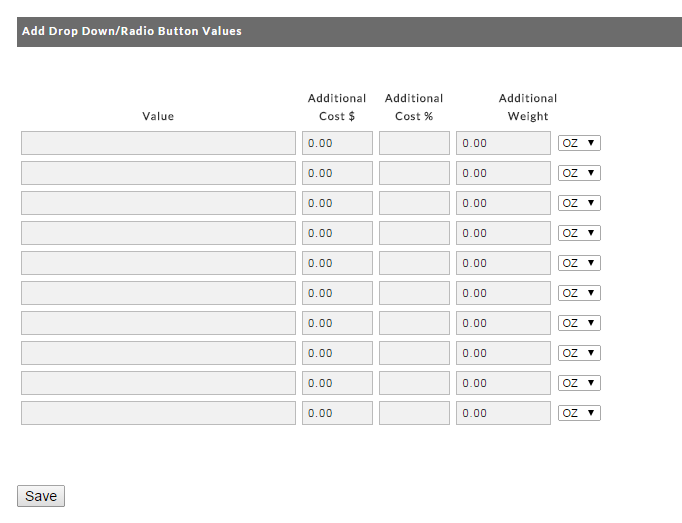
Here the merchant should specify all the different values for the option and the effect they have on the cost and weight of the item. For instance, an x-large shirt might cost $1.00 more or weigh slightly more. You would also indicate if the weight was in pounds (LB), ounces (OZ) or Kilogram (KG).
Once you've entered your values (up to 10), click on the "Save" button and you will be returned to the Order Editor screen. If you have more than ten values to enter, click on the "ADD" button. Values that you've added will appear on the Option Editor Screen and the look of this section will have changed.
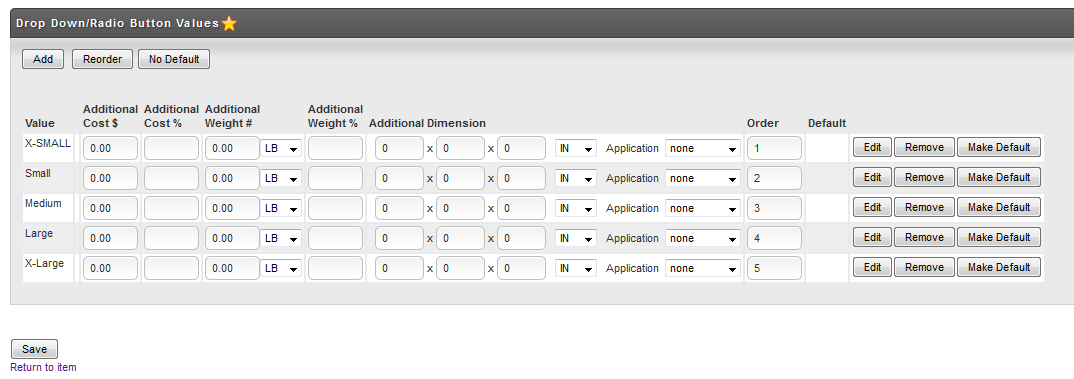
The new columns and buttons that now appear are explained below.
- Additional Cost and Additional Weight – the amounts that you set (if any) when creating the values will appear in these columns.
- Additional Dimension – this field will show "none". Click the Edit button to be taken to the editor screen where you can enter the additional dimension values.
- Order - This column will show the present order of this list. You can re-arrange the order of your list by changing the numbers in this column. Once you have change the order numbers, click on the "Reorder" button in the Section Header. Your values will then shift to the order you configured.
- Default - This column will be blank until you select one of your Values as the default. Click on the "Make Default" button at the end of the row that you want to set as the default. The word "Yes" will appear in the Default column for that Value. In the example above, we have configured the Medium Value as the default. If you decide you want no default value, click on the "No Default" button in the Section Header. If you do set one of the values as the default, it will automatically appear in the options field when the customer adds the item to their shopping cart. The customer can change the option during checkout using the drop down menu. To change the default, click the "Make Default" button for the appropriate value.
- Edit Button - Clicking on a "Edit" button will take you to the Value Editor where you can change attributes for that particular value.
- Remove Button – Clicking on the "Remove" button will remove that Value from the list. This is a permanent action without a warning dialog.
- Make Default Button – explained above under "Default".
Radio Button Value List
Once you have selected the Radio Button List of Values the Drop Down/Radio Button Values section will appear at the bottom of the Option Editor screen.
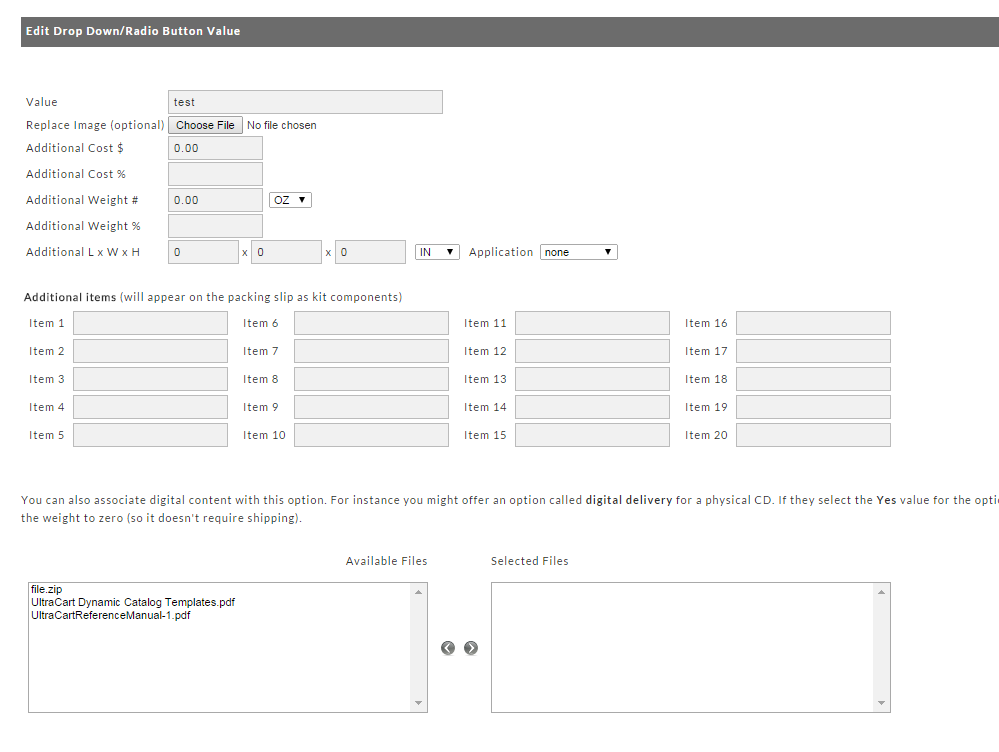
To add your values, click on the "ADD" button which will take you to the Add Radio Button Values screen. This procedure will be somewhat different than the drop down list.
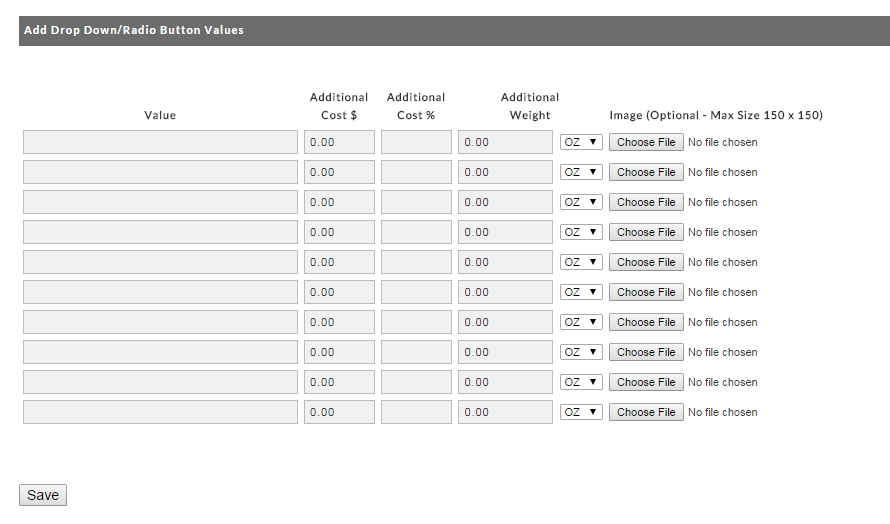
Here the merchant should specify all the different values for the option and the effect they have on the cost and weight of the item. For instance, an x-large shirt might cost $1.00 more or weigh slightly more.
Radio Button Value list also allows you to upload images assigned to each value. These images will be displayed in the cart along with each value. Click on the Browse button and navigate within your system to the location of your image. Repeat this process for each image you want to attach to each value.
Once you've entered your values (up to 10), click on the "Save" button and you will be returned to the Option Editor screen where your newly created Value list will be shown.
Associating Digital Content
You can also associate digital content with the Radio Button Value List (only). For instance you might offer an option for digital delivery for an picture to go along with the item. This would give the customer the option of purchasing the picture (which requires shipping costs) or digital delivery download (no shipping). Two Radio Button Values would be set as Safety Office and Safety Office 2. If the customer selects the Safety value for the option then it would associate a picture with the item and reduce the weight to zero (so UltraCart will not calculate shipping costs).
After creating the Item, we create the Item Option called Delivery Method with two values; Safety Office and Safety Office 2. They would appear as follows in the Option Editor.
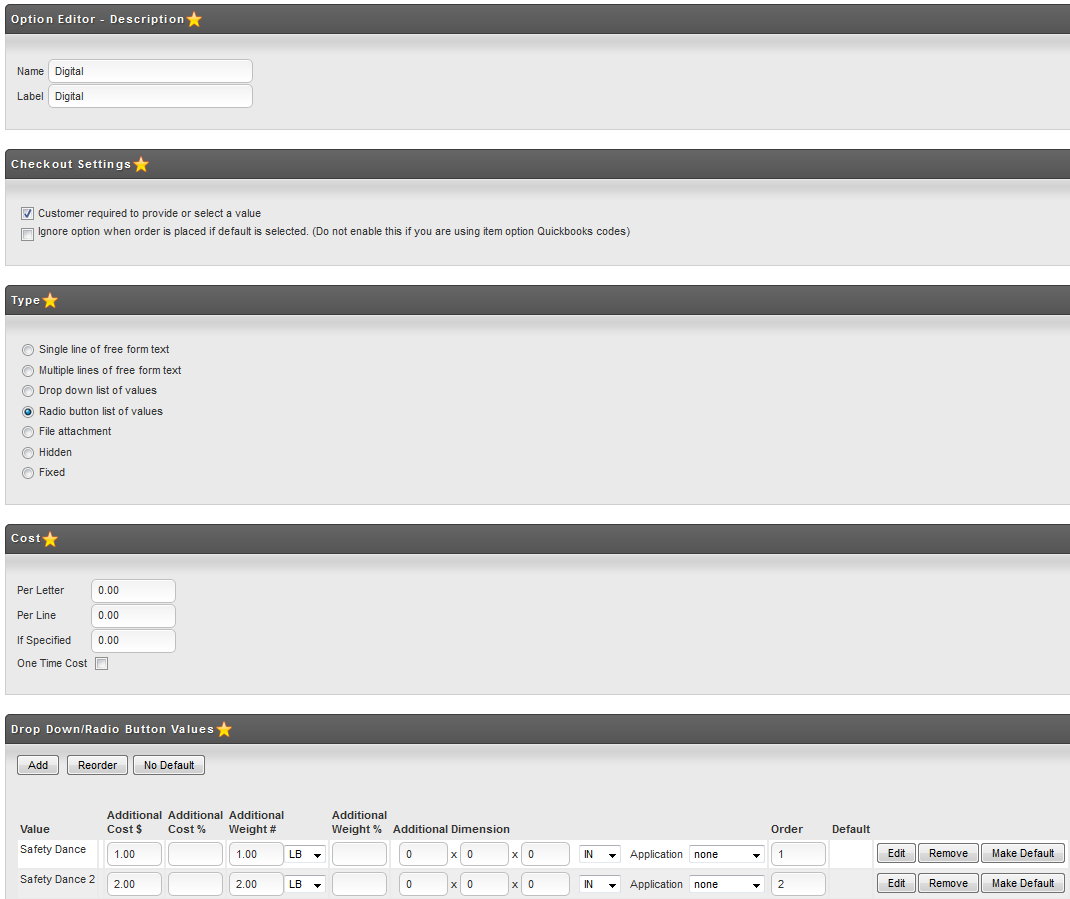
Figure 251 - Delivery Method options
To associate Digital Content click on the "Edit" button for the Radio Button Value desired. In this case it would be the Digital Download Value.
Radio Button Value Edit screen
This editor automatically shows all files that have been uploaded in the Digital Library. We associated them to this option by selecting and moving them to the right side (click on the arrow pointing to the right).
File Attachment
The file attachment option adds a upload button to the checkout that allows the customer to browse their computer and upload a file as an attachment to their order.
Configuration View of File Attachment Option
How it appears in the shopping cart

Options Listing
Once you have successfully created options, they will be listed under the options tab.
There are three buttons above the listings; Add Option, Reorder and Edit QuickBooks™ Codes.
Add Options – Click the "Add Option" button to add a new option for this Item.
Reorder – this simply rearranges the order the options are listed during checkout. Change the numbers to the order you want them to appear in the "Order" column. Click the "reorder" button when finished. The list will be rearranged into the order you have specified.
Edit QuickBooks™ Codes – Using options can make it convenient for a customer to select variations for an item but causes some issues when it comes to accounting since each item has its own accounting code. For instance, you might offer a Blue T-shirt that comes in small, medium, large, and x-large. The QuickBooks™ code for the Item might be BLUESHIRT. However, the codes might have been configured in QuickBooks™ for all the variations as; BLUESHIRT-S, BLUESHIRT-M, BLUESHIRT-L, and BLUESHIRT-XL. This screen allows you to assign the QuickBooks™ code to each unique item option. Enter the code desired and click the "Save" button. Repeat these steps for each Option.
Remove Item Option
Click the "Remove" button to delete an option. Warning! There will be no confirmation dialog presented.
Edit Item Option
Click the "Edit" button to be returned to the Option Editor screen. There you can make changes. Click the "Save" button when finished.
Variations
This is an incredibly powerful tool for catalog users that have Items with variations. It basically allows you to define selectable options for your items that have different flavors (colors, sizes, etc.). Although you could utilize Item Options to fill this need, you wouldn't get the inventory control and reporting that Variations will fulfill.
Method 1 - Variation Wizard
First click on the new button to create the parent item. Then click on the Options from the menu. (any edits will be saved).
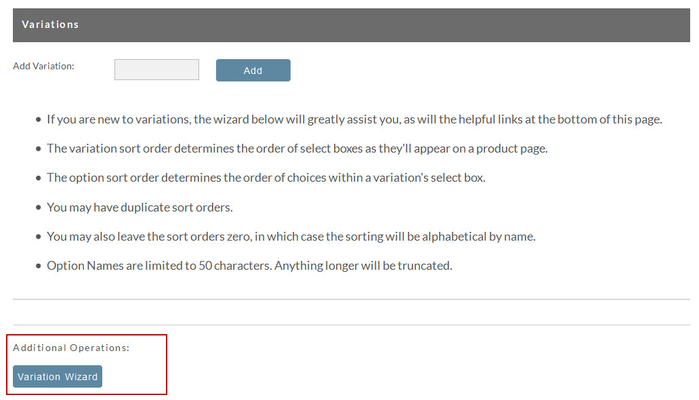
In the Variations section click the Variations Wizard button as shown below.
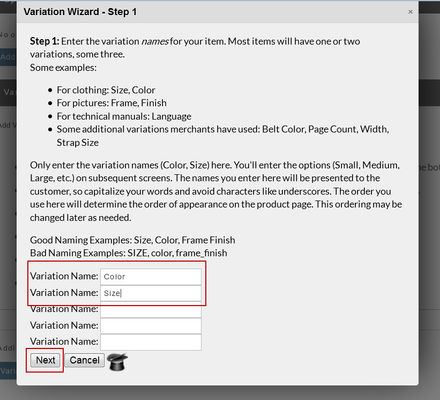
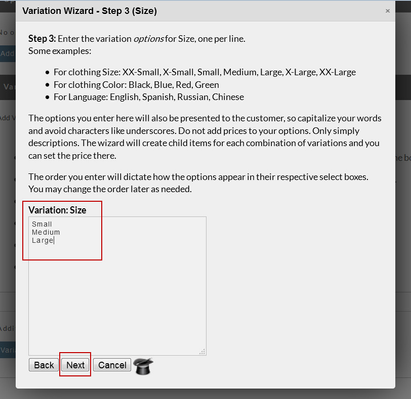
The wizard will pop up on the screen. Enter the names of the variations for the product and click next as shown below. In the case of this shirt we have Size and Color as our two variations.
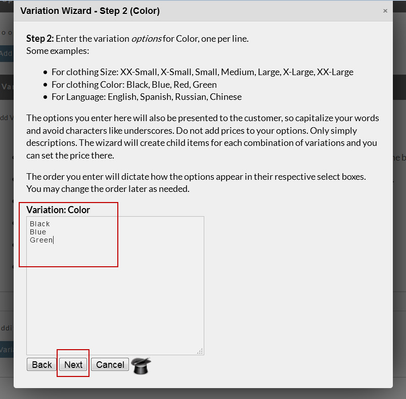
Next we enter the values for the Color variation as shown below and click next
Then we enter the values for the Size variation as shown below.
Finally we assign items to the variation matrix. Notice that the system will automatically suggest item IDs for the child items and will create them if they don't exist.
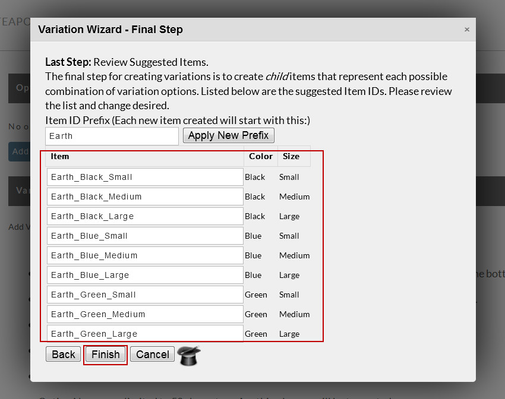
Once the wizard completes the complete matrix will display on the page as shown below.
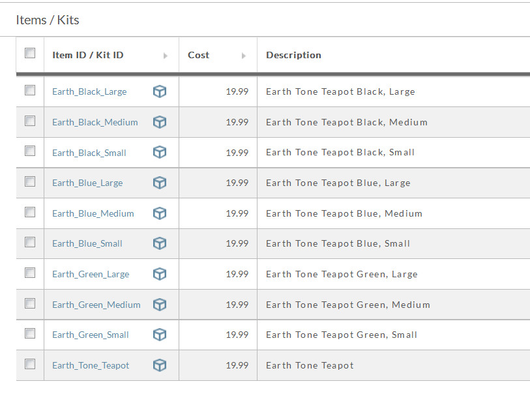
The item list should now look like the screen shot below.
Method 2 - Item setup without the variation wizard
First click on the new button to create the parent item. Then click on the Options from the menu. (any edits will be saved).
We'll configure the first child item. In this case it is the small black shirt. Shown below are the minimum fields that we will configure on the item. Click the Catalog tab when finished. Your changes will be saved.
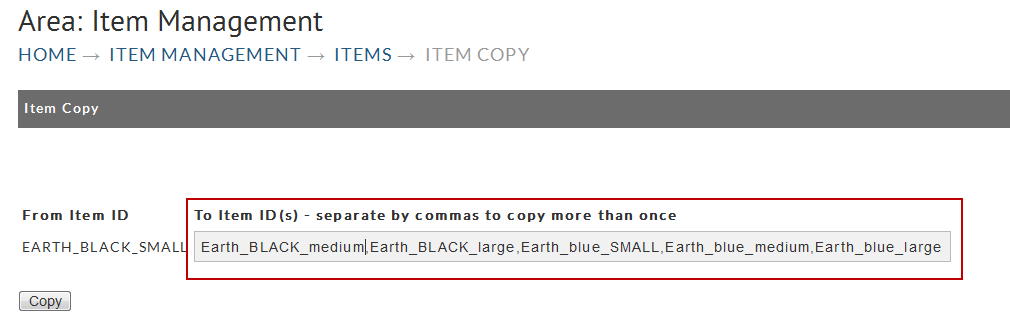
To speed things up we will use the copy tool to make six more copies of this item. Check the box and click the copy icon as shown below.

Enter all the additional item ids into the box separated by commas as shown below and click copy.
After the copy operation completes you will see the items in the list. You will need to click on each item and adjust the description until your list looks like below.
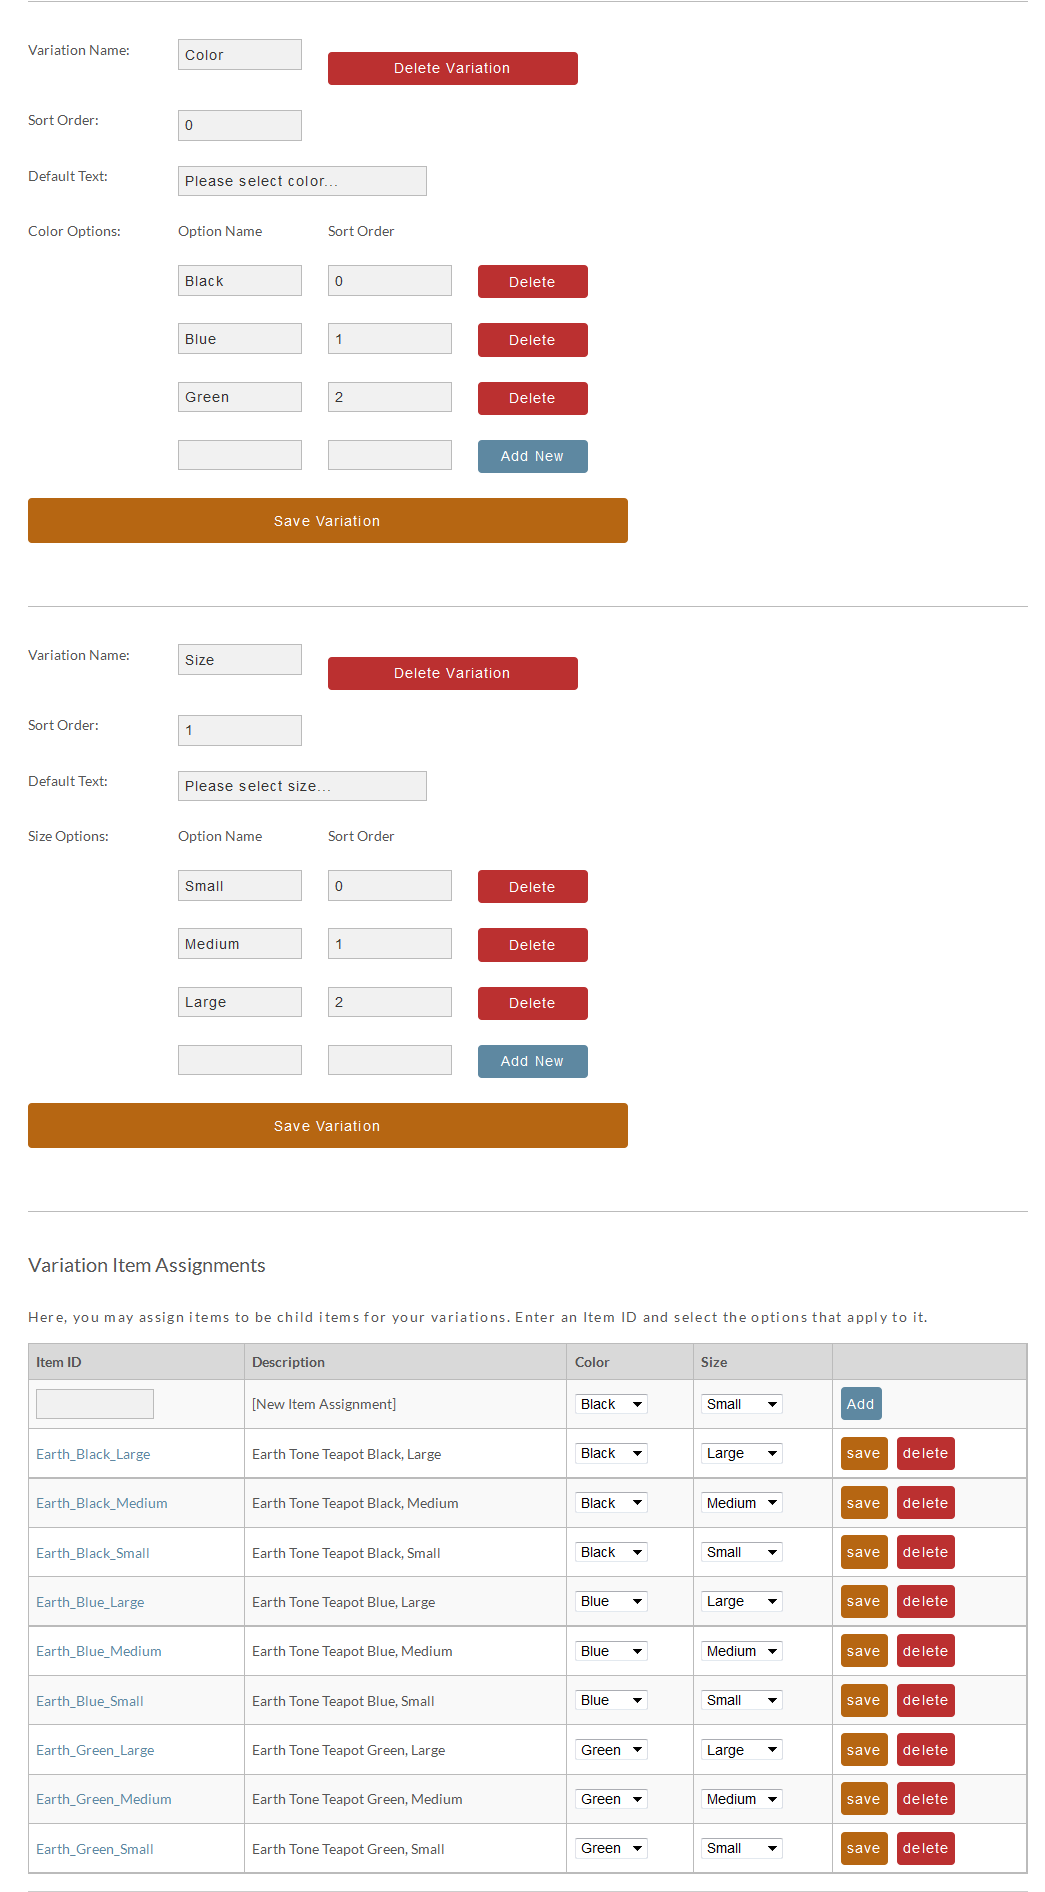
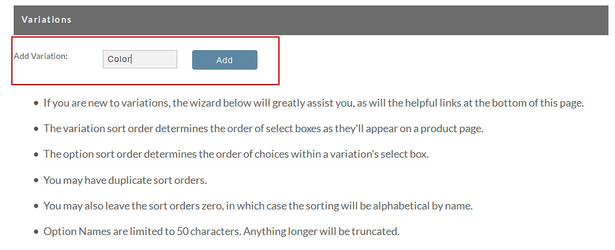
Once you have the items created you will now need to create the variation on the parent item and assign the items into the variations. We do this by editing the parent item in this case its item "Earth_Tone_Teapot" and click on Options.
Simply add the variation name into the field provided and click "Add". You will need to do this for all the variation types you have, in this example they will be Color and Size.
After clicking Add a new section will be provided so that Color options can be configured. Simply add your option name and then click "Add New". Once you are done adding in all of your options simply click "Save Variations", this will save and refresh the page.
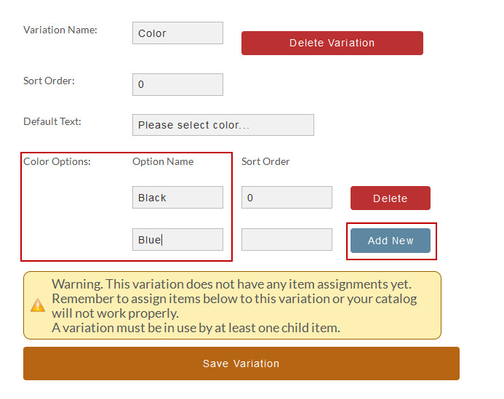
We will do this for both Color and Size, until we have all of our variation options configured. Once that is complete you can move down to Variation Item Assignment. From here we simply provide an item id and then set the variation options that apply to the item.
Item Variation Assignments
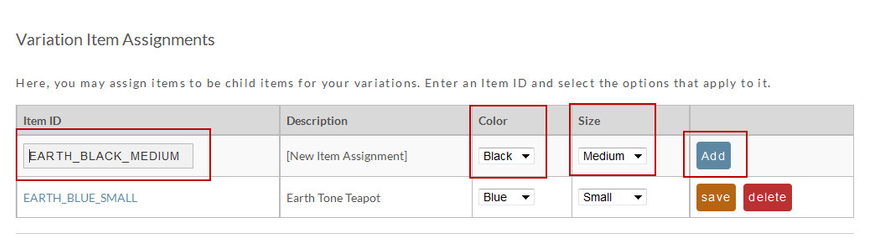
Once you have added all of the items and there variations simply click save and you are ready to go.
Method 3 - Configuring Large Numbers of Variations with Batch Item Import
Obviously there was a lot of clicking to perform the configuration of a single item with variations. The fastest way to configure variations is with a spreadsheet and the batch item import. The easiest way to illustrate the composition of the spreadsheet is with a screen shot of the example configured above.

Obviously there are additional columns in the spreadsheet associated with description, cost, weight, etc, but the example above shows the variation configuration. Notice the parent item always has to come first in the spreadsheet. If you use a naming convention where the child item always has the parent item as a prefix then the nature sorting of your spreadsheet will take care of this requirement. Next there are three columns for each variation: name, parent and value. Make sure the name and parent are consistent for each variation in the spreadsheet. In this example we have Color,SHIRT and Size,SHIRT in colors Z,AA and AC,AD. The variation value columns cover the individual values associated with each child item.
Once your spreadsheet is created you can upload it with batch item import tool.
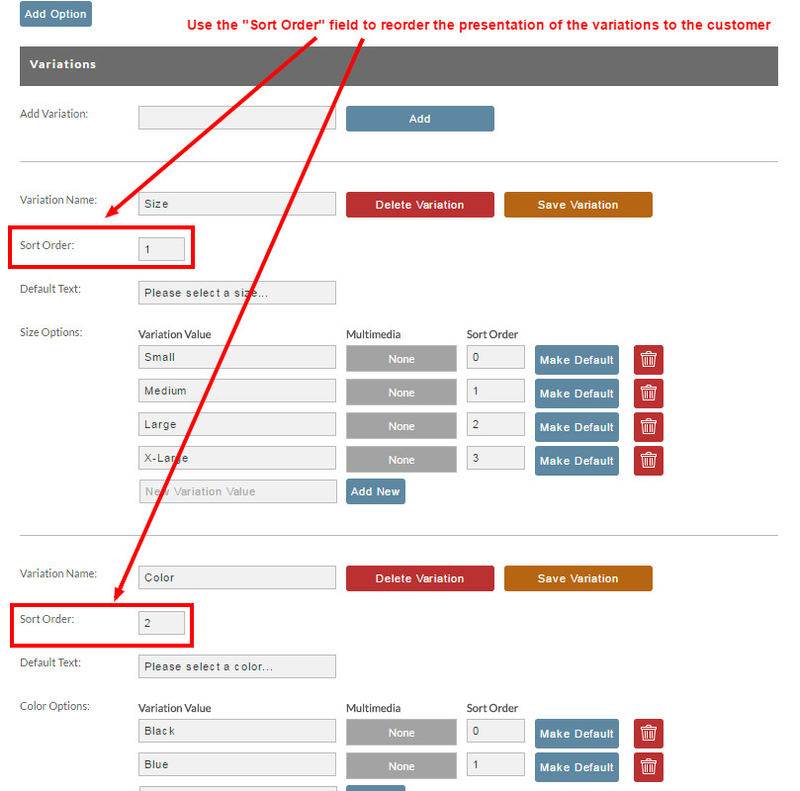
Sorting Options
Sort Order of the Variation
You can reorder your variations using the "Sort Order" field that appear within each configuration variation.
For example if you preferred to have the customer select their size before being prompted to choose the color. The sort order would be "1" for the "Size" variation and a "2" for the "Color" variation:
Sort Order of the Variation "Options"
Similarly, you can also set the sort order the options to your variations using the "Sort Order" field that appear within the list of options to each variation.
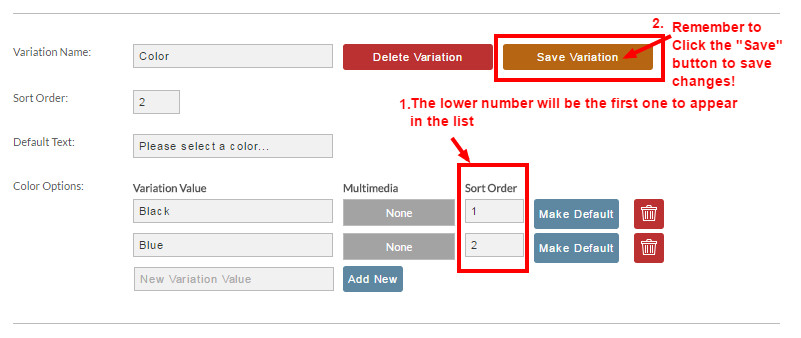
For example you might decide that you prefer to have the "Black" color option to appear first in the variation drop-down menu, to do that simply enter "1" into the Sort Order field for "Black" and "2" for Blue" then click the "Save variation" button.
Drag-and Drop Sorting
Sort Order - Use Drag and Drop!
In addition to the sort order sorting, you can use drag-and-drop within the variation options. To do so, move your cursor in between the "Variation Value" and "Multimedia" columns and the cursor will change to the "hand" then click to hold that variation value and drag it to the location you want it to appear in the list.
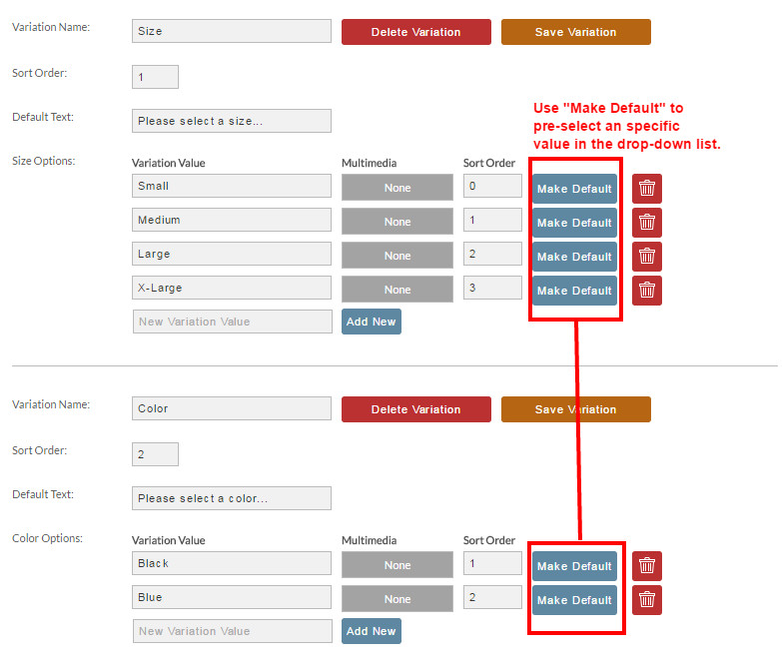
Make Default
You can configure a specific variation option as the default option. This will cause the variation to show this choice by default, so the customer would not need to click the drop-down list to make a choice. To set a variation option as the default option, click the "Make Default" button next of the variation option you want to make default.
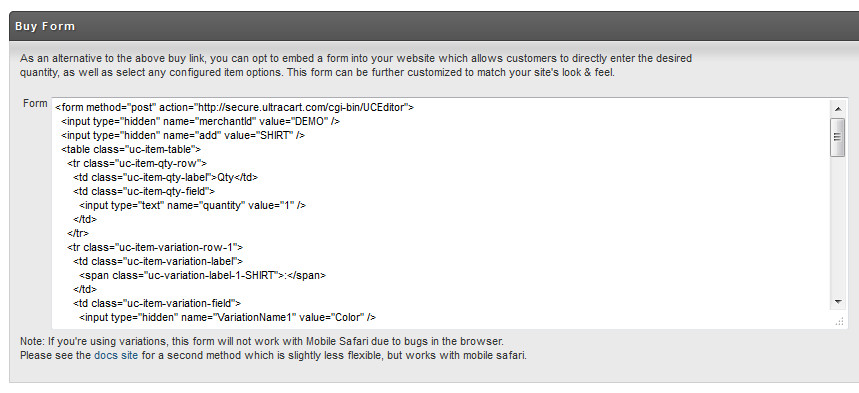
Deploying the Buy Form
Deploying the form with the variations is quite simple. First click on the [view] link associated with the parent item "Shirt". There is a section of the links page labeled Buy Form as shown below. Copy the content from the buy form to the HTML page on your site. Please note that this form will be very plain and require some styling. You'll notice that this form will have select boxes for each variation, but no option elements specified. Allow the values are dynamically populated by the two JavaScript files loaded at the end of the form. The form only needs to be redeployed to your site if you add/remove a new variation. Simply adding or removing a child item does not require the form to be redeployed.
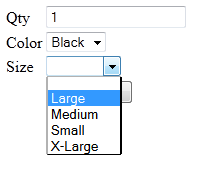
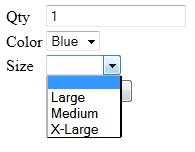
Once the form is on your site it will look like the following screen shot.
Notice that we have four options for size when the black color is selected, but only three options for size when the blue color is selected. Variations support the concept of not every single combination being possible. The select boxes will update on the fly as the customer chooses options so that there is never an invalid combination of selections that the customer can make.
Troubleshooting
Things to look for if the form is not populating the drop-down menu for the item variations:
- Make sure at least one item is configured with inventory in stock or the enable inventory tracking turned off. Otherwise, the javascript that is creating the array of the variations will return a null value.
- When testing the variation code is being tested in a local HTML page prior to being publish to your live website, the javascript tagsa below the form code will need to be edited to add the "http:" prefix to the script src URL's.
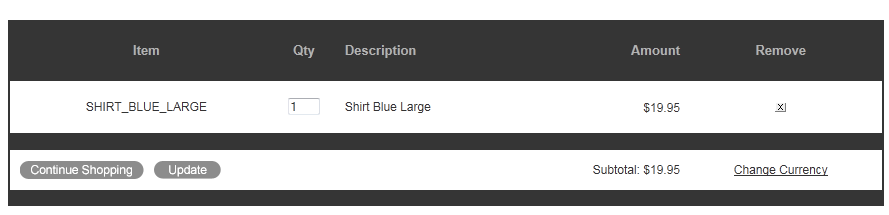
If you select a large blue shirt and click add to cart you will notice that the child item is added to the cart.
jQuery Dependency
The catalog variation support requires jQuery 1.7.2. The form will automatically detect and include jQuery if it's not already on the page. The code should be backwards compatible with 1.4.2 which you may be using already on your site.
Delete Variations
Use caution here as clicking the "delete" button at the bottom of a variation column will delete the variation and all its values. There is no "confirm delete" dialog.
Delete Items
To remove an Item from the listing, click the "delete" button to the right of the row the item is in. Caution, there is no "confirm delete" dialog. Click the "delete" button to the right of the Item you want to remove. This does not delete the item from your store. It only removes it from the Variations screen. There is no "confirm delete" dialog.
FAQ
Q: I have items configured using item variations, do I configure the sale price only on the parent item?
A: When using variations, it's the "Child" items that eventually get added to the cart, so in order for the sale cost to properly apply to the item the customer is selecting, make sure to apply the sale cost to all children items.
Q: I have items configured using item variations, but I'm not seeing the child items appearing in the drop-down list?
A: If the drop-down list is not being populated, check to see if the child items have "Track Inventory" configured and the allocatable inventory is zero. Also check to make sure that the child items are not set to inactive.