| Table of Contents |
|---|
Overview
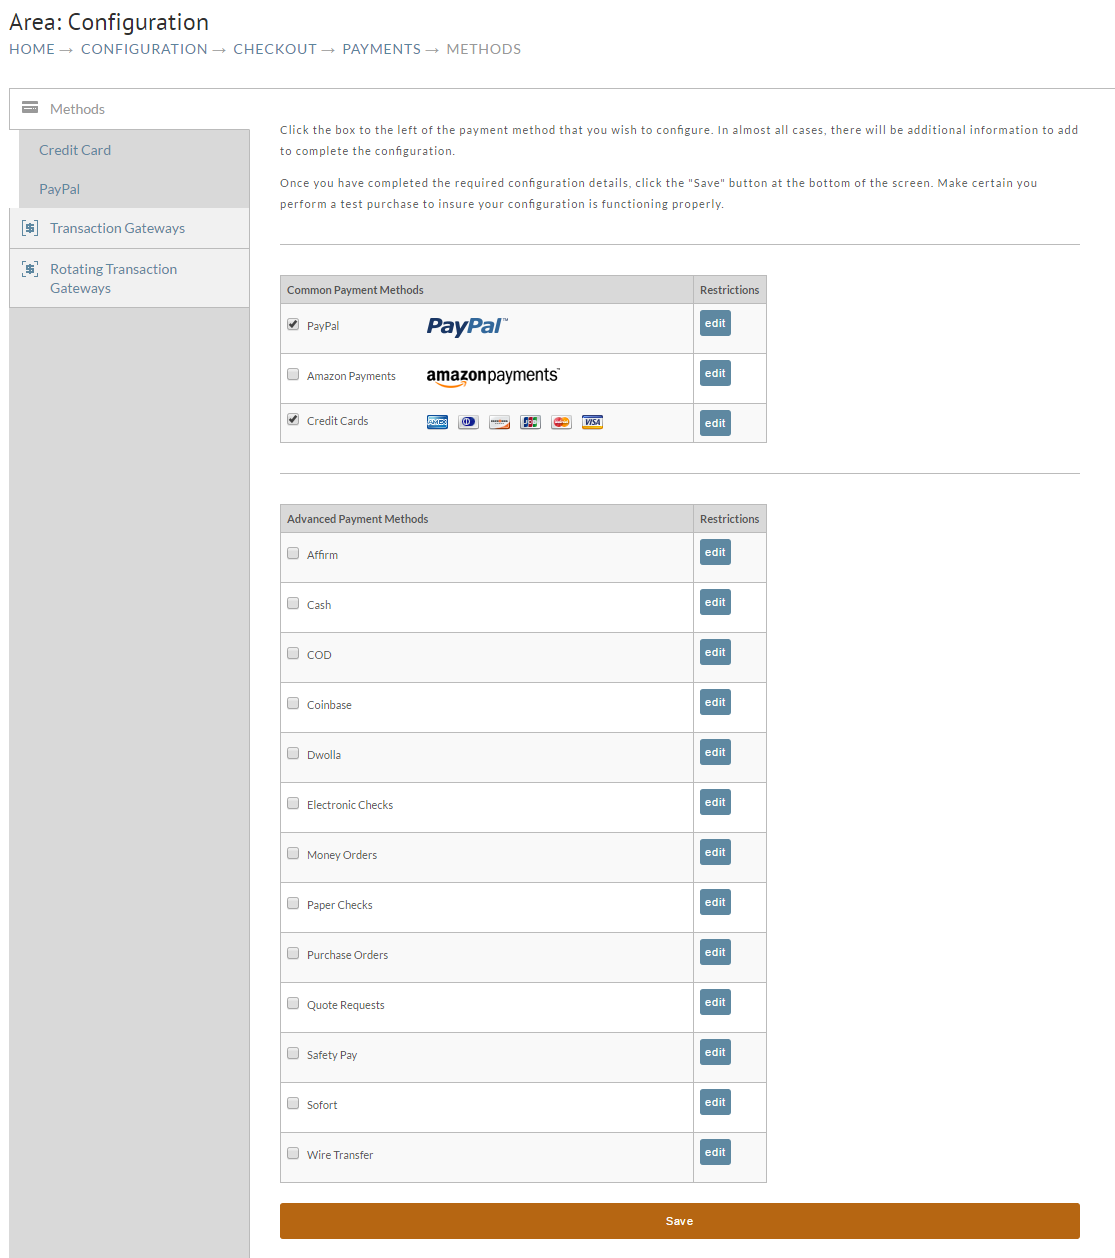
Under the Methods tab you will indicate which Payment Method(s) you want to accept. PayPal and/or Credit Cards may already be selected if you made those choices from the Payment Wizard (initial set-up).
The following are configurable payment methods:
- Pay Pal
- COD orders
- Credit Cards
- Checks &Money Orders
- Purchase Orders
- SafetyPay
...
Once you check a box to select a method, additional fields may appear for completion. A "Save" button is provided at the bottom of the screen. Clicking this button will save the information you have entered and return you to the Configuration Menu.
Some merchants will see text fields labeled QuickBooks™ codes during configuration. These will only appear for those merchants that have enabled UltraBooks. For more information about UltraBooks, see page .
PayPal
If you have already set up PayPal via our Payment Wizard mentioned earlier then you probably can skip this section. We do recommend you obtain a thorough understanding of PayPal and its integration Options.
See Demo
You can also learn more by clicking the "See Demo" link. This will take you to the PayPal website where you can view the Express Checkout demo and if desired, sign up. Note: If the link is not visible, uncheck the "Accept PayPal" box.
Simple Setup
Clicking the "Simple Setup" link will also take you to a PayPal web page for step by step instructions for setting up PayPal Express Checkout through Permissions.
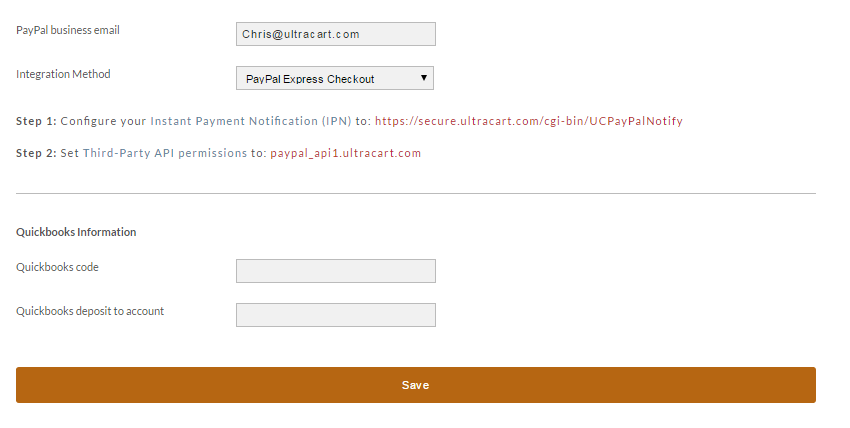
To accept PayPal as a Payment Method, click the check box to the right left of the "Accept PayPal" field. More fields will be revealed.
PayPal business email: enter the email address that corresponds to your PayPal business account.
Integration method: click the single method that you desire.
- PayPal Express Checkout
...
- PayPal Payments Pro
Simply follow Step 1 to configure your Instant Payment Notification and Step 2 to configure your API permissions to complete the setup process.
Clicking on the "Advanced tab" will display secondary section of configuration that will allow you to configure your First Party API setting rather then configure the steps above, along with a list of other configuration options.
First Party API Credentials. The information for these fields is provided by PayPal when you obtain your API Credentials (API Signature). See page for more on API Access.
| Name | Description |
|---|---|
| API User Name |
...
| Enter the User Name supplied by PayPal | |
| API Password |
...
| Enter the API Password supplied by PayPal | |
| API Signature |
...
| Enter the API Signature supplied by |
...
- PayPal Web Payments Standard:
Simply click on the radio button to the left. No additional fields are required. Note: you must have Instant Payment Notification set to "YES" in your PayPal account (Profile).
COD (cash on delivery)
...
| PayPal |
Amazon Payments
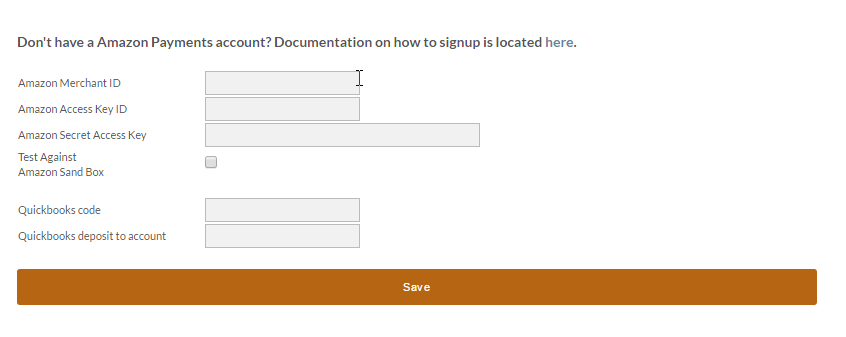
To accept Amazon Payments as a Payment Method, click the checkbox check box to the right left of the "Accept CODAmazon Payment" Fieldfield. Four more More fields will be revealed.
Field #1: Approved customers only: Check this box if you want to accept COD orders for your "pre-approved customers only".
You must enable customer profiles for this functionality. If you haven't already done so, navigate to:
| Panel |
|---|
Main Menu → Configuration → Customer Profiles |
and check the box for "Enable Customer Profiles".
You also must configure each customer's profile at:
| Panel |
|---|
Main Menu → Order Management → Customer Profile Management |
Field #2: Surcharge Transaction Fee: This is a merchant's opportunity to pass along the cost of C.O.D. fees to the customer. Enter the amount in dollars and cents.
Field #3: Surcharge Transaction Percentage: This percentage is in addition to the surcharge transaction fee. Enter the percentage in decimal.
Simply provide the Amazon Merchant ID, Access Key ID, and Secret Access Key to complete the setup process.
Credit Cards
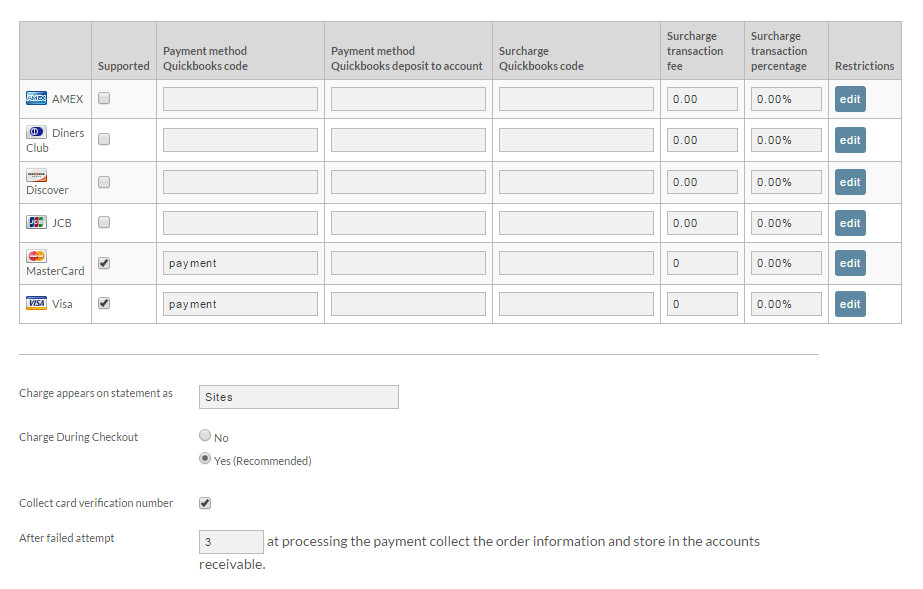
To accept Credit Cards as a Payment Method, click the checkbox to the right left of the "Accept Credit Cards" Field. Basically 3 more More fields will be revealed to complete the configuration.
UltraCart currently supports the four Six major types of credit cards: Visa, MasterCard, American Express, Discover, Diners Club, and DiscoverJCB. For each supported card, check the checkbox to the right of the card name. Only check those that your merchant transaction gateway supports.
Field #1:
| Name | Description |
|---|---|
| Charge appears on statement as |
...
| Enter the name of the company that will appear on the customer's credit card statement. To alleviate confusion to the customer, the billed by name will be printed on their receipt. This will help customers associate the charge on their credit card with the online store if the company name and DBA are different. This also helps prevent them from initiating a charge back. |
...
| Charge During Checkout | This option tells the system if the customer will be charge in real time when the order is placed or after. It is always recommended to keep this setting to yes unless you are setup to charge the customer after shipment. |
| Collect Card Verification Value number |
...
When this box is checked, the customer MUST enter the Card Verification Value (CVV2) number that appears on the back of their credit card. Note: Discover Card calls it the "Cardmember ID". This is performed only momentarily for real-time charge during checkout. This data is NOT retained in the database!
|
...
| After Failed Attempts | This setting will tell the system how many time the customer card can fail before the order is collect and sent to Accounts Receivable. If set to Blank then the customers card can fail over and over again until the customer corrects the issue. |
Affirm
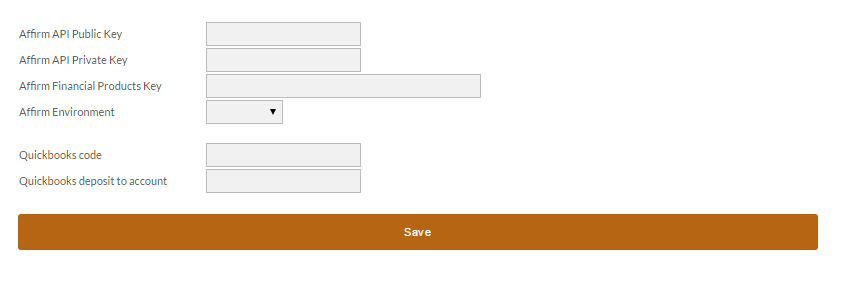
To accept Affirm as a Payment Method, click the checkbox to the left of the "Affirm" Field. More fields will be revealed to complete the configuration.
To complete the setup process for Affirm simply provide the Affirm API Public Key, API Private Key, Financial Products Key, and set the Affirm Environment.
Cash
To accept Cash as a Payment Method, click the checkbox to the left of the "Cash" Field.
| Info |
|---|
Cash orders are placed through the Back End Order Entry application (launch from the order management menu). |
COD (cash on delivery)
To accept COD (cash on delivery) as a Payment Method, click the checkbox to the left of the "COD" Field. More fields will be revealed to complete the configuration.
| Name | Description |
|---|---|
| Approved customers only | Check this box if you want to accept COD orders for your "pre-approved customers only". You must enable customer profiles for this functionality. |
| Surcharge Transaction Fee | This is a merchant's opportunity to pass along the cost of C.O.D. fees to the customer. Enter the amount in dollars and cents. |
| Surcharge Transaction Percentage | This percentage is in addition to the surcharge transaction fee. Enter the percentage in decimal. |
Paper Checks - Money Orders - Electronic Checks
Electronic forms of payment are typically preferred by merchants over checks because the funds become available to the merchant quicker, and the credit card company assumes more of the risk related to fraud. Paper checks, Electronic checks and Money Orders are still a common form of payment by corporations or for large orders by customers that do not have a credit card.
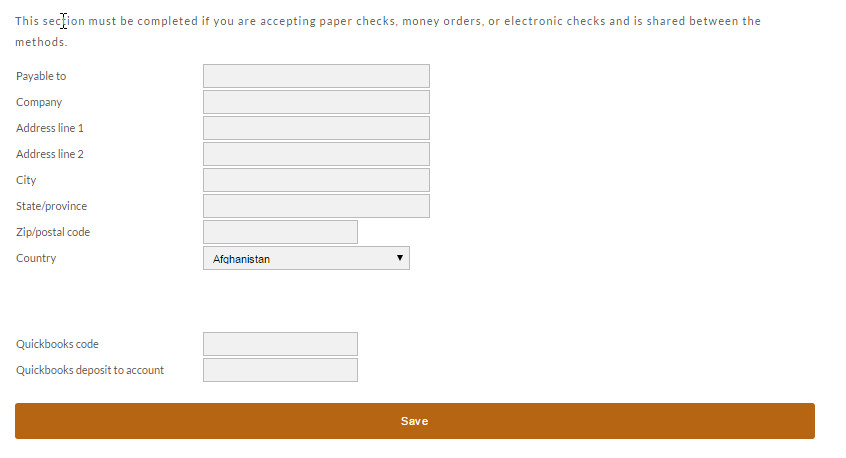
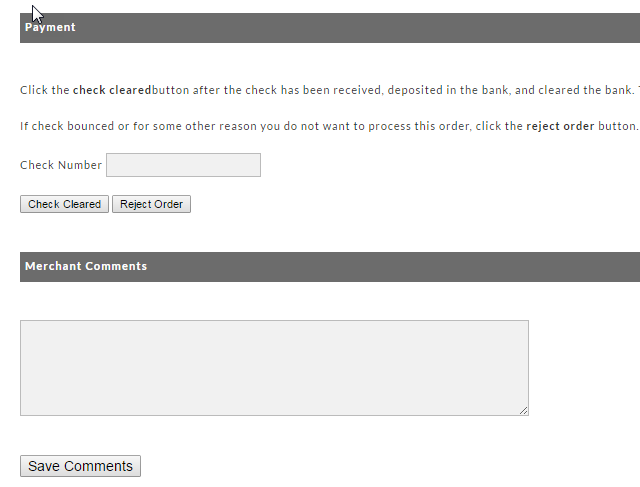
Accept paper checks: Check this box if you want to allow your customers to pay via paper check. Your order will be held in Accounts Receivable (AR) until you approve (checked cleared) or reject the order.
Accept money order: Check this box if you want to allow you customers to pay via money order. This will be very much like the paper check process; holding the order in AR for your approval.
Accept electronic checks: Check this box if you want to allow your customers to pay via electronic check. You no longer need to have an eCheck gateway to process check orders electronically. See the section on Printing Check Drafts in the Accounts Receivable section for details on how to use this feature.
Field #1: Payable to: If all follow the same configuration, simply click the box to the left of the desired payment option to display the configuration for each.
| Name | Description |
|---|---|
| Payable to | If the checks or money orders need to be made payable to a company name that differs from the one selling the items, it should be entered here. |
...
| Company |
...
| Enter the Company selling the product here. |
...
| Address line 1 |
...
| Specify the location where customers mail the checks or money orders. Some large merchants use a cash management and lockbox service provided by their corporate bank and will specify a post office box where the mailings should go. |
...
| Address line 2 |
...
| This field is to be used when the address is two lines in length (P.O. Box, etc.). |
...
| Fields 5-8 |
...
| Enter the City, State/province, Zip/postal code, and Country. |
The following is an example of what will appear at the bottom of an order that is held in Accounts Receivable for approval.
Purchase Orders
Accept purchase orders: Check this box if you want to allow your customers to pay via purchase order. This section will then expand to reveal 1 additional field. Field #1: Approved customers only:
Purchase Orders
To accept Purchase Orders as a Payment Method, click the checkbox to the left of the "Purchase Order" Field. More fields will be revealed to the right.
| Name | Description | ||
|---|---|---|---|
| Approved customers only | Check this box to restrict purchase orders for approved customers only. Most merchants that approve purchase orders will make them available for "approved customers only".
| ||
| Prevent Duplicate PO Numbers | This option will do just want it say, it will keep a customer from using a PO Number that has already been used on another order. |
Quote Request
To accept Quote Request as a Payment Method, click the checkbox to the left of the "Purchase Order" Field. More fields will be revealed to the right.
| Name | Description | ||
|---|---|---|---|
| Approved customers only | Check this box to restrict purchase orders for approved customers only. Most merchants that approve purchase orders will make them available for "approved customers only".
|
...
|
Saf-T-Pay
SAF-T-PAY is a secure payment system that allows non-credit card usersand overseas shoppers to make online purchases directly through theirlocal bank. To learn more about and register with this integrated feature go to: http://www.saftpay.com.
Accept Saf-T-Pay: Check this box if you want to configure Saf-T-Pay. This section will then expand to reveal 3 additional fieldsthe configuration area. Enter your Merchant ID, User ID and Password that were assigned to you when you registered with Saf-T-Pay.
Wire Transfer
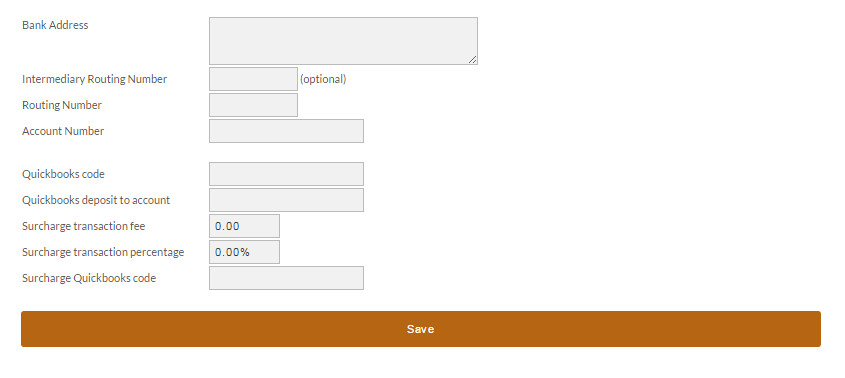
Accept wire transfer: Check this box if you want to allow your customers to pay via wire transfer. The section will then expand to reveal 5 additional fields. To accept Wire Transfer as a Payment Method, click the checkbox to the left of the "Wire Transfer" Field. More fields will be revealed to complete the configuration.
| Info |
|---|
Wire transfers apply to U.S. based merchants ONLY! Your bank information will be printed on the Customer's receipt after checkout. The customer will then have to work directly with their banking institute to perform the Wire Transfer using the information you provide on this section. |
Field #1: Surcharge transaction fee: This is a merchant's opportunity to pass along the cost of Wire Transfer fees to the customer. Enter the amount in dollars and cents.
Field #2: Surcharge transaction percentage: This percentage is in addition to the surcharge transaction fee. Enter the percentage in decimal. Example "1.5".
Field #3: Bank Address: A text box is provided for you to enter the entire Bank Address. Press the "Enter" key at the end of each line.
Field #4 & 5: Account Number & Routing Number: Most businesses have more than one bank account. In the boxes provided, enter the Routing Number and Account Number for the appropriate account you want the wire transfer made to.
| Name | Description |
|---|---|
| Bank Address | A text box is provided for you to enter the entire Bank Address. Press the "Enter" key at the end of each line. |
| Routing Number | Most businesses have more than one bank account. In the boxes provided, enter the Routing Number |
| Account Number | Most businesses have more than one bank account. In the boxes provided, enter the Account Number for the appropriate account you want the wire transfer made to. |
| Surcharge transaction fee | This is a merchant's opportunity to pass along the cost of Wire Transfer fees to the customer. Enter the amount in dollars and cents. |
| Surcharge transaction percentage | This percentage is in addition to the surcharge transaction fee. Enter the percentage in decimal. Example "1.5". |
