| Table of Contents |
|---|
Overview
This tutorial will walk you through the process of creating an upsell Upsell using the new Visual Builder powered upsell functionality. This new upsell new functionality provides for several important benefits:
- Design everything visually
- Easier to understand visual layout of the order of the offers
- A/B path variations
- A/B offers
- Superior statistics about the upsell offer and path performanceyour upsells visually without writing HTML/CSS/JavaScript
- Easier path/offer configuration
- Drag and drop re-arrange the ordering of your offers
- Perform A/B experiments on paths and offers
- Easy to embed videos from YouTube, Vimeo or Wistia
- Completely responsive (mobile friendly)
- Real-time performance statistics
- Tracks abandons and refunds
- Calculates true net incremental revenue generated
- Easy to copy paths between multiple StoreFronts
Webinar Video: Upsell After Visual Builder
...
It's important to note that this new functionality is available only in the following themethemes:
- Elements version 0.96 or higher
- Fashion 0.20 or higher
- Mr Teas 0.48 or higher
- Natural 0.27 or higher
- Woodland 0.21 or higher
- LIFTY
- Jewel
- Native
- Natural VB
- Elements
- Hero
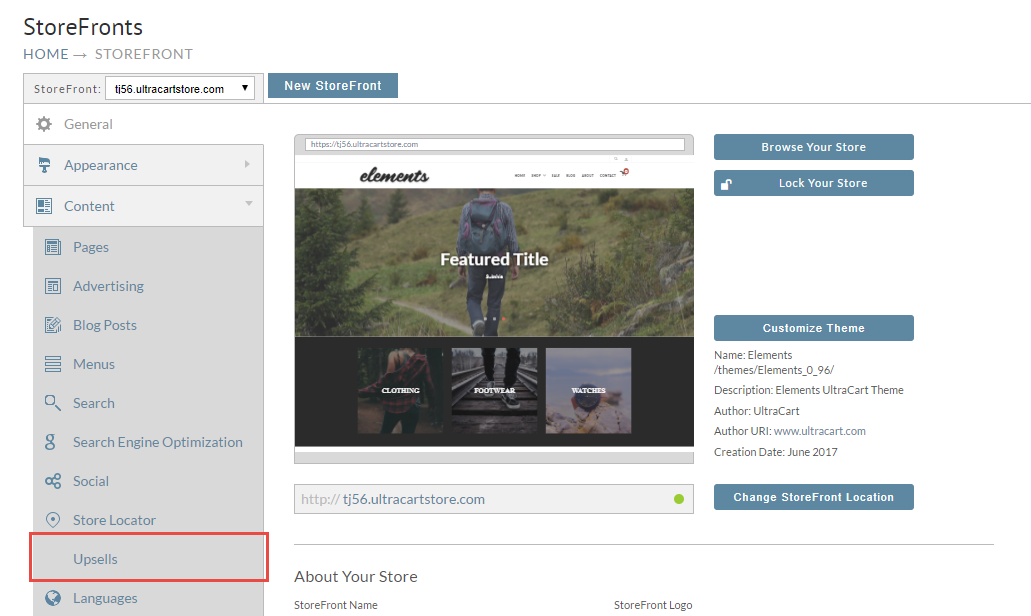
To get started, expand the content Content section (Tab) of your StoreFront and click on Upsells. If you do not see Upsells listed, then you are not running a theme that supports visual upsellsthem.
Create a Path
The first thing that you want to do is create a path by clicking on the new path Add Upsell Path button. A path is a sequence of offers that a customer will experience during the checkout if the customer has they have an item in their cart that triggers the path. A customer will go through each path that they qualify for starting at the top of the page and working their way to the bottom. .
.

Path Settings
Once you have created a Path you can also configure Path settings to trigger what path a customer might see based on different factors. To view the Path settings simply click on the Pencil Icon on the right as shown below.

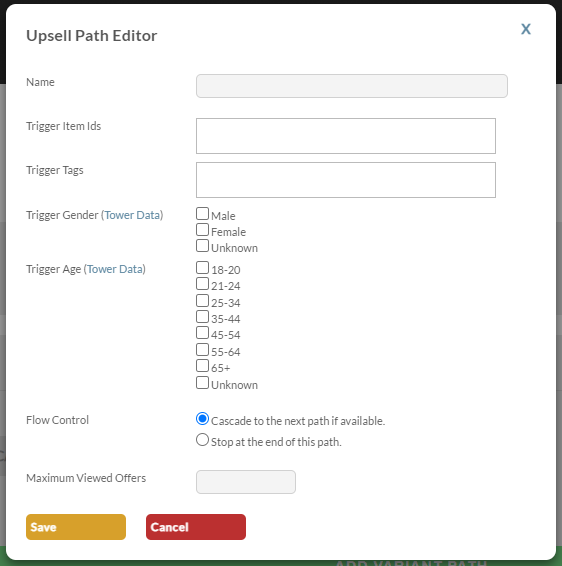
This will open the Upsell Path Editor.
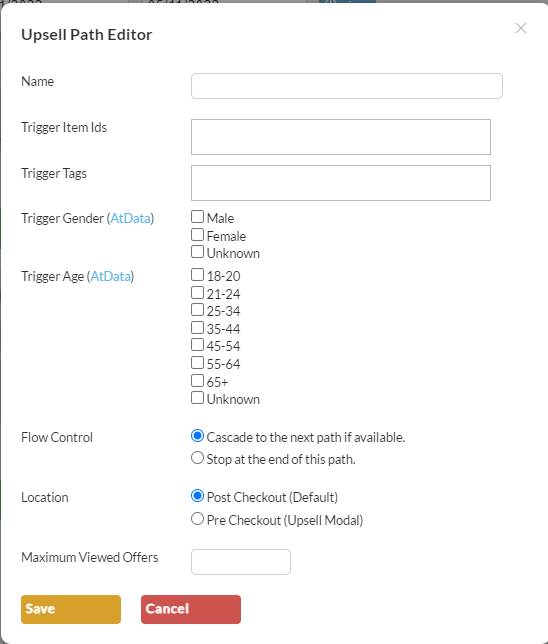
Upsell Path Editor Settings
| Upsell Path Field Names | Description | |||||
|---|---|---|---|---|---|---|
| Name | Allow you to name the path. | |||||
| Trigger Item IDs | Allows you to trigger the Upsell Path based on the items in the cart. | |||||
| Trigger Tags *New | Allows you to trigger the Upsell Path based on the Product Tags for the items in the cart. | |||||
| Trigger Gender *New | Allows you to trigger the Upsell Path based on the customer Gender *Requires Tower Data | |||||
| Trigger Age *New | Allows you to trigger the Upsell Path based on the age of the customer *Requires Tower Data | |||||
| Flow Control | This allow you to tell the Upsell Path to stop after this path is complete or continue to the next path in the list. | |||||
| Flow Location | Post Checkout (Default) Pre Checkout (Upsell Modal within the checkout process)
| |||||
| Maximum Viewed Offers | Allows you to set a limit to the number of offers a customer can see within the Path. |
Simply click Save at the bottom of the model to set and changes to the setting you would like to make.
Creating an Upsell Offer
Click on the + button to create your first step.
A prompt will appear on the screen. We're going to create an offer Offer so click on OK as shown below.
...
When the editor appears, there are 5 minimum things that you have to must complete. Follow the steps below They are:
- Give the offer a meaningful name (not visible by the customer)
- When ready, set the offer to active.
- Choose the item(s) that are being upsold to the customer.
- Pick one of the pre-defined layouts that you want to start with. After picking the selecting your layout you can click on the preview of the offer to launch the visual editor for the upsell. Make whatever content adjustments to the offer that you want. Note that the first two pre-defined layouts use a textblock of "lorem ipsum" as a placeholder. So make sure you change that to some meaningful marketing verbiage.
- Save
...
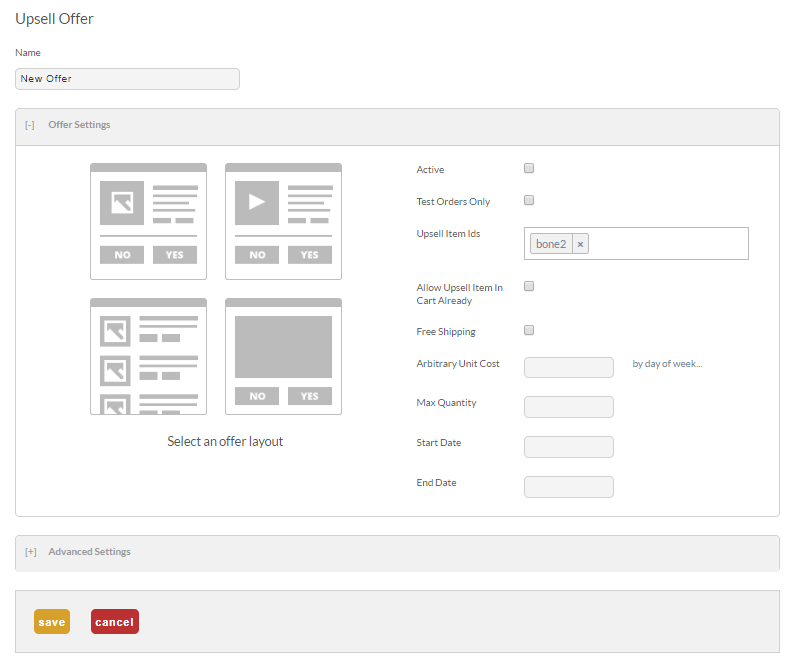
Offer Settings
| Field | Description |
|---|---|
| Active | If Check, the offer is active. |
| Test Orders Only | If selected the offer will only appear when the test credit card is used during the placement of the order. |
| Upsell Item Id's | The item(s) added to the order if the customer selects 'yes' for the offer. |
| Allow Upsell Item In Cart Already | Select this when the upsell Item ID is already in the cart prior to the display of this offer. |
| Free Shipping | Flags the upsell item as a free shipping item in the offer even if the item normally charges for shipping. |
| Arbitrary Unit Cost | If you are selling the item blow the cost configured on the item, then enter the new lower unit price here. Optional Setting: "By Day of Week" → Allows for a different arbitrary unit cost for each day of the week. |
| Max Quantity | Sets a max quantity for the upsell item. |
Start Date | Sets the Starting date for this offer (this is useful for setting time sensitive offers (like a Memorial Day special, for example.) |
| End Date | Sets the end date for this offer (this is useful for setting time sensitive offers (like a Memorial Day special, for example.) |
| Info | ||
|---|---|---|
| ||
PLEASE NOTE: The Offsite Content URL will only appear in the upsell offer editor when the Upsell Path is set to 'Post Checkout' flow location. |

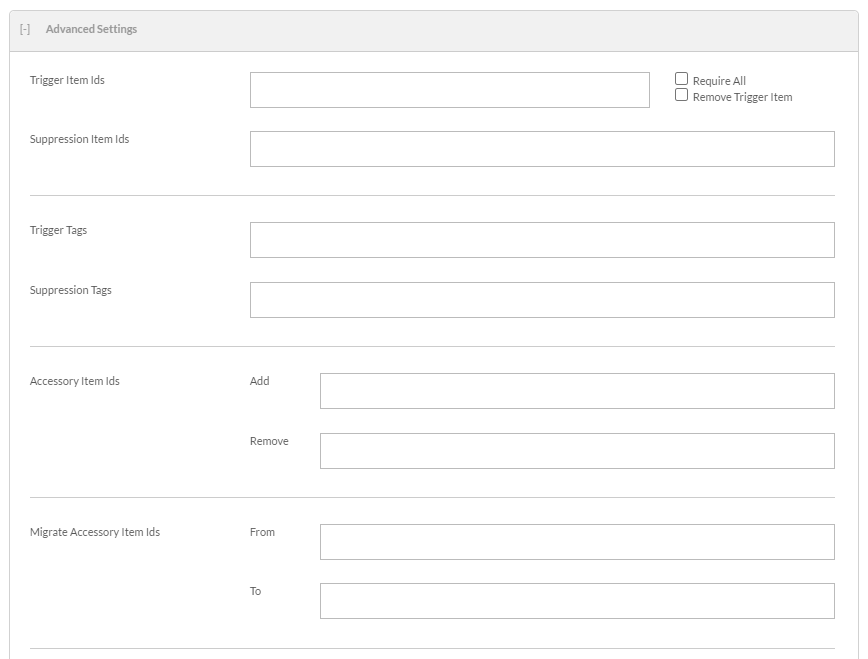
Advanced Settings
| Field | Description | ||
|---|---|---|---|
| Trigger Item Ids | If the configured items are in the customer cart during the initiation of the upsell offers, they will trigger the offer to be presented to the customer. Optional Settings:
| ||
| Suppression Item Ids | If the configured items are in the customers cart, the offer to be suppressed to the customer. | ||
| Trigger Tags | If the configured Tags are in the customer cart during the initiation of the upsell offers, they will trigger the offer to be presented to the customer. Tags are configured within the item editor. | ||
| Suppression Tags | If the configured Tags are in the customers cart, the offer will be suppressed to the customer. | ||
| Accessory Item Ids | The configured Item Ids will be added/removed if the customer selects yes to the offer.
| ||
| Migrate Accessory Item Ids |
| ||
| Trigger Countries | If selected, only customers ordering to the configured countries will trigger the offer. | ||
| Suppression Countries | If selected,customer ordering from the configured countries will not be shown the offer. | ||
| Trigger Shipping Methods | Only orders that selected the configured trigger shipping method will be presented with the offer. | ||
| Suppression Shipping Methods | The offer will be suppressed for any order in which the selected shipping method was selected during the initial checkout. | ||
| Trigger Payment Methods | Only orders that have selected the configured trigger payment method will be presented with the offer. | ||
| Suppression Payment Methods | The offer will be suppressed for any order in which the selected payment method was selected during the initial checkout. | ||
| Trigger Age | The offer will only be triggered if the customer is within the range of ages selected, by default it is shown to all customers if nothing is selected | ||
| Trigger Gender | The offer will only be triggered if the customers gender matches the selected gender, by default it is shown to all customers if nothing is selected. | ||
| Suppression Device Type | This allows you to prevent the customer from seeing the offer based on the device size they are ordering from. Mobile , Tablet , Desktop. | ||
| Removable On Confirmation | If selected, the customer will be presented with a upsell confirmation page in which they are able to remove the upsell items they have added to their order. | ||
| Lock Shipping | When selected, the shipping estimate from the initial checkout will be retained, even if the upsell includes a shippable item.
| ||
| Skip Existing Customers | When selected, if the customer will be skipped if their email address is contained in a previous order. |
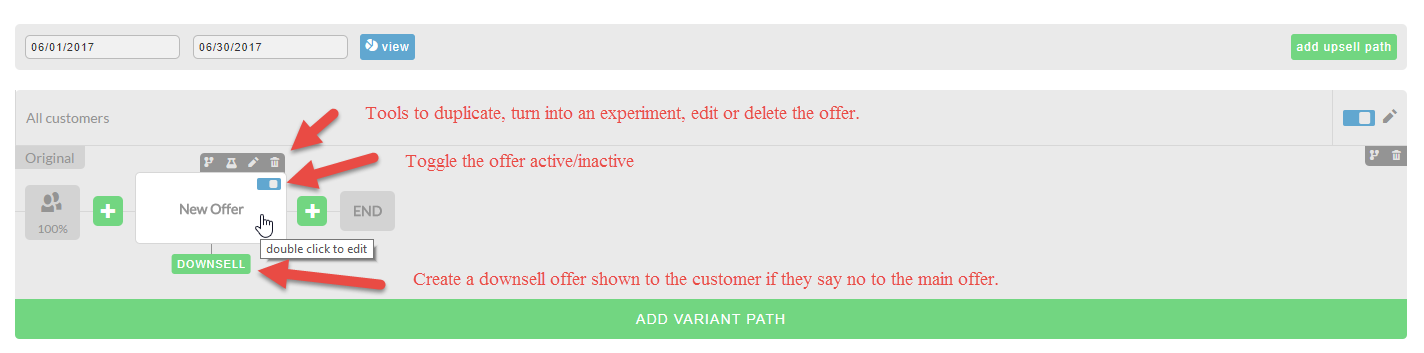
Path View
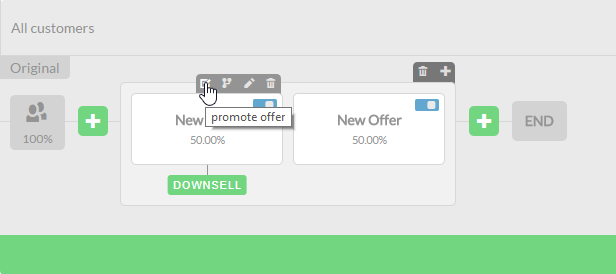
Now that we have our first offer created, let's look at how it shows in the path. When you hover over the offer you will see a grey popup set of tool icons along with a DOWNSELL option. There is also a quick toggle to make the offer active (blue) OR inactive (grey).
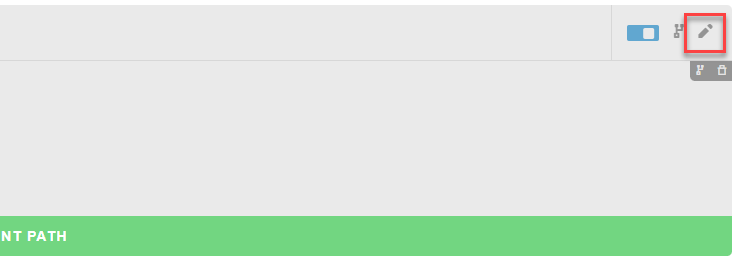
Editing the Path Settings of an Existing Path
Clicking the pencil in the top right corner of the path row will open this dialog window:
Path Settings
You can edit the:
| Upsell Path Field Names | Description |
|---|---|
| Name | Allow you to name the path. |
| Trigger Item IDs | Allows you to trigger the Upsell Path based on the items in the cart. |
| Trigger Tags *New | Allows you to trigger the Upsell Path based on the Product Tags for the items in the cart. |
| Trigger Gender *New | Allows you to trigger the Upsell Path based on the customer Gender *Requires Tower Data |
| Trigger Age *New | Allows you to trigger the Upsell Path based on the age of the customer *Requires Tower Data |
| Flow Control | This allow you to tell the Upsell Path to stop after this path is complete or continue to the next path in the list. |
| Maximum Viewed Offers | Allows you to set a limit to the number of offers a customer can see within the Path. |
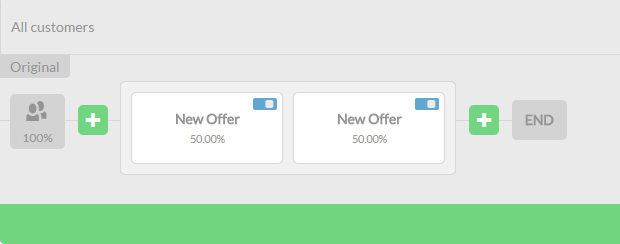
Creating an Offer Experiment
...
We now have two offers within an experiment. Since there are two offers, each one will receive 50% of the traffic. If there were three offers in an experiment then each one would receive 33.33%, etc.
| Info | ||
|---|---|---|
| ||
| When you've decided on the winning offer in an offer experiment, hover over that offer and click the promotion tool as shown below. |
...
| Once done, only the winning offer will remain. |
Creating a Path Experiment
...
- Average Visitor Revenue (AVR)
- Average Visitor Profit (AVP)
- Views
- Transactions (TRANS)
Advanced Topics
Replacing default Yes-No buttons with custom Yes-No buttons
Using custom buttons in place of the defaulted 'Yes'& 'No' buttons for your upsell offer is a simple process.
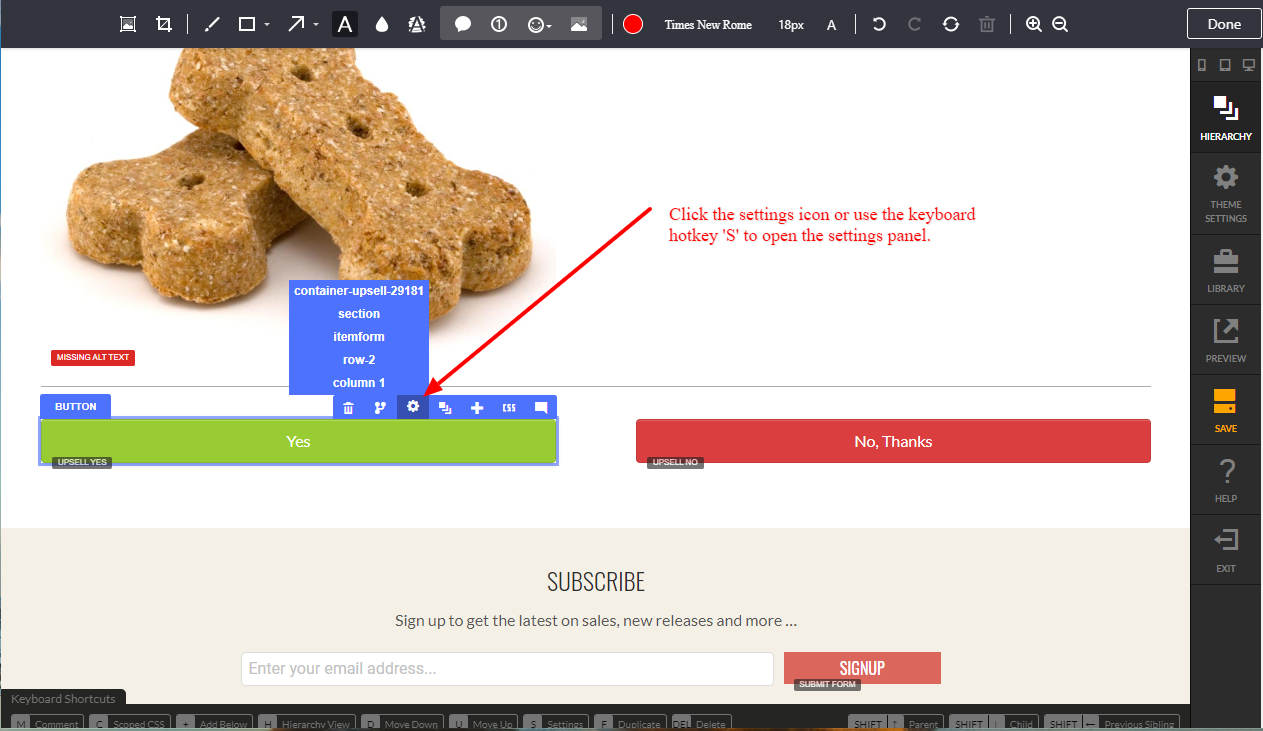
To modify the button images, edit your upsell offer, then highlight a button in the Visual Editor then clicking the "setrtings" icon or clicking the 'S' hotkey:
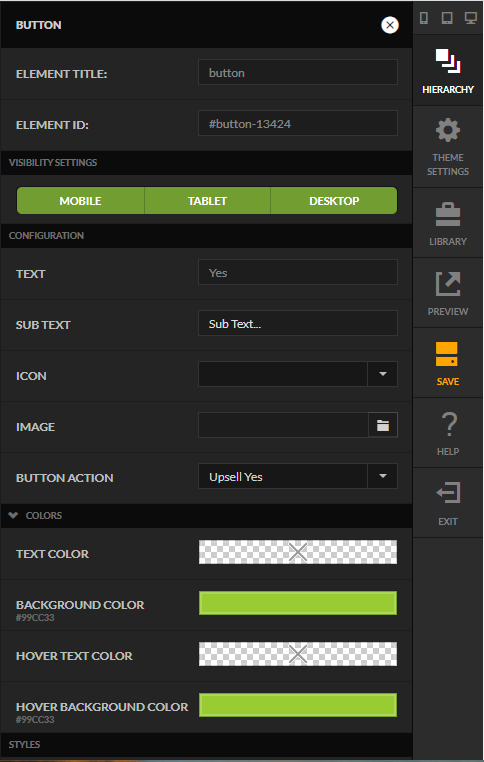
In the settings panel that opens you can edit the button by:
- Changing the default button text and customizing the text and background colors, etc.
- Adding sub-text
- Applying an icon
- Uploading a custom image
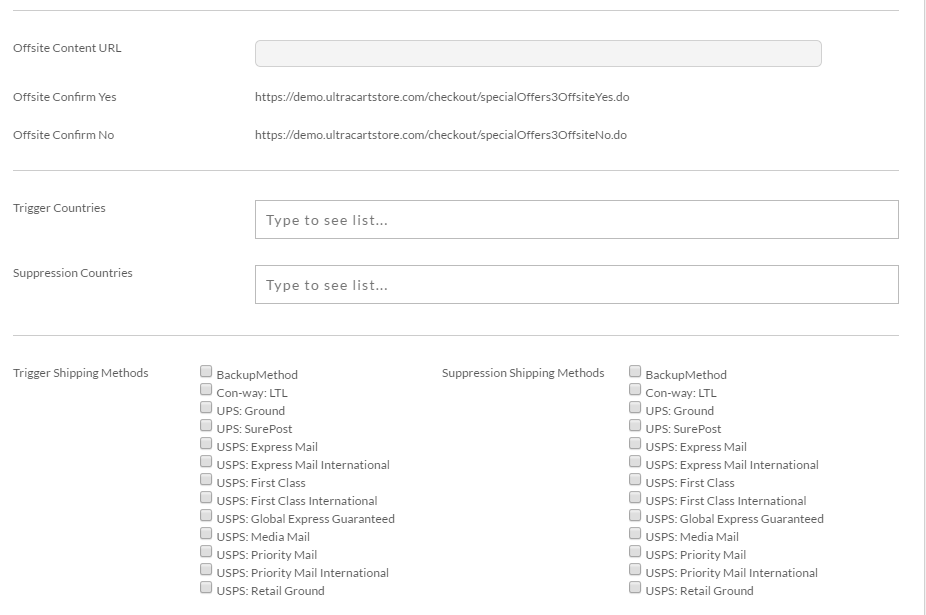
Offsite Content
One of the advanced features of the StoreFront Upsell system is the ability to have an offsite page as part of the upsell sequence. Below is a screenshot of the portion of the advanced configuration associated with offsite content.
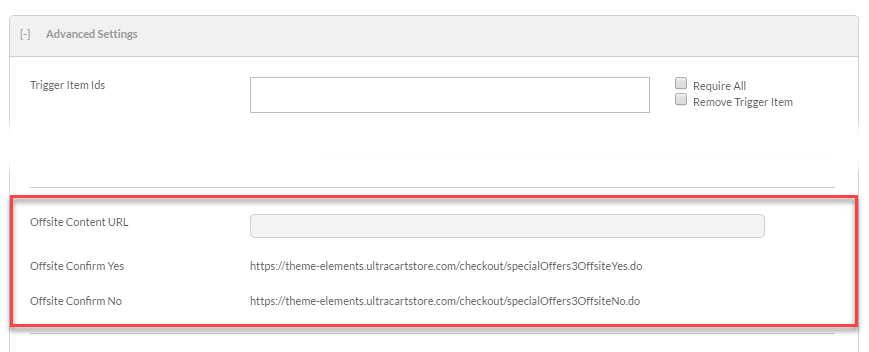
Here is what the three fields represent:
| Setting | Description |
|---|---|
| Offsite Content URL | This is the URL to the offsite content. It MUST be an https URL. The system will not work if you use regular http URLs as browsers won't send the proper referrer header. |
| Offsite Confirm Yes | This is the URL that you should redirect the browser back to when the customer clicks the Yes button on your offer. |
| Offsite Confirm No | This is the URL that you should redirect the browser back to when the customer clicks the No button on your offer. |
If your offer page contains multiple items that the customer to choose from you can redirect back to the Offsite Confirm Yes URL and specify ?ADD=ItemId parameter on the URL.
Frequently Asked Questions
Q: When I create the VB version of the upsell, will it automatically replace the legacy one, or will I need to switch it over, or delete the old one? What's the mechanism that switches from the old to the new?
A: Once you have created an upsell offer in the Visual Builder, it will take over and the old offers will be ignored. You will not need to delete the old offers for the VB offers to take affect.
Q: How do I test to see if I got my upsell offers configure correctly?
A: Place a test order to verify that the correct offers for the checkout scenario appear. If you do not see the expected offers, email support referencing the test OrderId and a description of any offers that were expected to be displayed but did not appear. UltraCart support will inspect the server-side shopping cart logs to troubleshoot the issue and then report back to you.