...
If you've already completed signup at Klaviyo then click here.
At this first KLAVIYO screen, scroll to the very bottom and enter your email.
...
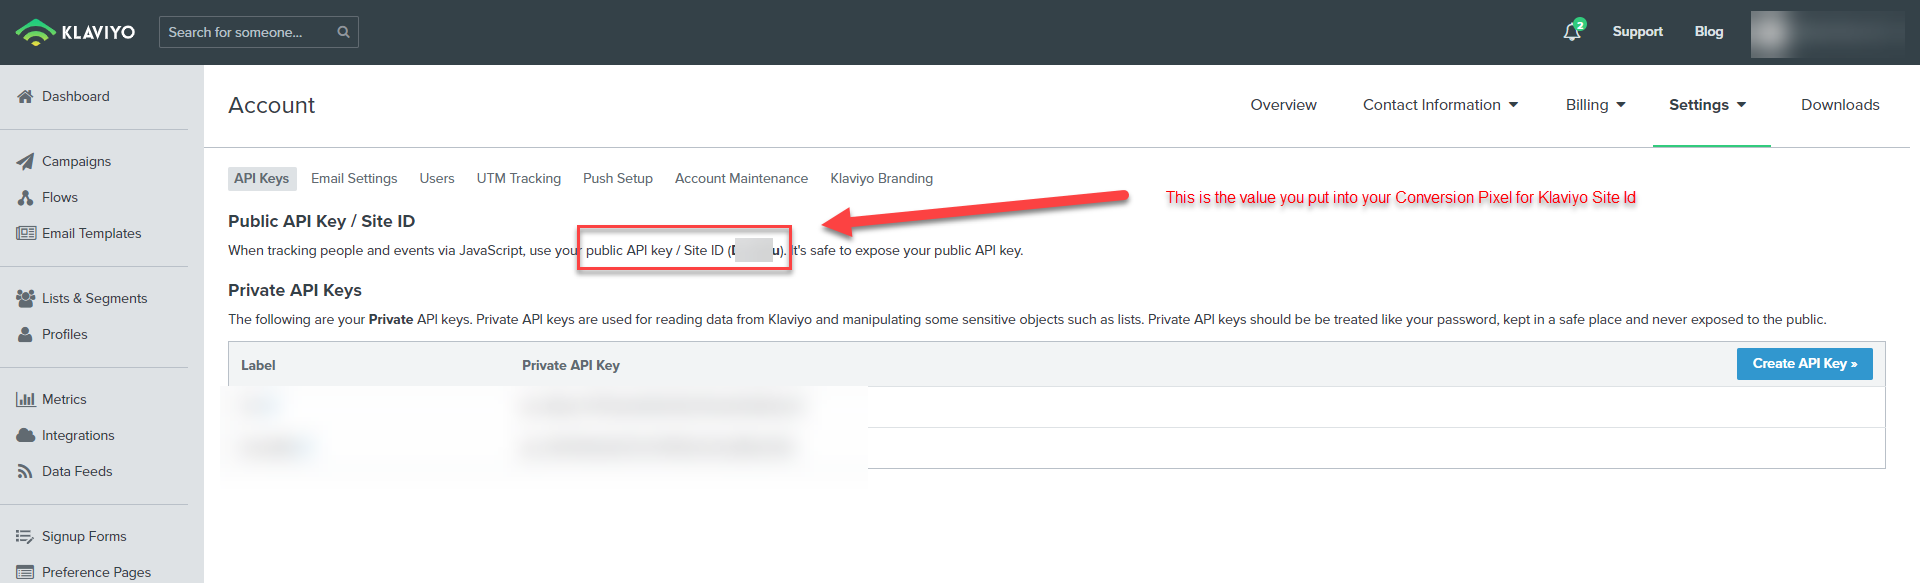
Once you've successfully completed the sign up, obtain your Private API Key from Klaviyo under Account > Settings > API keys.
| Info | ||
|---|---|---|
| ||
You'll see both a public and private key, you'll only need the PRIVATE key for the integration process with UltraCart. |
| Anchor | ||||
|---|---|---|---|---|
|
...
Return to UltraCart and navigate to:
| Panel |
|---|
Main Menu → Operations → Marketing → 3rd Party Autoresponders Email → Klaviyo |
Once at the Klaviyo screen, enter your API Key and click Save.

| Info | ||
|---|---|---|
| ||
You'll see both a public and private key, you'll only need the PRIVATE key for the integration process with UltraCart. |
New Api Configuration options within Klaviyo
Klaviyo has implemented new versions of the API, there are now three options:
- Full
- Custom
- Read-only (is not valid for the integration)
| Info | ||
|---|---|---|
| ||
*Please note that you'll need both 'read' & 'write' options for the integration, so only the Full & Custom options will work. Required Endpoints for Custom API:
|
Additional Integration Settings
After the API Key has been successfully saved, additional configuration settings will appear:


| Field Name | Description | |||||
|---|---|---|---|---|---|---|
| Send Regular Events | Send Regular Events = Send basic e-commerce events about what was purchased.
| |||||
| Send Return Cart Events | Send Return Cart Events = Trigger an event for a return cart. | |||||
| Item Thumbnail Size | UltraCart sends over the item thumbanil for display in their outgoing email. | |||||
| Trigger return cart event after __ hours | Determines when the return cart event is triggered. If you want to use Klaviyo to use emails to get people to return, make sure to configure this field to at least 1 hour. | |||||
| Abandon cart after ___ hours | Determines when the an idle shopping cart is abandoned. This is when the cart is purged from the database. Make sure this is several days. We recommend 72 hours if you're doing return cart emails. |
Subscribing your Email Lists
...
Update this section in UltraCart to update or change which lists a customer should automatically be subscribed to upon making their purchase. Please note that you can only subscribe customers to lists and not segments.
Subscribing Customer to an Email List Based on Specific Item Purchase

Integrating With Newsletter Sign-up with your Storefront Host
To integrate your Klaviyo account with the Storefront, in the UltraCart back-end, navigate to the storefront. Scroll down below the 'Contact Us Information' section, then click the edit button for the 'mailinglist newsletter' (the second instance of mailinglist) then select the Klaviyo mailing list, then save the changes.
Conversion Pixel Configuration
Navigate to Storefront host, then click on the "Conversion and Tracking" tab in the storefront menu, then click on the "Other" tab and scroll down towards the bottom of the page to the Klaviyo section:
![]()
Enter your "site ID". You can find the Site ID inside your Klaviyo account under Settings → API Key as shown in the screenshot below.
Note Do NOT put your private key into the site ID field and expose your key to the entire world. If you're tracking is not working make sure you have the proper value.
- Optionally configure the "Opt in to" by selecting one of the following "[Statistics / Preferences / Marketing]" from the drop-down list AND then select one of the three options "[All Customers / EAA Customers / Non-US Customers]" for the "Required for" drop-down list.
- Click the save button to save the changes:
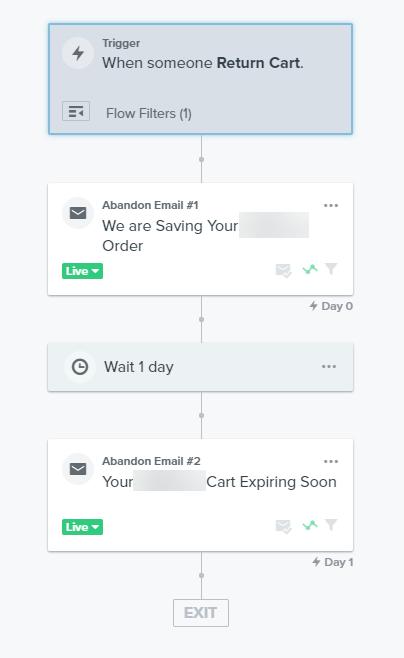
Having Klaviyo Send Return Cart Emails
Make sure that you have configured the following three settings in a similar fashion:

Then inside of your Klaviyo account you will need to create a flow that looks like this:
inside of your email template you will want to provide the customer a link to return to their cart. Make sure to use:
| Code Block | ||
|---|---|---|
| ||
{{ event.ReturnLinkLong }} |
Reviewing the Transmission Log
You can review the transmissions to Klaviyo by scrolling to the bottom of the page, you'll find the Log button next to the save button.
Related Documentation
https://developers.klaviyo.com/en/docs/retrieve_api_credentials#scopes