...
To begin the UltraBooks Configuration navigate to:
| Panel |
|---|
Main Menu → Configuration → UltraBooks |
Required Software
...
It's time to actually download the required software and configure your UltraCart account for UltraBooks. In UltraCart, navigate to:
| Panel |
|---|
Main Menu → Configuration → (middle menu) Back Office → UltraBooks |

After clicking on the UltraBooks link you'll be taken to the UltraBooks configuration screen (shown below).
...
In UltraCart navigate to:
| Panel |
|---|
Configuration → Checkout (section) → Payments |
For each of the payment methods you have enabled in UltraCart you will need to specify what the corresponding code is in QuickBooks™.
Run QuickBooks™ and from the drop down menus click on Customers -> Enter Sales Receipts. You can also access this from the Home window. Click on the "Create Sales Receipts" button.
...
It's absolutely necessary to set up UltraBooks Items that exactly match each of your UltraCart Items. When doing so, one of the following scenarios will apply:
| SCENARIO (If) | ACTION (Then) | |
|---|---|---|
| 1 | Your Items already exist in QuickBooks™ but not in UltraCart | Create your UltraCart Items using the exact same name you used for your QuickBooks™ Items |
| 2 | Your Items already exist in UltraCart but not in QuickBooks™ | Create your QuickBooks™ Items using the exact same name you used for your Item ID's |
| 3 | Your Items DO NOT exist in either program | Create both using the exact same name |
| 4 | Your Items already exist in both UltraCart and QuickBooks™ but with different names | You'll need to enter the exact QuickBooks™ Item name into the QuickBooks™ Class field at the Item Editor level in UltraCart (see screen shot below) |
| Note |
|---|
Although it's not common, Scenario #4 above does indeed occur. One's first thought is to either change all the Item ID's in UltraCart to the same as QuickBooks™ (not recommended) or vice versa. That is one way of doing it (for new accounts) but we have an easier solution. You can leave the Item names in both applications as they are and simply enter the QuickBooks™ Item name into the QuickBooks™ Code field for all your UltraCart Items. See the screen shot below for an example. |
...
If you plan to manage inventory via QuickBooks™ there's one important configuration. When you create a "New Item" in QuickBooks™, you not only want the name to exactly match that of the Item in UltraCart, you also need to set the Item Type as "Inventory Part". If you do not see Inventory Part in your list below, you need to turn inventory management on within your QuickBooks. Edit Preferences Edit → Preferences and make the changes shown below.
...
In your QuickBooks program navigate to:
| Panel |
|---|
Home → Lists (menu item) → Item List → |
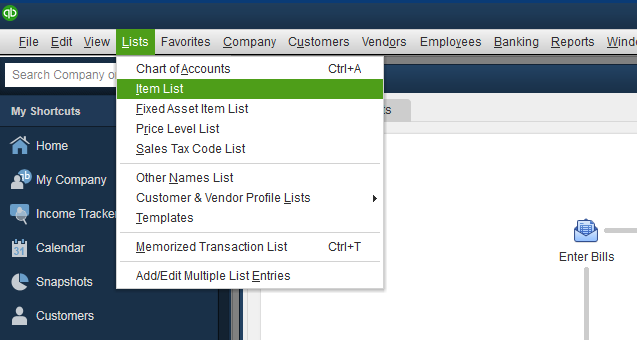
From the Item List window, click the Item button (bottom left corner) and select New from the top of the pop up list.
...
Prior to launching your UltraBooks program from your Start button, make sure you have your QuickBooks™ company file open in the background.
| Panel |
|---|
Start → Program files → UltraBooks → UltraBooks |
The application will prompt you for your UltraCart merchant login information. Enter your Merchant ID, Login (user name) and Password.
...
| Tip |
|---|
Anytime you change settings within UltraBooks you will need to close and reopen the program for those changes to take effect. |
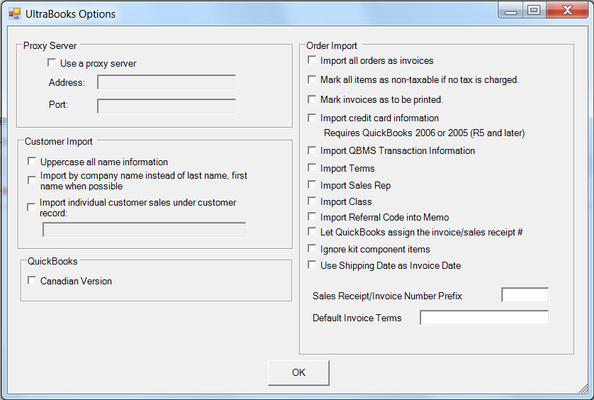
Proxy Server
| Option | Results (box checked) |
|---|---|
| Use a proxy server | This is only used by merchants behind a firewall that requires a proxy server to get to the internet. By clicking this box you can then specify the Server Address and Port (number) |
Customer Import
| Option | Results (box checked) |
|---|---|
| Uppercase all name information | All customer names will be converted to upper case during import. |
| Import by company name instead of last name, first name when possible | Whenever a company name is present, the record will be imported by such. |
| Import individual customer sales under customer record | ALL retail orders import as the same customer. You must configure the customer first. |
| Info | ||
|---|---|---|
| ||
An UltraCart Customer profiles can be linked to a specific customer record in QuickBooks. This configuration will ensure that orders placed via the customer profile will be linked to the same customer regardless of the billing/shipping address details provided in the order. This can be useful with wholesale customers that may have many locations for which they place orders. |
QuickBooks™
| Option | Results (box checked) |
|---|---|
| Canadian Version | Allows use of the Canadian version of QuickBooks™. |
Order Import
| Option | Results (box checked) |
|---|---|
| Import all orders as invoices | ALL orders will be imported as Invoices. (Normally, Credit Card orders are imported as Sales Receipts and Purchase Orders as invoices). |
| Mark all items as non-taxable if no tax is charged | In most cases, this is good to have checked. |
Mark Invoices as "to be printed" in QuickBooks | When you select Print Forms/Invoices in QuickBooks™, all invoices will appear in a list for batch printing. You can still de-select certain ones prior to printing. |
| Import credit card information (Requires QuickBooks™ 2006 or 2005 (R5 and later)) | Few merchants will consider this option for obvious security reasons. |
| Import QBMS Transaction Information | This feature is for merchants that have the QuickBooks™ Merchant Services payment gateway configured. It will import the transaction information for orders that were processed via QBMS. |
| Import Terms | Some merchants have terms spelled out in the checkout that will become part of the order. This options will insure those terms are imported to become part of the QuickBooks™ sales record. |
| Import Sales Rep | The Sales Rep name is configured on the Customer Profile and will be imported along with the order. |
| Import Class | The Class is configured on the Customer Profile and will be imported along with the order. |
| Import Referral Code into Memo | This is a special field. It will not apply to 99% of merchants. |
| Allow QuickBooks™ to assign the invoice/sales receipt | This would be used if you are making direct entry into QuickBooks™ as-well-as importing. This will help avoid collisions. |
| Ignore kit component items | This is only used by merchants that have kits in their Item Configuration. |
| Sales Receipt/Invoice Number Prefix _ | If you want to precede your Sales Receipt of Invoice with a special Prefix, enter it into the box provided |
| Default Invoice Terms _ | QuickBooks™ invoice form allows merchants to set various payment terms. Here you can define the Default term when the Invoice is created during import. |
Importing Orders
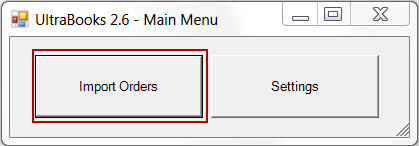
Clicking the "Import Orders" button will begin the download process. You must have the appropriate QuickBooks™ file open prior to importing. When the download and importing of order files has completed successfully, you will see the following screen.

You may receive an error during import. These errors are usually contributable to mismatched QuickBooks™ codes in either your UltraCart or QuickBooks™ accounts. If you are unable to determine the cause or remedy, contact UltraCart support.
...
UltraBooks will only export orders that are in the "completed" state (have been marked as shipped). Once exported via UltraBooks, they will be tagged as "Exported to QuickBooks™".
If, for some reason, you want to re-export an order, you'll need to reset its export status. To do so, log in to your account and navigate to:
| Panel |
|---|
Main Menu → Order Management → Review Orders |
In the search screen, enter the order ID or whatever search criteria necessary to locate the order. Once you have located the order:
...
If you should decide to disable UltraBooks integration, navigate to;
| Panel |
|---|
Main Menu → Configuration → UltraBooks |
Pressing the "Disable" button will prevent future downloading of orders. There will be no warning dialog for this action. However, the codes you have entered will remain intact. You can again configure UltraBooks without having to re-enter the codes (except for any additions that you may have made in Coupons, Gift Charge / Wrap Papers, Payment Methods, Shipping Methods or Tax Rates.
...