...
- .Net Framework
- The .NET Framework version 3.5 redistributable package includes everything you need to run applications developed using the .NET Framework.
- The download exe file (dotnetfx.exe) is approximately 23698 KB as of this writing and may take considerable time to download.
- From the main UltraBooks screen, click on the link ".net Framework". and download the file to your system.
Once the file has been downloaded, double click the dotnetfx.exe icon which will usually take only a minute or two to install. This software will perform its work in the background when you run UltraBooks.
Info title v3.5 Please note that while you may have a later version installed, such as .NET 4, the UltraBooks integration presently requires the v3.5 version of the .NET framework. Each version of the .NET framework work independently (different applications require different version). So, you can have the v3.5 and later versions installed at the same time. Just make sure that whatever version of the .NET framework we show listed in the download section of the UltraBooks configuration page is installed on your computer.
.NET Framework v3.5 Redistributable download link as of 08/25/2016
QuickBooks 2009 through 2014 2016 (Pro, Premium, Accountant or Enterprise)
Info title Quickbooks Online Not Supported Quickbooks Online is not supported. UltraBooks uses an API that is not available to the online version.
Quickbooks Point Of Sale (POS) version is also not supported.
- QuickBooks™ SDK QBFC 7.0
- This file resides on UltraCart's server and will download from there. Double click on the link "QuickBooks™ SDK QBFC 7.0". The file should download and install automatically.
- UltraBooks v2.6
This file also resides on UltraCart's server and needs to be downloaded to your system. Click on the link "UltraBooks v2.6". Once you have downloaded the file you will need to "extract" it using your favorite utility (WinZip, WinRAR archiver, etc). In order to make it easier to locate the files after extracting, it's suggested that you place the downloaded, compressed file into its own folder. Once that's done, double click on the Setup.Exe file to execute the extracting and installation of UltraBooks v2.6.
Info title Uninstall previous versions When installing a new version of the Ultrabooks, you'll first need to uninstall the existing version first, then install the latest version. This requirement is due to the fact that the settings are saved in the windows registry, so if you do not perform the uninstall, the new install won't actually be a complete fresh install, which could end up causing problems depending on the causes between versions of the UltraBooks application.
...
| Info | ||
|---|---|---|
| ||
Question: We run our Quickbooks from our server, do we have to install UltraBooks on the server or can each user needing to use it install UltraBooks on their workstation? Answer: It is okay to install UltraBooks onto workstations, provided that each employee will be downloading the orders into the same QBW file. |
...
Configuration Mode
...
QuickBooks Codes
Clicking the Configuration Mode button at the bottom of the Configuration Screen will enable your merchant account for QuickBooks™ configuration and present the "UltraBooks™ Configuration Mode" screen. There, you will be shown a list of your specific areas that will need accounting codes.
...
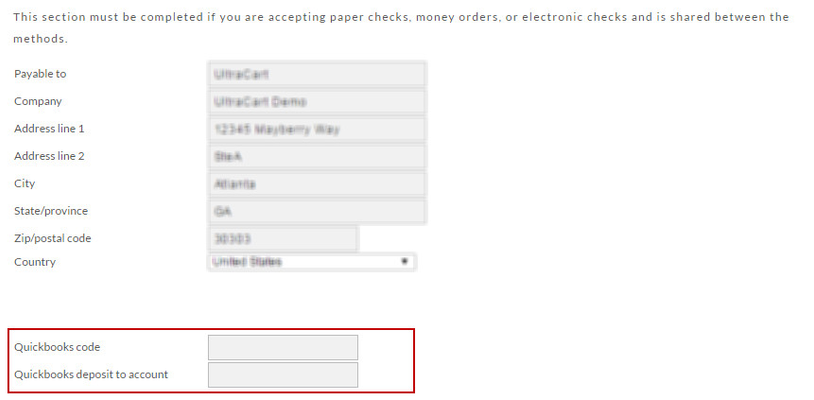
Paper Checks / Money Orders / Electronic Checks
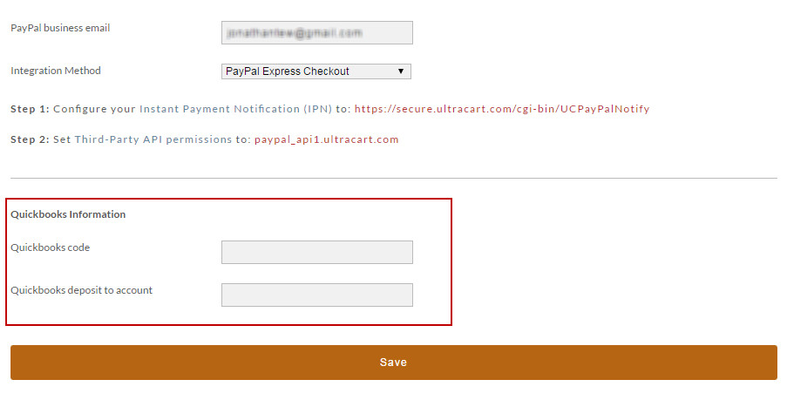
PayPal
To specify a different account click on the Chart of Accounts in QuickBooks™ and enter the name of the account you want to deposit funds into. Please note this is the NAME of the account and not the number!
...
The Surcharge QuickBooks™ code depicted above for Credit Cards and COD are to allow merchants to charge for those special services payment options. These codes come from the Item List in QuickBooks™. You'll probably need to create new Items in the QuickBooks™ Item List for these surcharges. The Item List can be found under the "Lists" menu or by clicking on the "Items & Services" icon on the Home screen. You'll see a row of menus at the bottom of the Item List window. Click on the Item drop down and select "new" to create a new item. Remember to enter the "name" you assign the item into the Surcharge QuickBooks™ Code field.
Each of your unique tax jurisdictions inside of UltraCart must have a corresponding entry in the QuickBooks™ system. To make this part of the configuration easier, UltraBooks can automatically add the missing tax jurisdiction to your QuickBooks™ file during the import process if it exists in UltraCart. So it is very important to configure the QuickBooks™ Codes inside of UltraCart for each tax jurisdiction.
...
Most merchants typically set up a single Item in QuickBooks™ that represents their shipping costs such as "Shipping and Handling". Click on Lists -> Items List inside of QuickBooks™ to view your item list. Add an item for Shipping and Handling if it does not already exist.
Tax Rate QuickBooks Codes
...
| Tip |
|---|
If you choose option 3; to ship after payment (shipped in QuickBooks), the order will be marked shipped in UltraCart. It will be the responsibility of QuickBooks to notify the customer of the tracking information (number). UltraBooks does not currently export tracking information back to UltraCart. |
...
Matching UltraCart Items with QuickBooks Items
...
It's absolutely necessary to set up UltraBooks Items that exactly match each of your UltraCart Items. When doing so, one of the following scenarios will apply:
...
| SCENARIO (If) | ACTION (Then) | |
|---|---|---|
| 1 | Your Items already exist in QuickBooks™ but not in UltraCart | Create your UltraCart Items using the exact same name you used for your QuickBooks™ Items |
| 2 | Your Items already exist in UltraCart but not in QuickBooks™ | Create your QuickBooks™ Items using the exact same name you used for your Item ID's |
| 3 | Your Items DO NOT exist in either program | Create both using the exact same name |
| 4 | Your Items already exist in both UltraCart and QuickBooks™ but with different names | You'll need to enter the exact QuickBooks™ Item name into the QuickBooks™ Class field at the Item Editor level in UltraCart (see screen shot below) |
...
Manage Inventory in QuickBooks
...
| Note | ||||
|---|---|---|---|---|
| ||||
QuickBooks™ definition: "use for goods you purchase, track as inventory, and resell" |
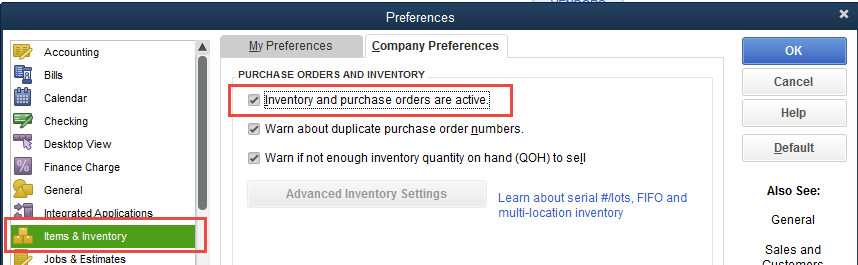
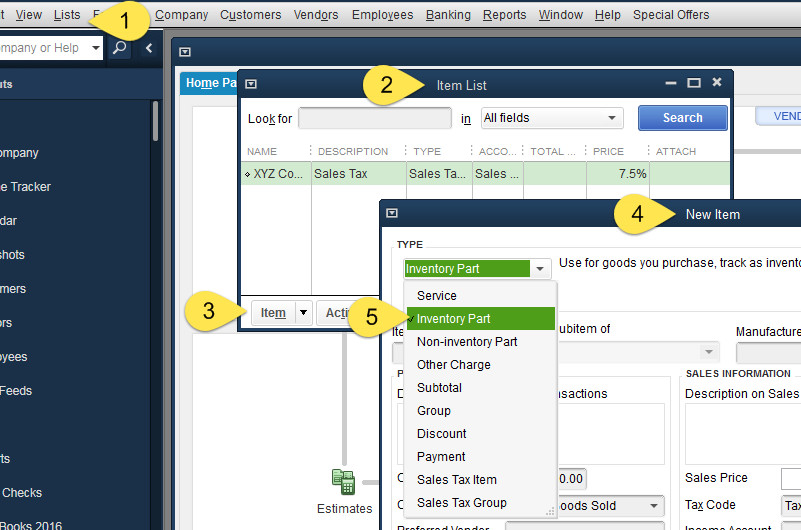
If you plan to manage inventory via QuickBooks™ there's one important configuration. When you create a "New Item" in QuickBooks™, you not only want the name to exactly match that of the Item in UltraCart, you also need to set the Item Type as "Inventory Part". If you do not see Inventory Part in your list below, you need to turn inventory management on within your QuickBooks. Edit → Preferences and make the changes shown below.
Create New QuickBooks Item
...
Select Inventory from the Type field drop-down menu. Configure the rest of your Item details and click the button when finished. OK
How UltraCart stores data
...
If you are currently using date/time based order Ids you should switch to numerically sequential order IDs. The date/time format is too long for QuickBooks™ to store and makes matching up orders between the systems difficult. Click on Configuration -> Order ID Scheme to verify your order ID configuration. We typically recommend that merchants start at 10000 and a width of 8 on their order ID scheme.
If you decide to stick to using the date/time based order ID then UltraBooks will allow QuickBooks™ to assign the next sales receipt number automatically and will place the UltraCart order number in the memo.
Going Live with UltraBooks
...
| Info | ||
|---|---|---|
| ||
An UltraCart Customer profiles can be linked to a specific customer record in QuickBooks. This configuration will ensure that orders placed via the customer profile will be linked to the same customer regardless of the billing/shipping address details provided in the order. This can be useful with wholesale customers that may have many locations for which they place orders. |
...
QuickBooks™
| Option | Results (box checked) |
|---|---|
| Canadian Version | Allows use of the Canadian version of QuickBooks™. |
...
Clicking the "Import Orders" button will begin the download process. You must have the appropriate QuickBooks™ file open prior to importing. When the download and importing of order files has completed successfully, you will see the following screen.

You may receive an error during import. These errors are usually contributable to mismatched QuickBooks™ codes in either your UltraCart or QuickBooks™ accounts. If you are unable to determine the cause or remedy, contact UltraCart support.
Common Tasks
Re-importing an Order
...
| Info | ||
|---|---|---|
| ||
UltraBooks generates a log file that is located in the "Documents" folder of your computer. TIP: The log file can grow large over time. So, we recommend that you first rename or delete the log file, then run UltraBooks again to replicate the problem (this will generate a new log file containing only the logged details of this single session.) Next, close Ultrabooks and on your computer, gather the log file which is located by clicking the windows "Start" button then clicking on "Documents" in the top right side of the Start Menu. The log file is titled "ultrabooks.log". Send the log file to support@ultracart.com along with your description of the observed issue. |
...
Disabling UltraBooks
If you should decide to disable UltraBooks integration, navigate to;
...