Return Email
| Table of Contents |
|---|
Return Email
UltraCart's Return Email feature (aka Abandon Sale Recovery) allows you to configure UltraCart to automatically send a very personalized email to the customer if they abandon their shopping cart. UltraCart will also generate a unique link in the email that will take the customer back to the shopping cart with all of their items pre-populated. A discount coupon that you have already created will automatically be applied. Viola, you saved a sale!
Most merchants offer the customer 10% off their order (via the coupon) if they return and purchase. The system is smart enough to not send an existing customer a coupon. This will help you close the sale on new customers.
There are three steps to configuring the return email option:
...
| Panel |
|---|
...
Setup your return email address
You will certainly want the email to be personalized and appear to be coming from your address rather than from ultracart.com. Hence, this feature can only be used by merchants that have an email server capable of sending authenticated SMTP traffic.
| Panel |
|---|
Main Menu → Configuration → Email Notifications > Email Addresses |
...
Field | Description | Optional | |
|---|---|---|---|
Server | The IP Address or host name of your mail server (mail.hostname.com) | ||
Alternate Port | The standard port is 25. If you need an alternate port, indicated it here (i.e., 465). | Y | |
Username | Your username as indicated on your mail server |
| |
Password | Your password used on your mail server | ||
Your email address |
| ||
Friendly Name | This is the name (typically yours) that you may have established to show when you send mail in stead of your email address. |
|
Configure a Coupon
To provide the customer an incentive to return to the cart and make the purchase, you'll want to make them an offer they can't refuse. In this step you'll create a coupon that when configured during the Return Email step, will automatically be injected into the cart. When the customer returns to the cart, they'll be pleased to see your gracious offer.
To configure your coupon navigate to:
...
| Panel |
|---|
Main Menu → Operations →Marketing → Return Email |
...
Click on the [new] button which will take you to the return email editor. The email will be prepopulated with the stock UltraCart return email message as shown below.
...
Field | Description | |||||
|---|---|---|---|---|---|---|
| Name | Give the return email a name that is meaningful to you (you can have more than one configured return email message.) | |||||
Coupon | From the drop-down menu, select the coupon code you previously created for this application. | |||||
Subject | Enter the text you want to appear as the Subject line in the Email. | |||||
Message | The Message field allows you to enter the text that you want your customers to see when reading the email. This is your opportunity to really convince them to return and complete the purchase. Note: There are three tags used in the email to insert critical information. You can place them anywhere in the body of the message but you must insure that they are the proper syntax. They are:
| |||||
| Javascript Checkout URL (***Must be an UltraCart Catalog URL) | Configure the URL to your custom checkout (which must exist within your catalog file space) so that the customer can be directed back to your custom checkout. If left blank the customer's shopping session link will direct the customer to the default Ultracart checkout.
| |||||
| Return Link Parameters | ||||||
Send email after | This is the amount of time the system will wait before sending your return email to the customer. Simply enter the number of Hours you want the system to wait before sending out your message. | |||||
Abandon after | The amount of time the system will hold a customer's information and items. The items ordered will be in an "allocated to order" state for the duration of this timer. While the order is being held, the inventory for that item is also put aside, holding the item(s) for the customer. Merchants with tight inventory controls and limited supply of products should use caution with this setting. A long duration for Abandon After can cause some "out of stock" issues because those items, while in the allocated state, will reduce your available to allocate count. New customers will receive the dreaded "out-of-stock" message and cannot purchase those items when inventory levels fall to zero. The word of caution is; if you have small inventory levels, set a reasonably low duration for the Abandon After field. | |||||
Proactive Email Collection | Select this check box if you want the email address of customers that abandoned their checkout to be added to your opt in email list. |
...
The field will also do an AJAX background call to save the email address that the customer types in even if they don't click the update cart button.
Testing Proactive Email Collection in Action using FireBug(tm)
...
- The proactive email collection field appear in the shopping cart with the label "Your contact email"
- The background call will appear in the console tab of the firebug extension as soon as you tab through to the next field or the checkout/update buttons are clicked.
...
Frequently Asked Questions
Question: I'm trying configure my Gmail account for the return emails, but when I try to configure the SMTP credentials in the Email Addresses page, I encounter error upon saving my SMTP/Email credentials:

When I log directly into my gmail account I see the following:

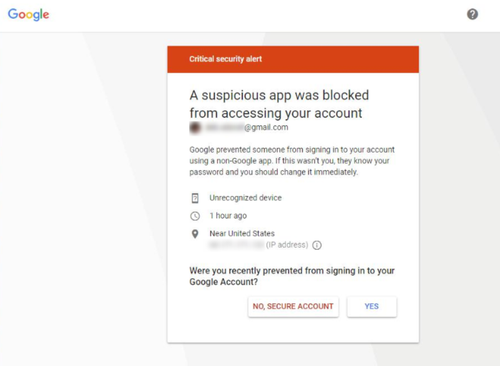
ANSWER: The solution to this situation is detailed in option two of the following Google Knowledgebase article:
https://support.google.com/accounts/answer/6010255
Specifically:
- Change your settings to allow less secure apps to access your account. We don't recommend this option because it might make it easier for someone to break into your account. If you want to allow access anyway, follow these steps:
- Go to the "Less secure apps" section in My Account.
- Next to "Access for less secure apps," select Turn on. (Note to Google Apps users: This setting is hidden if your administrator has locked less secure app account access.)"