| Table of Contents |
|---|
Using Endicia Dazzle Tutorial
...
Before you can begin you must already have an Endicia Dazzle Premium or Professional account and the software downloaded/installed. If you have not already signed up for an account, please visit you can do so at: http://www.endicia.com to signup. After you have signed up for your account you will need to that you can download the software and install it.
Easier Integration - UltraShip
| Tip | ||
|---|---|---|
| ||
UltraShip is a multi-carrier software solution that makes printing postage infinitely easier than working with export/import files for each carrier's software solution. Click here to learn more about UltraShip. |
UltraCart Configuration
First we need to specify all the options within UltraCart that will control the details passed to Endicia. First navigate to:
| Panel |
|---|
| [ Menu|/mainMenu.do@merchant] {rarr} [Configuration|/configuration/configurationMenuLoad.do@merchant] {rarr} [Shipping|/configuration/shipping/distributionCenterListLoad.do@merchant] {rarr} [Shipping Specific Options|/configuration/shipping/shipperSpecificLoad.do@merchant] Menu → Configuration → (checkout section)Shipping → (middle menu) USPS |
Scroll down to the Endicia Dazzle section. Below is a screen shot of a typical configuration.


Field | Recommended Value | Description |
|---|---|---|
Abort on Error | No | When this option is set to Yes Endicia will stop printing the rest of the file if an error is encountered. |
Auto print customs forms | Yes | This will print the customs forms for international shipments. Be careful and thoroughly test your international shipping configuration. |
Delivery Confirmation | Yes | Setting this to yes will provide tracking numbers for your shipments. |
Signature Confirmation | No | Setting this to yes will require someone to sign for the package. If you have a large problem with |
charge backs you may want to set this to yes. | ||
Insured Mail | ENDICIA | This will ensure your packages with Endicia which is less expensive than the USPS |
Insured Mail Threshold | 0 | Determines the threshold when insurance should be used. Some merchants only want to insure expensive shipments over say $100 |
Layout | C:\Users\Public\Documents\Endicia\DAZzle\Zebra Label.lyt | Most merchants will print 4x6 Zebra labels. |
Output File | c:\endica\ultracart-import-output.XML | This is where Endicia will kick back the XML file with tracking information that can be imported into UltraCart |
Parcel Select | No | Set to yes to use the USPS Parcel Select system. |
Prompt | No | Set this to yes to prompt the user whenever there are errors with addresses, etc. |
Return Address | Your ship from address | The address from which you are shipping packages from. |
Start | PRINTING | Starts the printing of the labels automatically if the XML file is specified as a command line arguments of the Dazzle executable. This is an advanced option. |
Stealth Postage | TRUE | This will keep Endicia from printing the exact postage amount on the label. |
Test | NO | Set this to NO when printing live postage. |
CCEmail | Leave blank | Provides a copy of the email sent to the customer. UltraCart will send out notices to the customers so we do not recommend using this feature. |
After you have configured the Dazzle options to meet your company's needs, scroll to the bottom of the page and click Save.
...
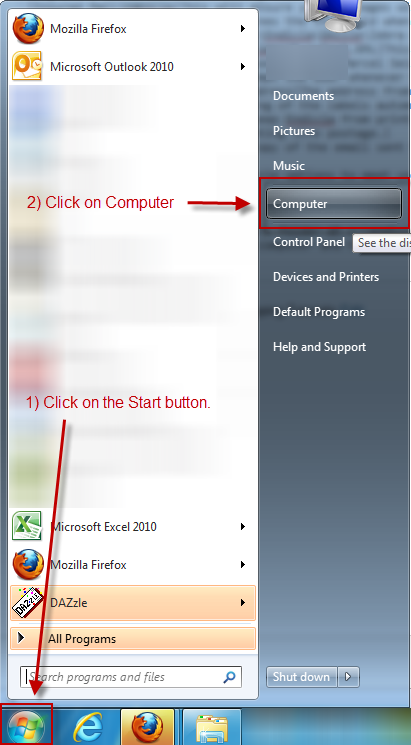
You will need to create a temporary folder at c:\endicia on your machine. We will assume that you have not worked on the command line and will create the folder using the Windows Explorer. First click on the Start button located in the lower left corner of your computer and then select Computer as shown below.
Now click on the Local Disk (C:) as shown below.
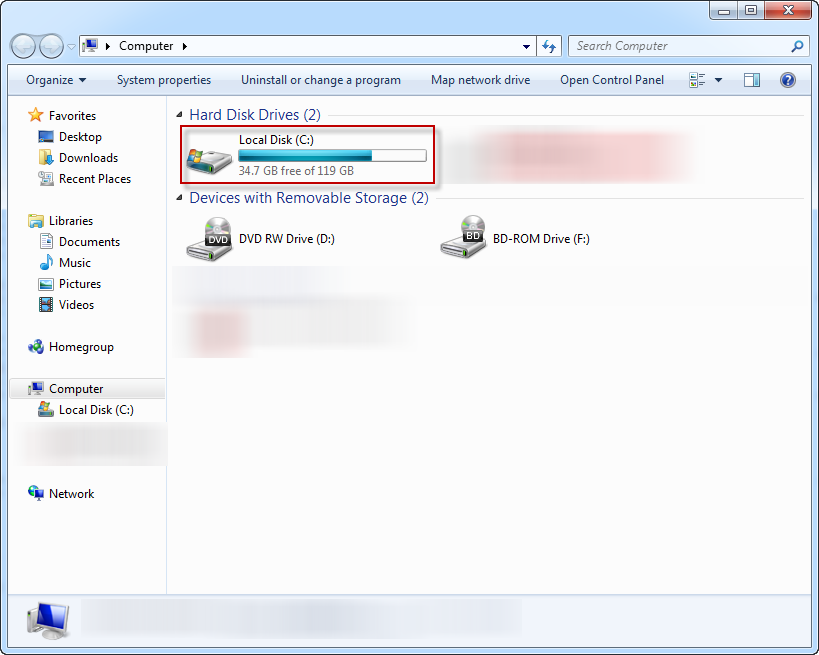
Next click on the "New Folder" button at the top. When the text field appears type in "endicia" and hit Enter.
Your screen should look like the screen shot below.
...
First navigate to your shipping department located at:
| Panel |
|---|
| [ Menu|/mainMenu.do@merchant] {rarr} [Order Management|/orderProcessingMenu.do@merchant] {rarr} [Shipping Department|/orderprocessing/sdm/menuLoad2.do@merchant] |
Scroll down to one or more of the orders that you want to ship and click the check box as shown below.

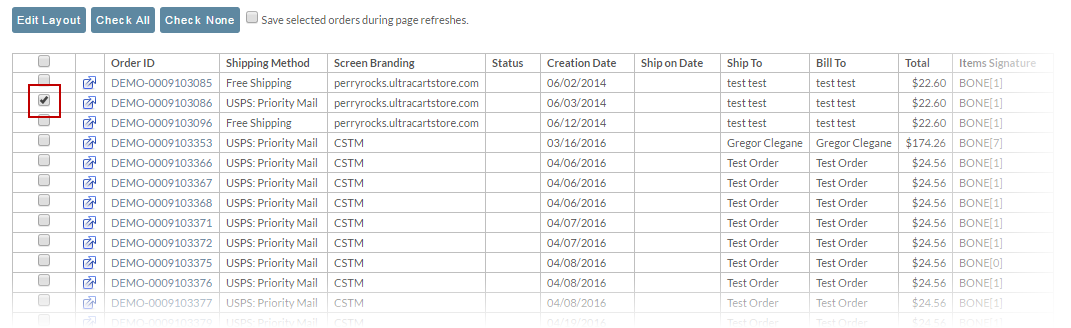
Now on the left hand side of the screen click the "Export to Endicia Dazzle" button as shown below.


When you click the button a file save dialog will appear on your browser like the screen shot below. In the filename field change it from "ultracart-output.xml" to "c:\endicia\ultracart-output.xml". Now click the save button.
...
At this point we have successfully download downloaded the XML file with the shipment information. If you were to open this file in Notepad it would look like the screen shot below.
...
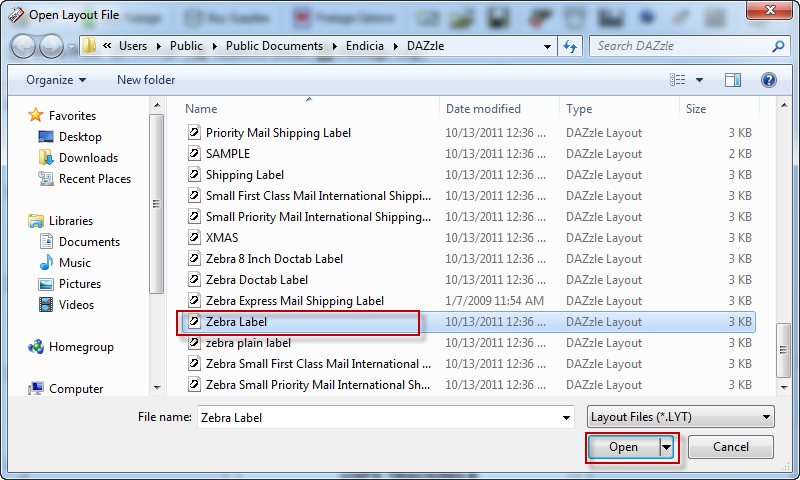
Endicia is smart enough to automatically open the folder that contains the layout files. Scroll down to the appropriate layout for your printing. In this tutorial we are working with Zebra Layout.lyt since we are printing 4x6 thermal labels (the most common shipping label). The screen shot below shows us selecting and opening Zebra Layout.lyt and opening it.
Next click File -> Printer Setup on the menu as shown below.
...
We are now ready to import tracking information back into UltraCart from Endicia. Navigate to:
| Panel |
|---|
| [ Menu|/mainMenu.do@merchant] {rarr} [Order Management|/orderProcessingMenu.do@merchant] {rarr} [Shipping Department|/orderprocessing/sdm/menuLoad2.do@merchant] |
On the left hand tool bar click on the Import Endicia Dazzle button as shown below.


This will open up a lightbox on the screen. Click on the browse button and locate the c:\endicia\ultracart-import-output.XML file as shown below.
...
UltraCart will apply the tracking numbers, mark the orders as shipped and then remove from the shipping department listing.
Importing Tracking Information from the Endicia Postage Log
...
| Warning |
|---|
UltraCart can not match up tracking numbers with orders that were hand entered into Dazzle. The order had to originate from an XML file produced by UltraCart so that the Reference ID field contains the order ID. |
Frequently Asked Questions
Q: How do I control the customs description?
A: On the shipping tab of the item editor there is a customs description field that is used in the Endicia XML file.
| Panel |
|---|
Main Menu → Item Management → Items → Edit Item → Shipping Tab of Item Editor → Customs Information (Section) |

(See also: http://www.endicia.com/DazzleHelp/Content/Printing/complete_customs_forms.htm)
Q: How can I place the order id or items on the shipping label to make matching it to the packing slip easier?
A: In the XML record that UltraCart outputs for each order, the "Rubber stamp" fields are used to provide this information.
| Field | Contents |
|---|---|
| RubberStamp1 | Order ID |
| RubberStamp2+ | Item ID[Quantity] list. Rubber stamps can only be 50 characters log so large orders will use multiple rubber stamp fields. |
Endicia Dazzle provides documentation on working with rubber stamps on your label layouts. The short answer is that you need to edit your Endicia label layouts and place the rubber stamp information on the layout where you want it to print.