...
Navigate to the Catalog Tab.
| Panel |
|---|
Select the Item
Click on the Catalog tab
Use the Wizard to create the variation you need (complete with items)
Remove the existing options
|@menuitemmanagement] → Items → [Select an Item] → Click on Catalog tab. |
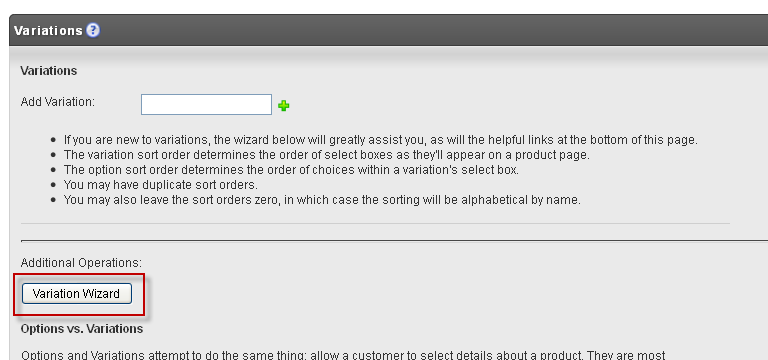
Click on the Variation Wizard button. It's at the bottom of the Variations section.
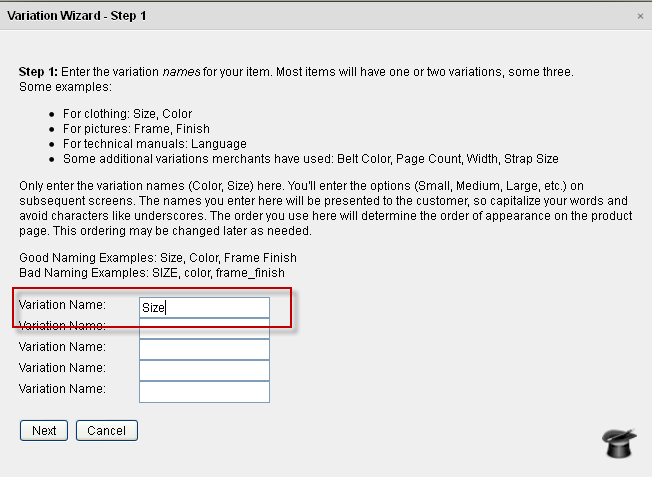
For Step 1, enter the variations needed. For this example, we had a single variation Size. Enter that.
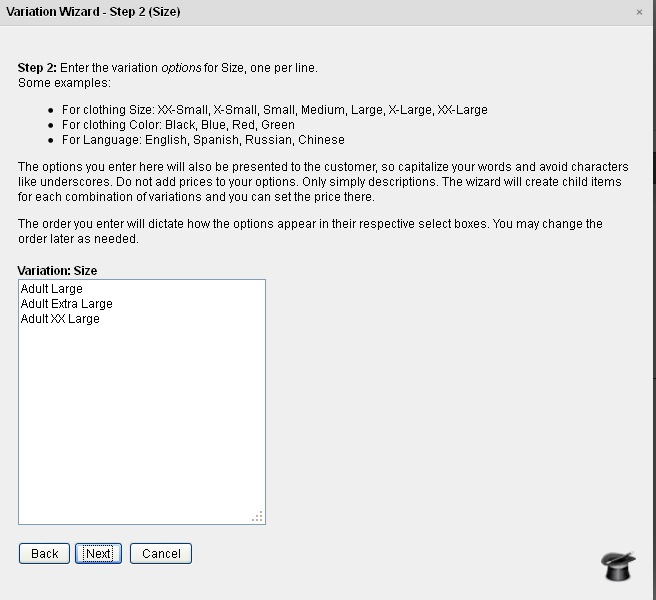
For Step 2, enter the Size options review, they were Adult Large, Adult Extra Large, and Adult XX Large.
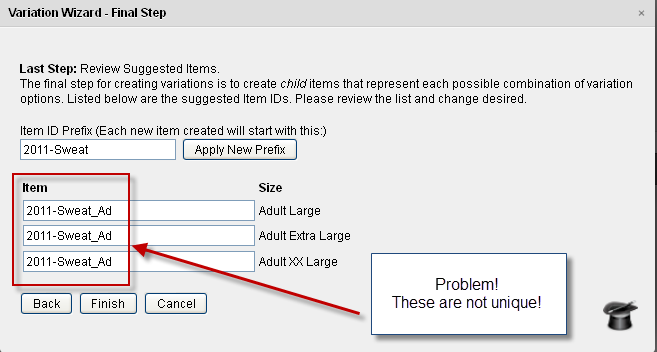
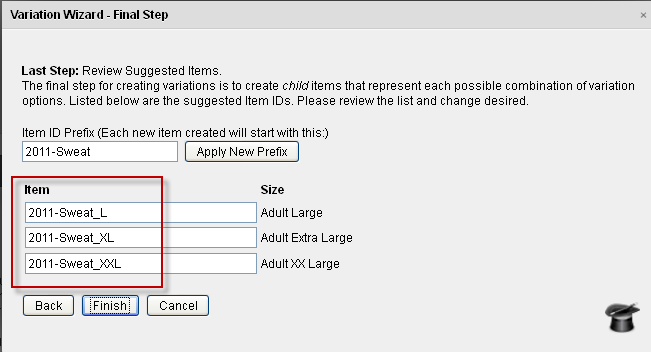
On the final screen, we're presented with a list of proposed child items that will map to each variation.
We have a problem.
Notice in the picture below that all the item IDs are the same. Item IDs are limited to 20 characters, and the system detects suggested names that are too long and abbreviates them.
So, we will edit the names, giving them uniqueness.
When we click the Finish button, the items are created by copying the parent item and then displayed for us to review.
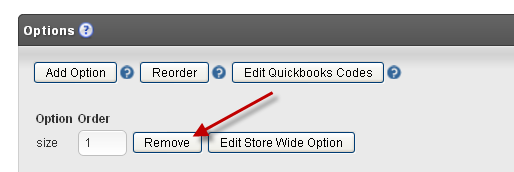
If everything looks good, the last step is to remove the Options associated with this item.
Click on the Options tab, and then remove the Size option.
Final Product
The final step to making your web page use these variations is to add code to your template.
Please see the article Using Variations on a Non-Catalog Site for instructions.
Here is the code that was used on this site to show the variations properly.
Header Code
This variation code makes use of catalog_3.2.js. It is new as of May. 2013. It requires jQuery and makes heavy use of classes and ids. The code manages multiple variations.
For example, given a shirt with both a Size variation and Color variation, and limited inventory, the shirt's item page needs to update the Color select box each time a Size is chosen to prevent the customer from buying something out of stock. Also, if the price changes based on variations, that needs to be reflected immediately.
How it Works
When you include the two .js files below, and then call ucCatalogVariationsInit, passing in the item id and matrix, the routine registers a jQuery ready() call that does the following for each registered item:
- Populate the select boxes.
- Populates labels.
- Attach handlers to select boxes and radio buttons.
- Updates any cost fields with the base cost.
- Attaches a validation handler to the form that ensures all variations are selected.
The UCEditor cgi (the url that manages the shopping cart) only cares that the variations are send in named pairs: VariationName1=Size&VariationValue1=Small&VariationName2=Color&VariationValue2=Blue. So, care must be taken to ensure the html elements contain both the proper classes and name.
The easiest way to create name parameters like VariationValue1 and VariationValue2, and generate the classes needed for dynamic action, is to generate the variations in a loop. The code below does that.
Here are the classes and ids available to enable dynamic variations (note, the actual code does not have line breaks or spaces in the names.:
| Format | Velocity Code* | Example Output | HTML Elements | Comments |
|---|---|---|---|---|
.uc-variation-form-<ITEMID> | uc-variation-form-${item.getMerchantItemID()}" | class="uc-variation-form-SHIRT" | form | this can be inside your #if($hasVariations) or outside. It's just a class name, and won't hurt anything if it's not used. If present, the form submit will be bound to a validation routine that will alert the user of empty fields and cancel the submit. |
uc-variation-label-<VARIATION_INDEX>-<ITEMID> | uc-variation-label-${velocityCount}-${item.getMerchantItemID()} | class="uc-variation-label-0-SHIRT" | any element used for a label, such as td or span | You might wonder why the variation index is used instead of the variation name, because the name would reach better. The answer is because the index is safe. It's just a number. Some UltraCart merchant have strange variation names containing unsafe characters in them. So, we use the index to reduce the risk of breaking a page. |
uc-variation-field-<VARIATION_INDEX>-<ITEMID> | uc-variation-field-${velocityCount}-${item.getMerchantItemID() | id="uc-variation-field-0-SHIRT" | select or any block element | id, not class. if this element is a select, then the scripts will populate its options. if this element has the class At the end of this page is an example of using radio buttons for the 2nd of 3 variations. UltraCart doesn't recommend using radio buttons, but it's there if you need it. |
*The velocity code above assumes that it is inside this loop:
| Code Block | ||||
|---|---|---|---|---|
| ||||
#set($hasVariations = $item.getVariations().size() > 0)
#if($hasVariations)
   <script type='text/javascript'>
      ucCatalogVariationsInit("$item.getMerchantItemID()", ${item.getVariationMatrix().getJavascriptItemVariationMatrix()});
   </script>
   #foreach($variation in $item.getVariations())
      <!-- VARIATION CODE HERE -->
   #end
#end |
| Code Block | ||||
|---|---|---|---|---|
| ||||
<script type="text/javascript" src="/js/jquery-1.7.2.min.js"></script>
<script type="text/javascript" src="/catalog_3.2.js"></script> |
Product Page Code
| Code Block | ||||||
|---|---|---|---|---|---|---|
| ||||||
#set($hasVariations = $item.getVariations().size() > 0) #if($hasVariations) <form action="http://secure.ultracart.com/cgi-bin/UCEditor" class=".uc-variation-form-${item.getMerchantItemID()}"> <input type="hidden" name="merchantId" value="2892A"/> <input type="hidden" name="ADD" value="${item.getMerchantItemID()}"/> <script type='text/javascript'> ucCatalogVariationsInit("$item.getMerchantItemID()", ${item.getVariationMatrix().getJavascriptItemVariationMatrix()}); </script> <table> #foreach($variation in $item.getVariations()) <tr> <td> <span class='uc-variation-label-${velocityCount}-${item.getMerchantItemID()}'><!-- label will display here --></span> </td> <td><input type='hidden' name="VariationName${velocityCount}" value="${variation.getName()}"/> <select name="VariationValue${velocityCount}" id="uc-variation-field-${velocityCount}-${item.getMerchantItemID()}"></select> </td> </tr> #end </table> <div class="uc-variation-cost-${item.getMerchantItemID()}"><!-- cost will display here --></div> <input type="submit" name="submit" value="Add to Cart"/> </form> #else #if($item.getAvailableQuantity() > 0) <form action="http://secure.ultracart.com/cgi-bin/UCEditor"> <input type="hidden" name="merchantId" value="2892A"/> <input type="hidden" name="ADD" value="$item.getMerchantItemID()"/> #foreach($option in $item.getOptions()) <input type='hidden' name='OptionName$velocityCount' value='${option.getName()}'/> ##$option.getLabel() <select name='OptionValue$velocityCount'> #foreach($optionValue in $option.getDropDownValues()) <option>$optionValue</option> #end </select> #end <input type="submit" name="submit" value="Add to Cart"/> </form> #else <em>Out of Stock</em> #end #end |
Here's an example of an item with three variations that makes use of uc-variation-container and uc-variation-radio classes to use radio buttons instead of variations. Notice that you must provide all the values for the radio buttons. The variation script only handles the enabling/disabling of the radio buttons based on availability of product. Our experience has shown that there's just too much surrounding custom html with radio buttons for us to provide a generic means of generating radio button values.
Lines 31-41 contain the relevant radio button code
| Code Block | ||||||
|---|---|---|---|---|---|---|
| ||||||
<form action="/cgi-bin/UCEditor" class='uc-variation-form-${item.getMerchantItemID()}'>
<input type="hidden" name="merchantId" value="DEMO"/>
<input type="hidden" name="ADD" value="$item.getMerchantItemID()"/>
#set($hasVariations = $item.getVariations().size() > 0)
#if($hasVariations)
<script type='text/javascript'>
ucCatalogVariationsInit("$item.getMerchantItemID()", ${item.getVariationMatrix().getJavascriptItemVariationMatrix()});
</script>
<div class="four columns omega">
<div class="order-box">
<div class="uc-variation-cost-${item.getMerchantItemID()}"></div>
<label id="supply">
<span>Select</span>
<!-- the following naming assumes that the day supply is the first variation (and the name of the variation is "Select") -->
<input type='hidden' name='VariationName1' value='Select'/>
<select name="VariationValue1" id="uc-variation-field-1-${item.getMerchantItemID()}"></select>
</label>
<label id="bottle">
<span>Number of Bottles</span>
<select name="quantity">
<option value="1">1</option>
<option value="10">10</option>
<option value="100">100</option>
<option value="1000">1000</option>
<option value="10000">100000</option>
</select>
</label>
<!-- when using a div as a variation field, all radio buttons within with uc-variation-radio class are assumed to be variation options -->
<div id='uc-variation-field-2-${item.getMerchantItemID()}' class='uc-variation-container'>
<input type='hidden' name='VariationName2' value='Delivery Type'/>
<div class="radio-entry">
<input type="radio" name="VariationValue2" class='uc-variation-radio' value="One-Time Purchase"/>
<span class="label">One-Time Purchase</span>
</div>
<div id="radio-easy-ship" class="radio-entry">
<input type="radio" name="VariationValue2" class='uc-variation-radio' value="Easy Ship"/>
<span class="label">Easy Ship <img src="$baseUrl/images/product-easy-ship.png" width="30"/></span>
</div>
</div>
<small>
Save 10% and get FREE S&H
<label id="delivery">
<span>Select Delivery Schedule</span>
<input type="hidden" name="VariationName3" value="Delivery Schedule" />
<select name="VariationValue3" id="uc-variation-field-3-${item.getMerchantItemID()}"></select>
</label>
</small>
<div class="center">
<button type="button" id="add-to-cart">
<span class="cart-left">Add to Cart</span>
<span class="cart-right">»</span>
</button>
</div>
</div>
</div>
#else ## if-no-variations
<div class="four columns omega">
<div class="order-box">
$item.getCost()<br />
<label id="bottle">
<span>Number of Bottles</span>
<select name="quantity">
<option value="1">1</option>
<option value="10">10</option>
<option value="100">100</option>
<option value="1000">1000</option>
<option value="10000">100000</option>
</select>
</label>
<div class="center">
<button type="button" id="add-to-cart">
<span class="cart-left">Add to Cart</span>
<span class="cart-right">»</span>
</button>
</div>
</div>
</div>
#end
</form> |

