| Table of Contents |
|---|
Introduction
Options / Variations - There is a good explanation on the differences between Options and Variations here.
...
After clicking the "continue" button, the Option Editor Screen will appear. This screen is divided into five sections; Description, Check-Out Settings, Type, Cost and Drop Down/Radio Button Values. The last section, Drop down/Radio button list of values (shown in example below), will only appear if Drop Down or Radio Button list TYPE is selected.
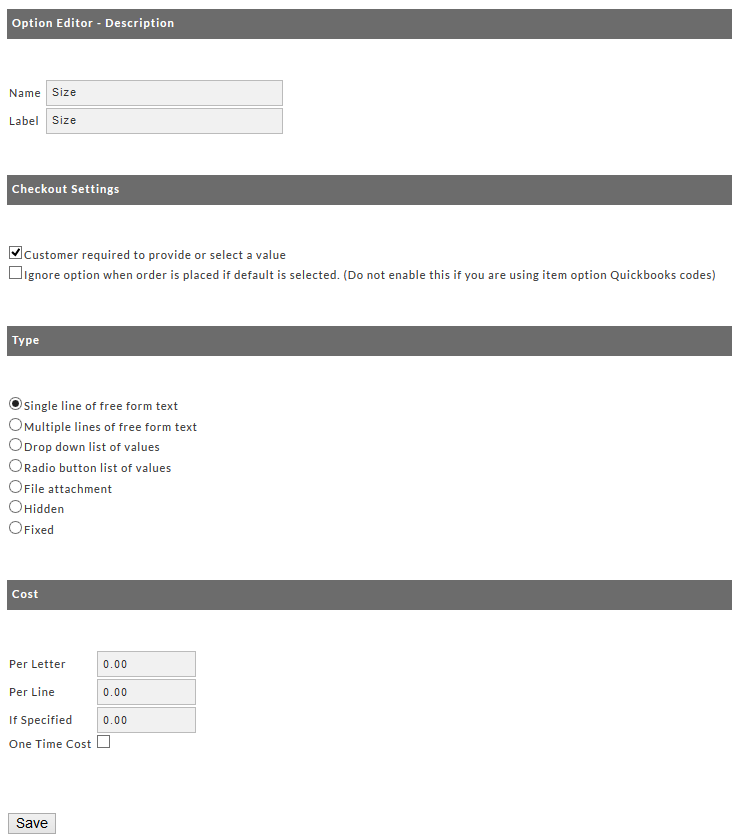
Description (fill-in)
...
- Name – the name of the option. For instance "T-shirt size". This will be automatically entered from your entry in the previous Add Option Screen. It can be changed at this screen if desired.
...
- Additional Cost and Additional Weight – the amounts that you set (if any) when creating the values will appear in these columns.
- Additional Dimension – this field will show "none". Click the Edit button to be taken to the editor screen where you can enter the additional dimension values.
- Order - This column will show the present order of this list. You can re-arrange the order of your list by changing the numbers in this column. Once you have change the order numbers, click on the "Reorder" button in the Section Header. Your values will then shift to the order you configured.
...
- Default - This column will be blank until you select one of your Values as the default. Click on the "Make Default" button at the end of the row that you want to set as the default. The word "Yes" will appear in the Default column for that Value. In the example above, we have configured the Medium Value as the default. If you decide you want no default value, click on the "No Default" button in the Section Header. If you do set one of the values as the default, it will automatically appear in the options field when the customer adds the item to their shopping cart. The customer can change the option during checkout using the drop down menu. To change the default, click the "Make Default" button for the appropriate value.
...
- Edit Button - Clicking on a "Edit" button will take you to the Value Editor where you can change attributes for that particular value.
...
- Remove Button – Clicking on the "Remove" button will remove that Value from the list. This is a permanent action without a warning dialog.
...
- Make Default Button – explained above under "Default".
Radio Button Value List
Once you have selected the Radio Button List of Values the Drop Down/Radio Button Values section will appear at the bottom of the Option Editor screen.
To add your values, click on the "ADD" button which will take you to the Add Radio Button Values screen. This procedure will be somewhat different than the drop down list.
...
This editor automatically shows all files that have been uploaded in the Digital Library. We associated them to this option by selecting and moving them to the right side (click on the arrow pointing to the right).
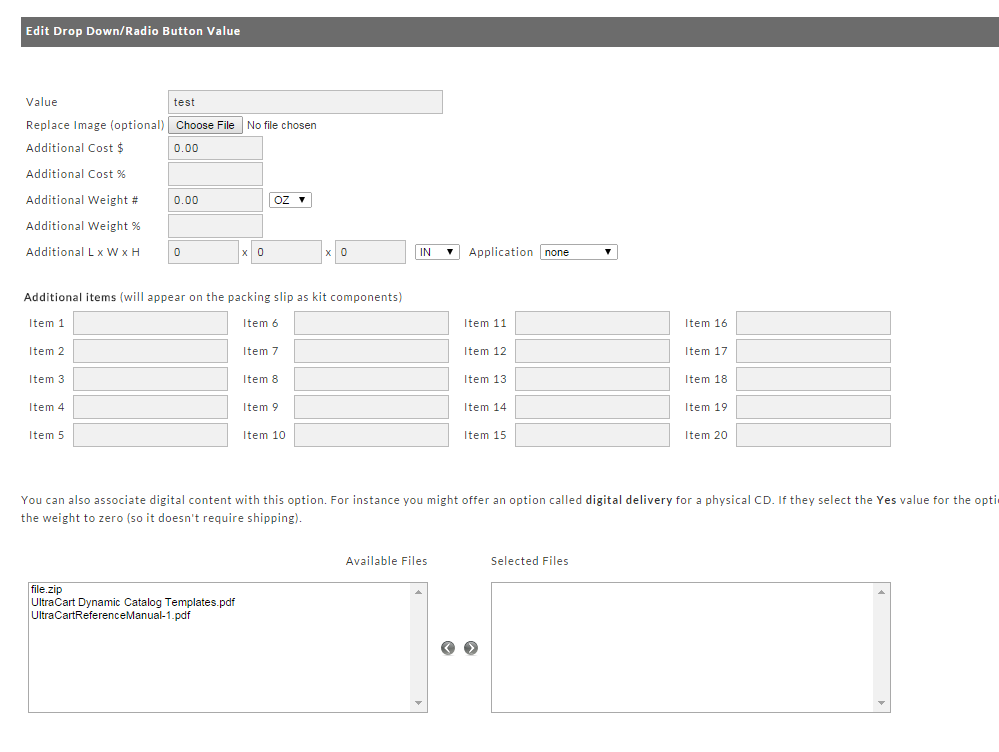
File Attachment
The file attachment option adds a upload button to the checkout that allows the customer to browse their computer and upload a file as an attachment to their order.
...
Click the "Edit" button to be returned to the Option Editor screen. There you can make changes. Click the "Save" button when finished.
Variations
This is an incredibly powerful tool for catalog users that have Items with variations. It basically allows you to define selectable options for your items that have different flavors (colors, sizes, etc.). Although you could utilize Item Options to fill this need, you wouldn't get the inventory control and reporting that Variations will fulfill.
Method 1 - Variation Wizard
...
| Warning |
|---|
The variations code will not work if you have the following characters in your item ids: < > & " ' + - (greater than, less than, ampersand, double quote, single quote,plus, minus and spaces) In general, it's a very bad idea to have these characters in your item ids at all, regardless if you are using variations. The item ids serve as keys and are embedded with html in hundreds of places. Using html special characters greatly increases the likelihood of something breaking. We receive numerous support calls about this. No spaces allowed. The item ids are concatenated into html element id and class names. Those values are then used in jQuery selectors. The characters above drastically change the jQuery selectors and break the code. Sorry. There is no work around. |
Method 1 - Variation Wizard
First click on the new button to create the parent item. Then click on the Options from the menu. (any edits will be saved).
...
Once you have added all of the items and there variations simply click save and you are ready to go.
Method 3 - Configuring Large Numbers of Variations with Batch Item Import
...
| Info | ||||||||||
|---|---|---|---|---|---|---|---|---|---|---|
| ||||||||||
|
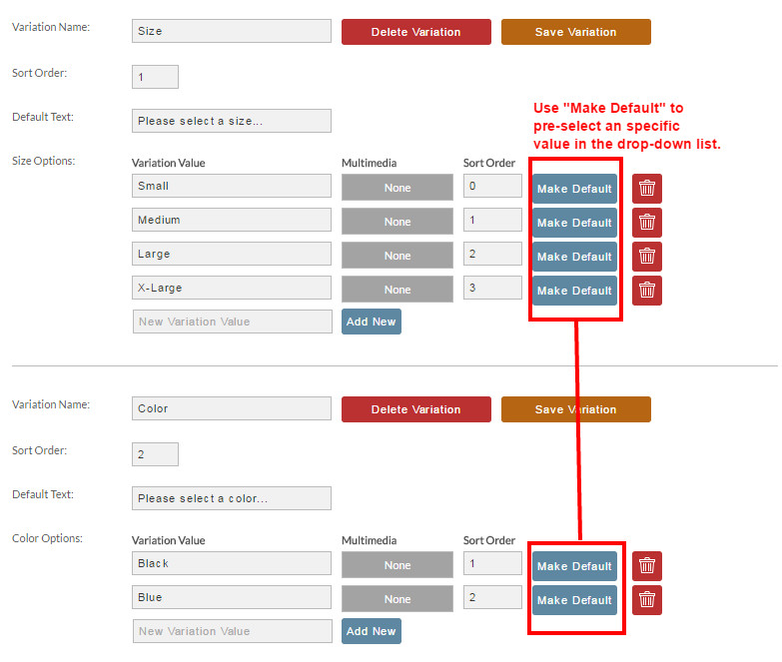
Make Default
You can configure a specific variation option as the default option. This will cause the variation to show this choice by default, so the customer would not need to click the drop-down list to make a choice. To set a variation option as the default option, click the "Make Default" button next of the variation option you want to make default.
Deploying the Buy Form
Deploying the form with the variations is quite simple. First click on the [view] link associated with the parent item "Shirt". There is a section of the links page labeled Buy Form as shown below. Copy the content from the buy form to the HTML page on your site. Please note that this form will be very plain and require some styling. You'll notice that this form will have select boxes for each variation, but no option elements specified. Allow the values are dynamically populated by the two JavaScript files loaded at the end of the form. The form only needs to be redeployed to your site if you add/remove a new variation. Simply adding or removing a child item does not require the form to be redeployed.
...
Notice that we have four options for size when the black color is selected, but only three options for size when the blue color is selected. Variations support the concept of not every single combination being possible. The select boxes will update on the fly as the customer chooses options so that there is never an invalid combination of selections that the customer can make.
Troubleshooting
Things to look for if the form is not populating the drop-down menu for the item variations:
- Make sure at least one item is configured with inventory in stock or the enable inventory tracking turned off. Otherwise, the javascript that is creating the array of the variations will return a null value.
- When testing the variation code is being tested in a local HTML page prior to being publish to your live website, the javascript tagsa below the form code will need to be edited to add the "http:" prefix to the script src URL's.
...
If you select a large blue shirt and click add to cart you will notice that the child item is added to the cart.
...