...
- QuickBooks will display a prompt to authorize UltraBooks to act on your behalf. Adjust the settings as desired to grant UltraBooks the level of access you are comfortable with.
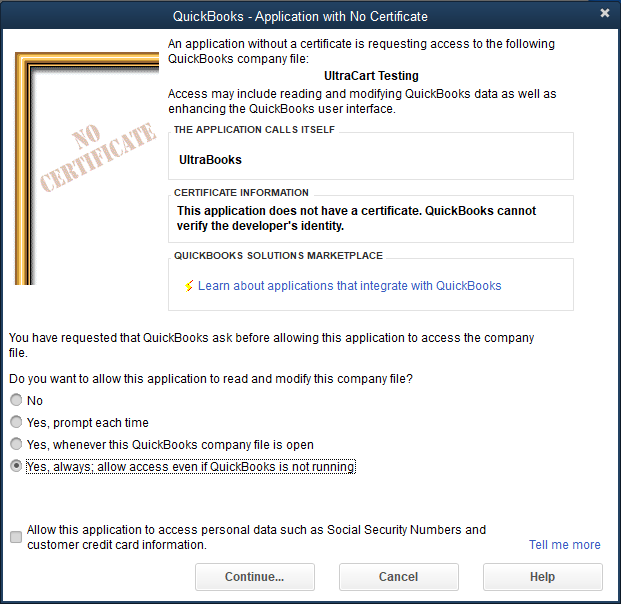
| Warning |
|---|
If you are using a multi-user QuickBooks™ environment then this application confirmation process must be completed by an Administrative level user. |
UltraBooks Settings
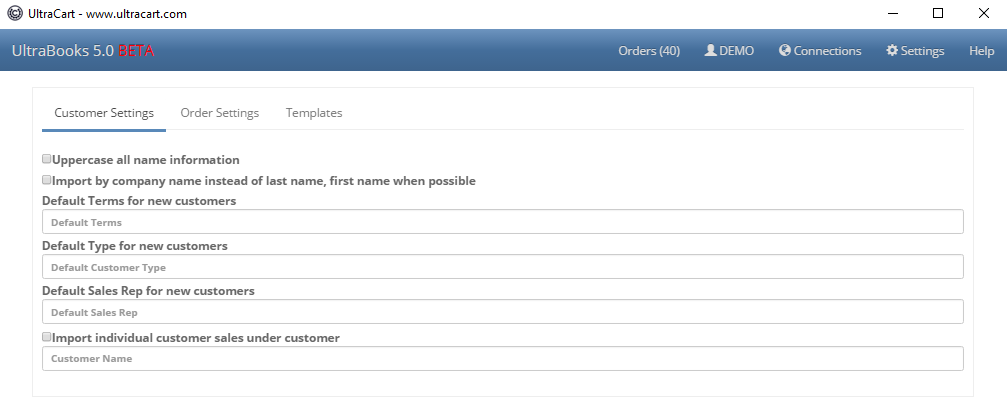
Every merchant should, prior to conducting their first import of orders, click the Settings button and configure their specific import options as needed.
Upon clicking the Settings button (top of screen) you will be presented with the UltraBooks Options Screen.
Customer Settings
| Option | Results (box checked) |
|---|---|
| Uppercase all name information | All customer names will be converted to upper case during import. |
| Import by company name instead of last name, first name when possible | Whenever a company name is present, the record will be imported by such. |
| Default Terms for new customers | If you wish new customers assigned a default/initial Terms, enter it here. The value must be a valid Terms found in your QuickBooks application. Within QuickBooks, navigate to Lists → Customer & Vendor Profile Lists→ Terms List |
| Default Type for new customers | If you wish new customers assigned a default/initial Customer Type, enter it here. The value must be a valid Type found in your QuickBooks application. Within QuickBooks, navigate to Lists → Customer & Vendor Profile Lists → Customer Type List |
| Default Sales Rep for new customers | If you wish new customers assigned a default/initial Sales Rep, enter it here. The value must be a valid Type found in your QuickBooks application. Within QuickBooks, navigate to Lists → Customer & Vendor Profile Lists → Sales Rep List |
| Import individual customer sales under customer record | ALL retail orders import as the same customer. You must configure the customer first. |
| Info | ||
|---|---|---|
| ||
An UltraCart Customer profile can be linked to a specific customer record in QuickBooks. This configuration will ensure that orders placed via the customer profile will be linked to the same customer regardless of the billing/shipping address details provided in the order. This can be useful with wholesale customers that may have many locations for which they place orders. To add QuickBooks codes to customer profiles:
|
QuickBooks™
| Option | Results (box checked) |
|---|---|
| Canadian Version | Allows use of the Canadian version of QuickBooks™. |
Order Settings
| Option | Results (box checked) |
|---|---|
| Import all orders as invoices | ALL orders will be imported as Invoices. (Normally, Credit Card orders are imported as Sales Receipts and Purchase Orders as invoices). |
| Import as Sales Orders instead of Receipts | Records are created as Sales Orders |
| Mark customers as non-taxable if no tax was charged | |
| Mark all items as non-taxable if no tax is charged | In most cases, this is good to have checked. |
Mark Invoices as "to be printed" in QuickBooks | When you select Print Forms/Invoices in QuickBooks™, all invoices will appear in a list for batch printing. You can still de-select certain ones prior to printing. |
| Import credit card information (Requires QuickBooks™ 2006 or 2005 (R5 and later)) | Few merchants will consider this option for obvious security reasons. |
| Import QBMS Transaction Information | This feature is for merchants that have the QuickBooks™ Merchant Services payment gateway configured. It will import the transaction information for orders that were processed via QBMS. |
| Import Terms | Some merchants have terms spelled out in the checkout that will become part of the order. This options will insure those terms are imported to become part of the QuickBooks™ sales record. |
| Import Sales Rep | The Sales Rep name is configured on the Customer Profile and will be imported along with the order. |
| Import Class | The Class is configured on the Customer Profile and will be imported along with the order. |
| Import Referral Code into Memo | This is a special field. It will not apply to 99% of merchants. |
| Allow QuickBooks™ to assign the invoice/sales receipt | This would be used if you are making direct entry into QuickBooks™ as-well-as importing. This will help avoid collisions. |
| Ignore kit component items | This is only used by merchants that have kits in their Item Configuration. |
| Sales Receipt/Invoice Number Prefix _ | If you want to precede your Sales Receipt of Invoice with a special Prefix, enter it into the box provided |
| Default Invoice Terms _ | QuickBooks™ invoice form allows merchants to set various payment terms. Here you can define the Default term when the Invoice is created during import. |
Importing Orders
...
Common Tasks
Re-importing an Order
UltraBooks will only export orders that are in the "completed" state (have been marked as shipped). Once exported via UltraBooks, they will be tagged as "Exported to QuickBooks™".
If, for some reason, you want to re-export an order, you'll need to reset its export status. To do so, log in to your account and navigate to:
| Panel |
|---|
Main Menu → Order Management → Review Orders |
In the search screen, enter the order ID or whatever search criteria necessary to locate the order. Once you have located the order:
- click on the order ID to bring the record into the order editor.
- click on the "Edit Customer Information" link.
- click on the "other" tab.
- locate the "Exported to QuickBooks™" field.
- remove the check mark by clicking on it.
- click the Save button at the bottom of the screen.
...
Importing Historical Orders
...
| Use legacy tax code method (no tax groups) | Prior versions of UltraBooks would use a single tax code to represent all taxes collected for an order. The new version uses tax groups (automatically created for you) to correctly represent the tax collected at all levels. This eliminates a host of issues the old system caused. Checking this box will use the old system. |
Mark sales receipts as "to be printed" | When you select Print Forms/Sales Receipts in QuickBooks™, all sales receipts will appear in a list for batch printing. You can still de-select certain ones prior to printing. |
Mark Invoices as "to be printed" in QuickBooks | When you select Print Forms/Invoices in QuickBooks™, all invoices will appear in a list for batch printing. You can still de-select certain ones prior to printing. |
| Use QuickBooks default item descriptors | If the QuickBooks item has a description, then that description is used on the invoice/receipt. Otherwise, the UltraCart description is used. |
| Import credit card information (Requires QuickBooks™ 2006 or 2005 (R5 and later)) | This feature no longer works with v5.0 due to PCI compliance rules. |
| Import QBMS Transaction Information | This feature is for merchants that have the QuickBooks™ Merchant Services payment gateway configured. It will import the transaction information for orders that were processed via QBMS. |
| Import Terms | Some merchants have terms spelled out in the checkout that will become part of the order. This options will insure those terms are imported to become part of the QuickBooks™ sales record. |
| Import Sales Rep | The Sales Rep name is configured on the Customer Profile and will be imported along with the order. |
| Import Class | The Class is configured on the Customer Profile and will be imported along with the order. |
| Import Referral Code into Memo | This is a special field. It will not apply to 99% of merchants. |
| Allow QuickBooks™ to assign the invoice/sales receipt | This would be used if you are making direct entry into QuickBooks™ as-well-as importing. This will help avoid collisions. |
| Ignore kit component items | This is only used by merchants that have kits in their Item Configuration. |
| Use shipping date as invoice date | |
| If ShipTo address is missing, copy BillTo to ShipTo | Some merchants well digital goods and have no shipping address but still charge tax. This setting will prevent missing ship to addresses for orders without any shipping information. |
| Map Screen Branding to QuickBooks Order Class | Legacy sites only. If you're still using the old screen branding, why haven't you upgraded to StoreFronts?? It's free, and provides a vastly superior mobile checkout experience for your customers. |
| Map StoreFront to QuickBooks Order Class | Assigns the StoreFront server name to your Order classes. If checked, UltraBooks will expect to find an Order class with the same name as your storefront server name (www.mystore.com, etc). |
| Sales Receipt/Invoice No. Prefix | If you want to precede your Sales Receipt of Invoice with a special Prefix, enter it into the box provided |
| Default Invoice Terms | QuickBooks™ invoice form allows merchants to set various payment terms. Here you can define the Default term when the Invoice is created during import. |
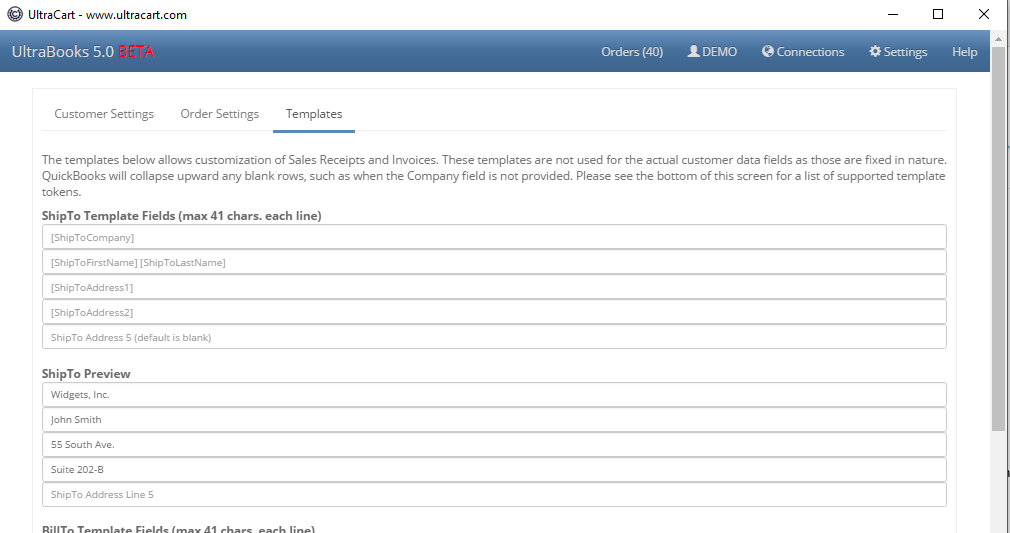
Templates
Templates are a new feature to v5.0 allowing for custom control of the Invoice/Receipt Address blocks. Each ShipTo and BillTo address blocks contain 5 lines. These templates allow you to specify each line exactly as desired. The template tokens are surrounded by square brackets. You may also enter other characters and symbols to be interpreted literally when the templates are processed. A full list of template tokens is found at the bottom of the Templates screen. As of 6/23/2017, the list of tokens was as follows, but is sure to change with time.
- [AdvertisingSource]
- [AutoOrderCode]
- [AutoOrderOriginalOrderId]
- [BillToAddress1]
- [BillToAddress2]
- [BillToCompany]
- [BillToFirstName]
- [BillToLastName]
- [BillToTitle]
- [ChannelPartnerCode]
- [ChannelPartnerOrderId]
- [Comments]
- [CustomField1]
- [CustomField2]
- [CustomField3]
- [CustomField4]
- [CustomField5]
- [CustomField6]
- [CustomField7]
- [DayPhone]
- [Email]
- [EveningPhone]
- [MerchantNotes]
- [OrderId]
- [PlacedByUser]
- [SalesRepCode]
- [ScreenBrandingThemeCode]
- [ShipToAddress1]
- [ShipToAddress2]
- [ShipToCompany]
- [ShipToFirstName]
- [ShipToLastName]
- [ShipToTitle]
- [StoreFront]
- [UpsellPathCode]
Importing Orders
Importing orders is a three step process with the majority of time spent validating mappings.
- Download the orders.
- Validate the orders.
- Fix any issues.
- Revalidate the orders
- Re-download orders if new mappings were created
- Import to QuickBooks
Validating Mappings
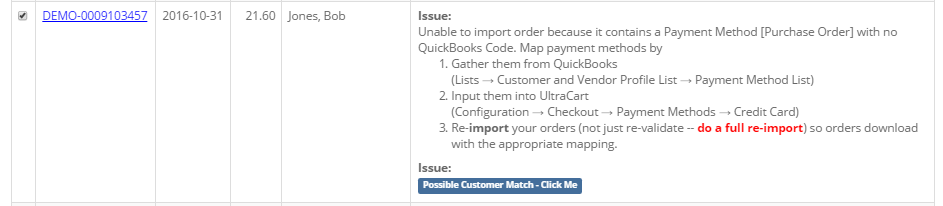
Select the orders to validate (or all if desired), and click the Validate Mappings button. UltraBooks will examine each order and report back any issues to correct. If the order had no issues, a green "Ready to Import" text will appear in the Status column. Those orders may be then imported into QuickBooks. The reported issues are detailed, so read through any issues and take appropriate action.
The order below has issues.
These orders are ready to import.

| Warning |
|---|
The 'Mark as Imported' button completely bypasses QuickBooks. It provides a means of removing unwanted orders from UltraBooks. Be careful that you do not remove wanted orders. |
Common Tasks
Re-importing an Order
UltraBooks will only export orders that are in the "completed" state (have been marked as shipped). Once exported via UltraBooks, they will be tagged as "Exported to QuickBooks™".
If, for some reason, you want to re-export an order, you'll need to reset its export status. To do so, log in to your account and navigate to:
| Panel |
|---|
Main Menu → Order Management → Review Orders |
In the search screen, enter the order ID or whatever search criteria necessary to locate the order. Once you have located the order:
- click on the order ID to bring the record into the order editor.
- click on the "Edit Customer Information" link.
- click on the "other" tab.
- locate the "Exported to QuickBooks™" field.
- remove the check mark by clicking on it.
- click the Save button at the bottom of the screen.
That particular order is reset to be exported to QuickBooks™ the next time your run UltraBooks.
Importing Historical Orders
After you have done your initial configuration you can import historical orders (orders placed before UltraBooks configuration) by navigating to the Batch Order Operations page, where you will have choices for flagging order(s) for downloading by entering in either the list of orderIDs (or the range of orderIDs) the clicking the button "reset exported to QuickBooks".
Manually Entering Orders into QuickBooks
If you're going to enter sales receipts or invoices manually into QuickBooks™ in addition to having UltraBooks import information, make certain that you do not use a number that will conflict with UltraCart orders. For instance manual sales receipts/invoices may be done in the 1000-9999 range while UltraCart orders would be in the 10000+ range. UltraBooks assumes that if the invoice/sales receipt with the same number exists then it needs to be deleted and replaced by the new one in the event that the merchant is re-downloading order information. It has no way of distinguishing something that is hand entered from something that is downloaded and dealing with it in any other way.
Processing Refunds
If the refund takes place before the order is exported to QuickBooks then the transaction will reflect it.
| Info |
|---|
If the refund takes place after the order has been exported to QB then it currently has to be manually adjusted within QuickBooks. |
UltraBooks Errors and Troubleshooting
| Info | ||||
|---|---|---|---|---|
| UltraBooks generates a log file that is located in the "Documents" folder of your computer.
| |||
UltraBooks v5.0+ now automatically reports any errors back to ultracart.com. UltraCart system engineers will receive the errors and investigate. You may be contacted for your log file (ultrabooks.log) which will reside within your installation director, C:\Program Files\UltraBooks Additionally, the validation and import of each order is captured and reported to ultracart.com. This information is tied to the order and viewable by UltraCart support. If you have questions about an order, contact UltraCart support and they will assist you. |
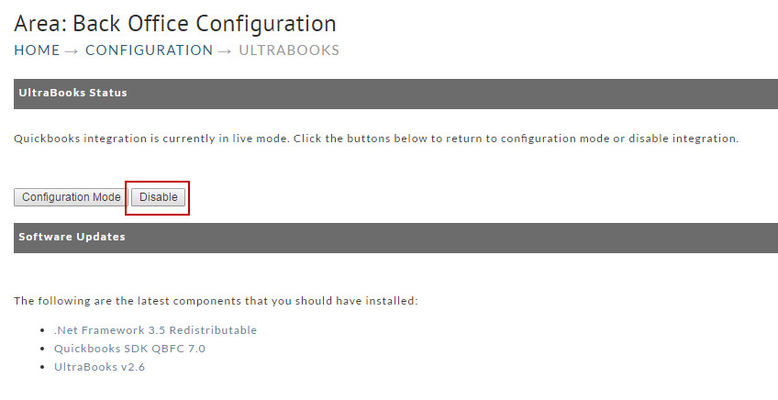
Disabling UltraBooks
If you should decide to disable UltraBooks integration, navigate to;
| Panel |
|---|
Main Menu → Configuration → UltraBooks |
Pressing the "Disable" button will prevent future downloading of orders. There will be no warning dialog for this action. However, the codes you have entered will remain intact. You can again configure UltraBooks without having to re-enter the codes (except for any additions that you may have made in Coupons, Gift Charge / Wrap Papers, Payment Methods, Shipping Methods or Tax Rates.
Frequently Asked Questions (FAQ)
Question: I am trying to log into UltraBooks but I'm getting a message that says I need to activate my IP?
Answer: When you receive this prompt, you will need to log directly into the UltraCart website and complete the IP Activation step there. Upon successfully completing the IP activation, you will be able to go back to the UltraBooks application and log in with your user.
Question: Can UltraBooks be used with cloud-hosted Quickbooks hosting services?
Question: We recently upgraded Quickbooks and now we cannot get UltraBooks to connect to download orders?

Go to the Edit menu and click Preferences.
In the Preferences window, click Integrated Applications in the list on the left.
Click the Company Preferences tab.
Make sure the Don't allow any application to access this company file check box is cleared.
Click OK to save your preferences.
Leave QuickBooks open and remain logged in as the Administrator.
Open your UltraBooks application log in and click the download button to initiate the connection to Quickbooks.
Switch to QuickBooks by pressing or choosing QuickBooks from the taskbar.
If you see a message asking whether the UltraBooks should be allowed access to your company file, click Yes.
Open the integrated applications preferences
Highlight UltraBooks name in the list of applications to specify that you are allowing access.
Select Properties.
Select the Allow this application to login automatically check box.
Select the Software Access user (from step 2 above) and click OK. You can select any user with full access rights, such as "Admin".
Click OK to close the preference screen.
Now your add-in application will be able to access your company file data even if QuickBooks is not running.
Question: I am using inventory assemblies in QuickBooks. When I export orders from Ultracart into QuickBooks the parts of the inventory assemblies also show up on the sales receipts which is messing up my inventory counts. How can I configure the downloads so that only the item sold shows up?
Answer: Launch UltraBooks application then click on the options button and check the box "Ignore Kit Components". Click the save button. Close UltraBooks and relaunch it to have the save changes take affect.
Question: We recently updated our Quickbooks and we have multiple people in our organization using UltraBooks to import our orders and recently one of our bookkeepers is unable to connect?
Answer: Quickbooks has a limitation restricting 3rd party applications connecting to QB's where the QB's server has multiple QB files open at the same time.
See: http://www.smartvault.com/support/kb305-error-0x80040438-the-application-trying-to-connect-to-quickbooks-is-not-supported-while-multiple-instances-of-quickbooks-are-running/
Example of the error captured in the log:
